By Kim Griggs
Computer availability maps are popping up all over university and library websites. Some libraries have created the maps in-house (see Appendix A), while others have used a vendor like LabStats (see Appendix B). I became interested in implementing a computer availability map when I attended a presentation by NCSU Libraries [1] where they listed their computer availability map as a top-viewed page on their mobile site. Since a real-time availability map supported the mobile context of a user on the go, I proposed to the Oregon State University Libraries (OSUL) Mobile team that we add an online availability map of our computer lab to the mobile site.
The result was a mobile computer availability map (http://m.library.oregonstate.edu/computers/) implemented with Ruby on Rails and scripts embedded in the computer’s build to track and display the availability status of the computers in the library’s Learning Commons. The map was released first to the mobile site and then was ported to OSUL’s Drupal website (http://osulibrary.oregonstate.edu/computers/). Both versions get high use, especially around mid-terms, finals and the beginning of term. Over the last year, the map has been the second-most-viewed page on the mobile site and in the top 20 most-viewed pages on the main site. Since releasing the map I have received many compliments and requests from the Library community to share how I implemented it.
Computer Availability Map Requirements
The following is a list of requirements the OSUL mobile team developed for our computer availability map. Your own requirements may vary.
Requirement 1: The map shall work on multiple screen sizes
To enable us to offer the computer availability map to our patrons on multiple devices, the map needs to be easily extendable to work on both the mobile site (300 px) and the full website (600 px) as well as the large LCD (900px) in the computer lab. This requires 3 maps with dimensions that can easily be scaled and code that can handle the multiple dimensions.
Requirement 2: The map shall be accessible
The map needs to be accessible to all our users. This requires paying attention to color use in icons, providing a text equivalent, standards compliant code and accessible mark-up.
Requirement 3: The map shall display a realistic view of the computer lab
To enable patrons to easily understand the map and be able to locate available computers in the lab, the map needs to be a realistic view of the lab with location-based pointers. This requires a digital image of the computer lab.
Requirement 4: The map shall display computers in use and not in use
The map needs to clearly display the status (available or unavailable) of the computers in the lab. This requires a database to store the location, an identifier for every computer, and scripts that are triggered when a user logs on or off. This also requires icons to identify the status.
Requirement 5: The map shall display which type of computer is available
We also want to capture what type of computers are in the lab, so the map needs to clearly display the type (PC or MAC) visually. This requires a database to store the type of every computer. This also requires icons to identify the types.
Requirement 6: The information on the page and in the map shall be updated in real-time
To keep the availability status up-to-date the map needs to be updated in real-time with an acceptable lag time of 5 min. This requires the database to be queried automatically as well as manually.
System Design & Architecture
The Computer Availability Map application I am going to show you how to build is a centralized logging system with a standard LAMP stack. A MySQL database is the backbone of the app and contains data about the computers in the lab. Each computer stored in the database contains a unique identifier, such as a name or IP address; an x, y location that relates them to their physical space in the lab; and the type of computer (Win/Mac). Embedded in each computer’s login and logout scripts are Perl files that send HTTP requests to a PHP script to update the individual computer status when a user logs in or out in real-time. A standard LAMP application and hand-drawn images of the lab provides the user interface of the computer availability map customized for different screen sizes.
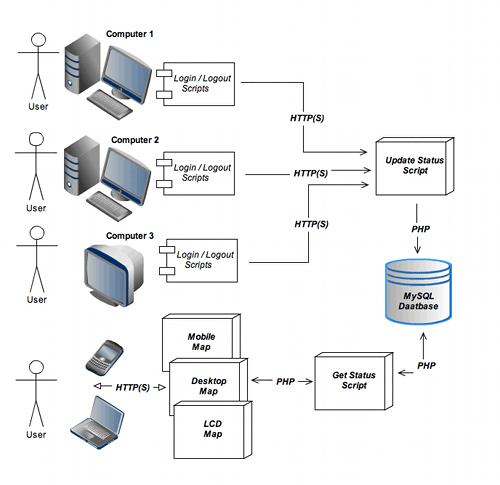
Figure 1. System Design & Architecture
Note: OSUL mobile team programmers decided to use this architecture because of our current development environment and expertise.
Implement the System
Building the availability map involves 6 steps. First you need to create the framework of the system and get the computers and the database talking to each other. Then you are going to create a map and icon images. Finally, you are going to build the user interface and finish with scaling the map for multiple screen sizes.
Step 1: Create the Database
Note: I am assuming you have access to a MySQL database and a basic understanding of database creation and management.
The Computer Availability database schema is pretty simple, all you need is one table.
| compstatus |
|---|
| id (int) (primary key) |
| computer_name(string) |
| top_pos(int) |
| left_pos(int) |
| status(int) |
| computer_type(string) |
| updated_at(date) |
If you have multiple labs, then you would need a field indicating which lab the computer is in. You could also extend the schema to include a listing of installed software or anything else you want to capture and display about the computers.
CREATE DATABASE 'computer_availability'
CREATE TABLE `compstatus` (
  `computer_name` varchar(250) NOT NULL default "",
  `status` int(11) default NULL,
  `computer_type` varchar(250) default NULL,
  `left_pos` int(11) default NULL,
  `top_pos` int(11) default NULL,
  `updated_at` timestamp NOT NULL default CURRENT_TIMESTAMP on update CURRENT_TIMESTAMP,
  PRIMARY KEY  (`computer_name`)
)
At this point you may not have the data for your computer lab; if you want to play along you can just use your own computer as a test case.
Step 2: Embed the login/logout scripts
Note: I am assuming you have access to the computer’s imaging process and a basic understanding of Perl scripts.
You need to track when a user logs on and when they log off; to do so you need 2 scripts that can pass along the computer’s status and name to a database.
#!/usr/bin/perl -w

use LWP;
use Sys::Hostname;

my $host = hostname();
 #the hostname after which you can find out the IP address
my $ipaddr = inet_ntoa(scalar gethostbyname($host || 'localhost'));

$ua = LWP::UserAgent->new;
#timeout in 60 seconds if we can't make a connection
$ua->timeout(60);

#send the HTTP request with the status of 1 and computer name
$request = $ua->post('http://yourdomain.edu/statuschange.php',
            	["status" => "1",
            	"workstation" => $ipaddr,
   	 "host" => $host]);

#if successful log 200 status else quit and log error
if ($request->is_success) {
	$content = $request->content;
    print "Content-type: text/html\\n\\n";
    print $content;
} else {
      die "Can't get to URL", $request->status_line;
}
exit;
Script 1. login.pl
#!/usr/bin/perl -w

use LWP;
use Sys::Hostname;

my $host = hostname();
 #the hostname after which you can find out the IP address
my $ipaddr = inet_ntoa(scalar gethostbyname($host || 'localhost'));

$ua = LWP::UserAgent->new;
#timeout in 60 seconds if we can't make a connection
$ua->timeout(60);

#send the HTTP request with the status of 0 and computer name and the host
$request = $ua->post('http://yourdomain.edu/statuschange.php',
            	["status" => "0",
            	"workstation" => $ipaddr,
   	 "host" => $host]);

#if successful log 200 status else quit and log error
if ($request->is_success) {
	$content = $request->content;
    print "Content-type: text/html\\n\\n";
    print $content;
} else {
      die "Can't get to URL", $request->status_line;
}
exit;
Script 2. logout.pl
Now you need to embed these scripts into the computer’s login and logout scripts. First, for this to work each computer is going to need a DNS entry. The process of adding the scripts will differ depending upon the operating system. See Appendix C for resources.
Step 3: Update the Computer’s Status
Note: I am assuming you have a basic understanding of PHP.
Now that you have the Perl scripts installed on the computers and triggering the HTTP request you need a script to capture that data and update the computer’s status in the database. This script needs to be stored at the location you pointed to in the HTTP request.
#add your database username and password
$user="username";
$password="password";
$database="computer_availability";

#unless the computers name was empty
if($_POST['workstation'] != ""){
    	$workstation = strtoupper($_POST['workstation']);
}
else{ #build the computer's name from the host

$host_domain = strstr($_POST['host'], '.');
    	$workstation = strtoupper(str_replace($host_domain, '', $_POST['host']));
}

#connect to the database
$DB = mysql_connect('mysqlcluster.adm.yourmysqlserver.edu', $user, $password);
@mysql_select_db($database) or die("Unable to select database");

#get the computer's row based on it's name
$checkQuery = "SELECT computer_name FROM compstatus WHERE computer_name = '".$workstation."'";
$result = mysql_query($checkQuery);

#if we find a computer update it's status
if(mysql_numrows($result)>0){
    	$query="UPDATE `compstatus` SET status = '".$_POST['status']."' WHERE computer_name = '".$workstation."'";
    	mysql_query($query) or die(mysql_error());
}

mysql_close($DB);
Script 3. statuschange.php
Sanity Check: Let’s test it out
At this point you can run some tests and make sure the computers are talking to the database. Since you don’t have the web service built yet, you’re going to log on and off then query the database to see if it recorded the status changes. Note: you can use your own computer as a test case.
- Check that the Perl scripts are installed into the computers build
- Check that your computer name is stored in the database and the status is 0
SELECT 'status' FROM 'compstatus' WHERE name = 'your computer name'
- Login to your computer
- Check the database to see if the status was recorded
SELECT 'status' FROM 'compstatus' WHERE name = "your computer name"
- If you see that the status is now 1 then it worked!
- Now test log off. You should see it set back to 0
Step 4: Create the Map
OSUL mobile team had a student designer create the computer lab image and the computer icons based on our design requirements. You will need to define your own requirements and create your own images.
Design Requirements
- The map shall be a simple but realistic view of the lab
- The map shall include physical markers such as the reference desk, printers or walls
- The map dimensions shall be 300px, 600px and 900px
- The icon dimensions shall be 10px, 20px and 30px
- The icons shall use both color and shape to identify its status and type
- The map shall have an empty spot for every computer (X,Y location)
The map is comprised of two layers: the lab image, and then the computer icons placed on top at an x,y location with CSS.
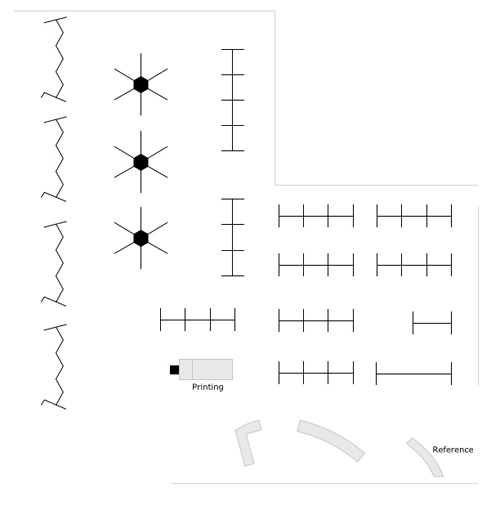
Figure 2. Computer lab image
Lessons Learned
Requiring that we support multiple screen sizes greatly increased the complexity of creating the maps. We used whole multipliers (2X) to scale the image and icons up and down. This allowed us to use simple math to change the computer’s x,y location when it was displayed on the various sizes of maps.
Since we wanted a map that could be usable and attractive on a mobile phone and a desktop, we decided to use a grayscale color scheme and simple line drawings to indicate where the computers are in regards to physical landmarks, such as the printers. We wanted the map to be realistic so we also tried to capture the shapes of the computer pods and clusters.
There were a couple little nuisances when we where creating the images. One thing was drawing the map so that the computer’s space in the pod or cluster was big enough to fit the icons. Choosing the orientation of the map also posed a problem. We choose to orient the map based on major reference points like the printers and help desk.
To support our accessibility requirements we decided to use both color and shapes to represent the status and type. We chose squares for PCs (pun intended) and triangles for Macs; red and an x for unavailable and green and a plus sign for available. We used both the color and the shapes to address color accessibility. We also provided a legend and text equivalents of the map’s information. We used just the text-equivalent for non-smart phone mobile users that cannot display the 300px image.
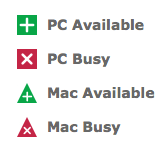
Figure 3. Computer icons
Finally, we chose to implement a CSS layout.
Step 5: Build the User Interface (UI)
Note: I am assuming you have a basic understanding of PHP, SQL and CSS. This code is intended to be used in a standard LAMP stack.
Now let’s put that final tier on and build the UI to display the map with the real-time computer availability status and computer types indicated by the correct computer icon.
<?php
#add your database username and password
$user="username";
$password="password";
$database="computer_availability";
#connect to the database
$DB = mysql_connect('mysqlcluster.adm.yourmysqlserver.edu', $user, $password);
@mysql_select_db($database) or die("Unable to select database");
$total_pc_results = mysql_query("SELECT * FROM compstatus WHERE computer_type='PC'");
$avail_pc_results = mysql_query("SELECT * FROM compstatus WHERE status='0' AND computer_type='PC'");
$pcs = mysql_num_rows($avail_pc_results) . '/' .mysql_num_rows($total_pc_results);
#get the textual data - total numbers and available numbers of MACs
$total_mac_results = mysql_query("SELECT * FROM compstatus WHERE computer_type='MAC'");
$avail_mac_results = mysql_query("SELECT * FROM compstatus WHERE status='0' AND computer_type='MAC'");
$macs = mysql_num_rows($avail_mac_results) . '/' . mysql_num_rows($total_mac_results);
#get all the computer's row of data
$result = mysql_query("SELECT * FROM compstatus");
mysql_close($DB);
?>
<div id="computer_map">
#Text Equivalant
<p>PC's available: <?php echo $pcs; ?> Mac's available: <?php echo $macs; ?></p>
# the map
<div id="computer_map_600">
<dl>
#loop through the rows and display the correct icon at the computer's location
#the computer's location is multiplied by 2 because this is the large map
#<dt class="avail_pc_600 icon" style="left:200px;top:100px>ICP10</dt>
#<dt class="avail_pc_600 icon" style="left:200px;top:100px>ICP10</dt>
<?php
while($row = mysql_fetch_assoc($result)){?>
<dt class="<?=($row['status']==0 ? 'avail' : 'busy');?>_<?=(strcmp($row['computer_type'],'PC')==0 ? 'pc' : 'mac');?>_600 icon" style="left: <?=($row['left_pos']*2);?>px; top:<?=($row['top_pos']*2)+30;?>px" ><?=$row['computer_name']?></dt>
<?php }?>
</dl>
#Last Update
<p>Map is updated every 5 minutes. Last updated: <?php echo date("M j, Y \&amp;amp;amp;amp;amp;amp;amp;amp;amp;amp;amp;amp;amp;amp;amp;amp;amp;amp;\m\d\a\s\h\; H:i:s"); ?></p>
#end map
</div>
</div>
Script 4. computers.php
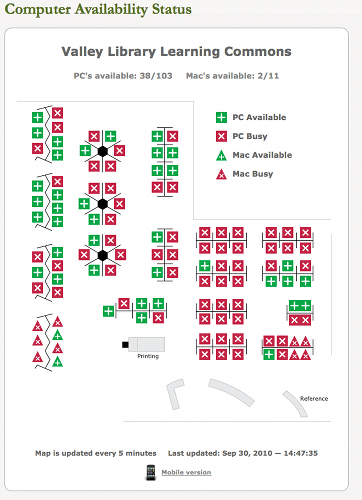
Figure 4. OSUL Computer Availability Map
Note: We first implemented this in Ruby on Rails (RoR) for our mobile site and then ported it to PHP so that it could be used on OSUL main site which is in Drupal. I have made the Ruby on Rails mobile version and the Drupal version available at: http://github.com/griggsk/availability-map/
Sanity Check: Let’s Test it Out
Now that you have all the pieces put together you can see it in action.
- Check that you have added your computer’s location to the database and it corresponds to a place on the map
- Login to your computer
- Navigate to the computers.php page
- Check to see that your computer is now displayed as unavailable
- Test logout. You should see that your computer is available
Optional Step 6: Support Multiple Sizes
If you want to support multiple sizes then you will need maps and icons in those sizes. OSUL choose 300px (mobile), 600px (full site), and 900px (LCD). You can use the same web app you built above to have a mobile version of the application. To alter the map you just built to work on smart phones you need to show the smaller images and reduce the multiplier of the location.
<div id="computer_map_300">
<dl>
#loop through the rows and display the correct icon at the computer's location
#the computer's location is not multiplied by 2 because this is the mobile site
#<dt class="avail_pc_300 icon" style="left:100px;top:50px>ICP10</dt>
#<dt class="busy_mac_300 icon" style="left:120px;top:70px>ICP20</dt>
<?php while($row = mysql_fetch_assoc($result)){?>
<dt class="<?=($row['status']==0 ? 'avail' : 'busy');?>_<?=(strcmp($row['computer_type'],'PC')==0 ? 'pc' : 'mac');?>_300 icon" style="left: <?=($row['left_pos']);?>px; top:<?=($row['top_pos'])+30;?>px" ><?=$row['computer_name']?></dt>
<?php }?>
</dl>
</div>

Figure 5. OSUL Mobile Computer Availability Map
Conclusion
There are some obvious problems with this solution. There’s the false negative/positive problem, such as students not logging off or computers needing service. There is also upkeep of the image to reflect changes to the layout of the lab. Then there is also one strict requirement: you must have access to the computer’s imaging process. If you don’t have that you can’t use this method.
I hope that this tutorial has been helpful; feel free to use this code in part or whole. The code can be easily integrated into Drupal sites or as a standalone LAMP or RoR application. Like this code, the tools used to build the map are free and open-source. The complete computer availability map application from this tutorial is available at http://github.com/griggsk/availability-map.
Reference
1 NCSU’s Computer Availability Map System Overview (pdf) greatly influenced how we implemented OSUL’s computer availability application.
Appendix A: In-House Availability Maps
- University of Technology Sydney Library
- NCSU Libraries
- ASU Libraries
- Smith College Libraries
- Boston College
- Georgia Institute of Technology Libraries
- Rice University Library
- UW-Madison College Learning Support Services
- UNC Charlotte
- UNCG Jackson Library
Appendix B: LabStats Availability Maps
Appendix C: Computer Imaging Resources
Windows:
Frequently Asked Questions About Logon Scripts
http://www.rlmueller.net/LogonScriptFAQ.htm
Option 1: Use Window’s group policy
Create System Startup / Shutdown and User Logon / Logoff Scripts
http://technet.microsoft.com/en-us/magazine/dd630947.aspx
Setting up a Logon Script through GPO in Windows Server 2008
http://www.petri.co.il/setting-up-logon-script-through-gpo-windows-server-2008.htm
Option 2: Use Active Directory
Setting up a Logon Script through Active Directory Users and Computers in Windows Server 2008
Macintosh:
Creating a login hook
http://support.apple.com/kb/HT2420?viewlocale=en_US
Logout hooks for dummies:
http://discussions.apple.com/thread.jspa?messageID=6891519
Note: Many of us may not have access to the computer’s imaging process. OSUL mobile team worked with the computer lab’s ITC (information technology consultant) to embedd the scripts. Our ITC provided me with the links above and said he uses option 1 for Windows and hooks for Macs. If your labs are under management by someone else, you may need to form a similar relationship.
About the Author
Kim Griggs is a Programmer/Analyst at Oregon State University Libraries. She has a B.S in Computer Science and a M.S in Human Computer Interaction. She is the developer of a number of projects including: Library a la Carte, an open-source CMS, OSUL Mobile Website & Catalog, and BeaverTracks, a location-based campus history tour mobile application.

Coding for Librarians : Applied knowledge is the best kind « mmit blog, 2012-01-10
[…] OSU Libraries’ Computer availability map […]
Mike Tishman, 2014-01-08
Hello Kim!
I am a first year student here over at the Florida institute of Technology and was trying to put together a system like this; However i didnt want to have to re-image the computers. I have been doing research for the past couple of days and have been trying alot of scripts I’ve written to obtain information that would indicate an active computer. However I have had no luck. Do you have any suggestions for me that wouldnt require re-imaging of the computers.
Any help would be greatly appreciated!
Thank you!
~Mike