by Michelle Suranofsky
Background
When the Pennsylvania Academic Library Consortium, Inc. (PALCI) [1] decided to upgrade its resource sharing software (EZ-Borrow) all of the participating libraries – among them Lehigh University – were responsible to have in place an implementation of the NCIP protocol to provide communication between the new EZ-Borrow software developed by Relias International [2] and their respective ILS.
Weighing Our Options
Lehigh had several options to consider for meeting this requirement:
- License the SirsiDynix [3] NCIP web service software
- Use the eXtensible Catalog (XC) [4] NCIP Toolkit (an NCIP Web Services implementation written in Java)
- Create our own solution
Licensing the SirsiDynix web services appeared to involve the least amount of effort, but it had a price tag. Using the XC Toolkit meant that we would need to write Java code to make the calls to the SirsiDynix catalog API. This is because the XC NCIP Toolkit ‘core code’ takes care of the mechanics of the NCIP web services but the connector (additional Java) code needed to communicate with the SirsiDynix API had not been developed yet. Often a picture is worth a thousand words so I’ll throw one in now. The diagram shown in Figure 1 gets ahead of the story but paints a picture of the XC NCIP Toolkit core code functionality and the role of the needed connector.
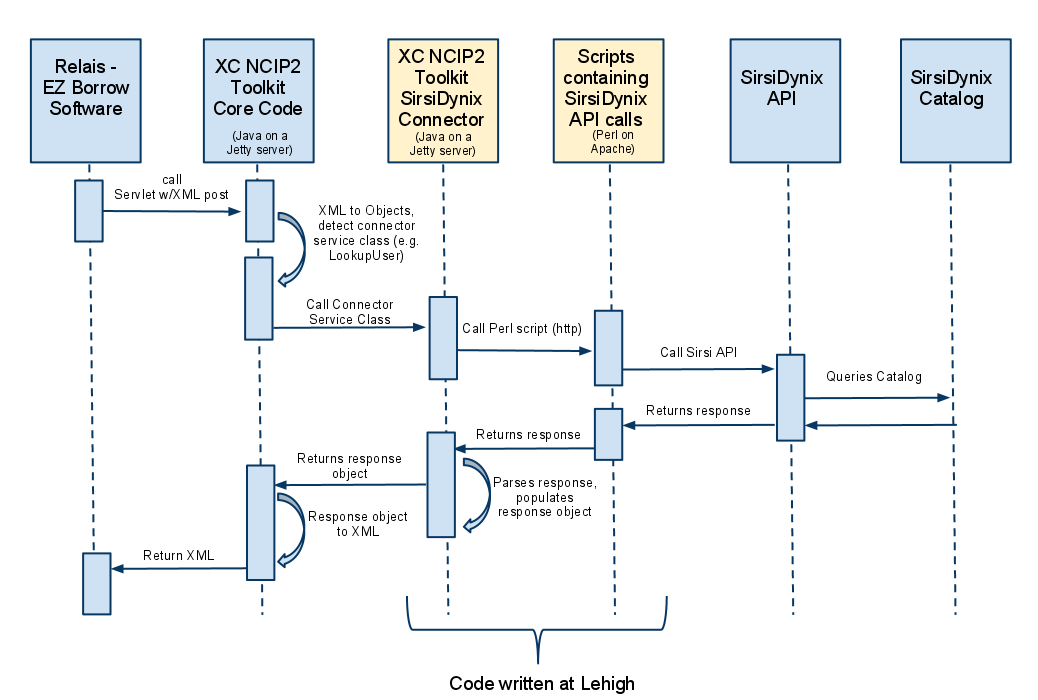
Figure 1. Diagram of the integration between EZ-Borrow, XC NCIP Toolkit and SirisDynix Symphony
To bridge the Toolkit to the SirsiDynix catalog we needed to write Java code that would call the catalog’s API and return the results back to the core Toolkit. The eXtensible Catalog Organization is building a library of open source connectors for various catalog products. At the start of this project, a SirsiDynix connector had not yet been written.
When we learned that we would not have to support the entire NCIP protocol, but rather only four of the services, we knew the job of writing connector code for the Toolkit or creating our own solution would be achievable in the amount of time we had (a couple of months). If the new Relais EZ-Borrow software had required us to support the entire NCIP protocol, we may have taken an entirely different approach. That undertaking would haven taken much more time. Since the XC Toolkit was available at no cost, we thought we should explore its capability before thinking about how we could possibly write our own solution. So Lehigh decided to put its newly hired Java developer (me) and its SirsiDynix Symphony API expert (Mark Canney) to work exploring the Toolkit and developing a solution.
Our initial plan was to create a proof-of-concept to confirm that the Toolkit would work for us by:
- Downloading the Toolkit code and getting it running locally (on my workstation)
- Taking a look at the existing ‘connector’ code that had been developed for other catalogs
- Reviewing the guidelines for connector code development provided by XC
- Writing connector code that would make the API call to SIRSI, parse those results, and return the results to the core Toolkit code.
The proof-of-concept development went well. I found the XC Toolkit code easy to work with and the performance tests I ran against it looked good. We demonstrated the prototype to our Library management team. They were happy…I was happy…so we decided to move forward with the project using the XC Toolkit. I should also mention that XC has written two versions of the Toolkit. The second version developed to support the NCIP 2 protocol. It was just around the time of this project that XC was finishing up work on version 2. We decided to move forward with version 2 since the Relais software would support either NCIP version, and because we knew eventually we would want to use the latest protocol.
My goal in writing this article is to share the technical details of this project’s implementation in order to bring a level of clarity to other organizations looking for a way to communicate with their catalog via NCIP. To that end, the sections of this article that follow elaborate on all of the technical details of the setup, coding, testing and deploying of this project. I have previously installed Eclipse, Tomcat, Maven and Subversion.
Setting up the Toolkit in Eclipse & Tomcat
To get started I wanted to get the Toolkit (core code) running as a project in Eclipse using my local Tomcat server. This setup would allow me to easily debug the entire process (not just the connector code I would be writing). It would also allow me to make any changes (that I might need to make) to the core code. Initially, because of something not expected in the XML Request from Relais, I did have to modify the core code. As the project progressed Relais adjusted their XML Request which enabled me to run the Toolkit code without any modifications.
There are many different ways to download the NCIP XC Toolkit. In fact, there are multiple approaches and tools for much of what is included in this article. Take these ‘steps’ with a grain of salt and adapt and implement as you like.
- To download the code outside of Eclipse use this Subversion call at the command prompt:
svn checkout https://xcncip2toolkit.googlecode.com/svn/core/trunk/ xcncip2toolkit-read-only
- Next…call the this Maven command from within the directory where you have downloaded the code:
mvn clean install
This gives you all of the XC NCIP2 Toolkit core code. My next steps could be somewhat controversial. I created a new project in Eclipse to import this code into. However, I changed the project structure (folders that the files live in) just slightly to create a structure that I prefer mainly so that I can easily debug and ‘hot deploy’ any code changes I want to make without having to wait for a ‘build’. This structure allows me to do so without having to do any extra Tomcat/Maven configuration. In other words, in my Eclipse development environment (on my workstation) – for this project – I take Maven out of the picture. This is just my preference for this project.
In Eclipse, create a new Dynamic Web Project named NCIPCore leaving all of the default settings except the default output folder. Change that to:
- NCIPCore/WebContent/WEB-INF/classes/
Copy:
- /folder_where_I_downloaded_code/web/target/web-0.0.1-SNAPSHOT/WEB-INF
- /folder_where_I_downloaded_code/web/target/web.0.0.1-SNAPSHOT/index.html
- /folder_where_I_downloaded_code/web/target/web.0.0.1-SNAPSHOT/stylesheet.xsl
into my Eclipse project NCIPCore/WebContent/.
Create the following packages in the NCIPCore project, src folder, as shown in Figure 2.
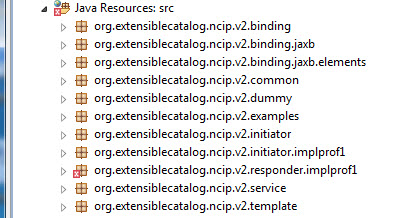
Figure 2. Create these packages within the NCIPCore project
Copy all of the .java files from /folder_where_I_downloaded_code/ into packages (as illustrated above) within the /NCIPCore/src folder. The project should look similar to Figure 3.
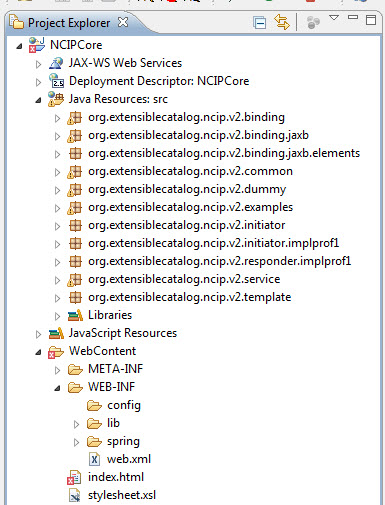
Figure 3. The NCIPCore project setup in Eclipse
Next, clean up a couple of the errors in the project and get it running on Tomcat.
Add Tomcat’s servlet-api.jar file to the build path of the project (Figure 4):
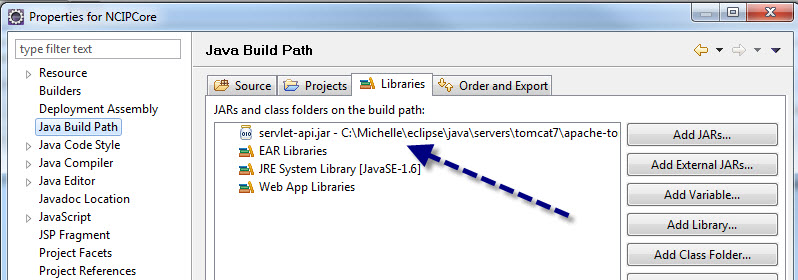
Figure 4. Add the service-api.jar file to the build path of the project
Add the NCIPCore project to the list of deployed projects on your Tomcat server (Figure 5):

Figure 5. Add the NCIPCore project to the Tomcat server
We are almost there, just a few last steps to configure. Create a new environment variable named NCIP_ROOT_DIR. Point that environment variable to a directory of your choice. You’ll need to put the NCIP configuration files in that folder as follows:
- Copy /folder_where_I_downloaded_code/NCIP-instance/ to the folder that your environmental variable points to. [NCIP_ROOT_DIR]
- Rename the ncipv2 folder NCIPCore
- Modify the log4j.config.txt file to point to your Tomcat log file
Start up Tomcat – you should not see any errors in the console. The console messages should look similar to Figure 6:
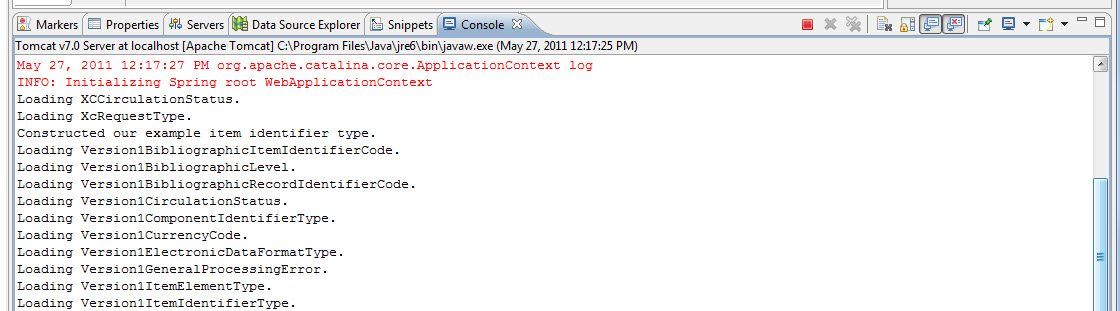
Figure 6. Console messages of the NCIPCore project
Point your browser to http://localhost:8080/NCIPCore/. Your port may vary, but typically Tomcat is configured to run on port 8080. You should see something like the a simple web page shown in Figure 7:
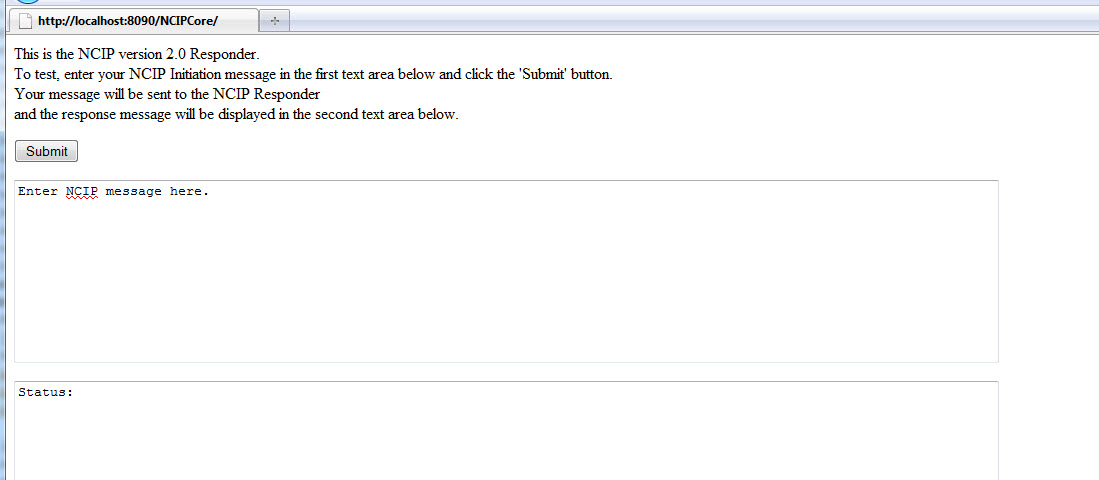
Figure 7. Index.html file that comes with the XC NCIP Toolkit.
Figure 7 shows the index.html file that comes with the Toolkit. You can use it to send test NCIP XML Requests to the application. Sample XML can be found on the XC NCIP2 Toolkit Google Code site [5].
By default the XC Toolkit is configured to use the “dummy connectors” that come with the project. These configuration settings are located the driver_config.properties file (Figure 8) which was placed into the NCIP_ROOT_DIR environmental variable folder.
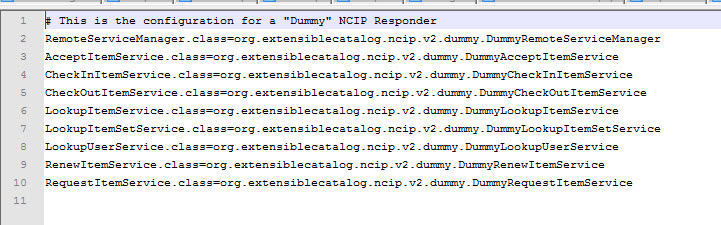
Figure 8. driver_config.properties file
Now that the Toolkit is running on your Tomcat server, if you are interested in walking through the code, a good place to start is to place a breakpoint in the “doPost” method of the NCIPServlet class. This is the class that catches all of the XML requests. In a sense, it is the front door to the application:
@Override
  public void doPost(HttpServletRequest request, HttpServletResponse response)
    throws IOException, ServletException {

    response.setContentType("application/xml; charset=\"utf-8\"");
    ServletInputStream inputStream = request.getInputStream();
    NCIPInitiationData initiationData = null;

    try {
       initiationData = translator.createInitiationData(inputStream);
    } catch (ServiceException e) {

    returnException(response,
       "Exception creating the NCIPInitiationData object from the servlet's input stream.", e);
    }

    if (initiationData != null) {
       NCIPResponseData responseData = messageHandler.performService(initiationData);
       try {
          InputStream responseMsgInputStream = translator.createResponseMessageStream(responseData);
          try {
As illustrated in the code snippet below, the JaxBTranslator class detects the type of NCIP service being called and transforms the XML from the request into the appropriate type of request object based on the service type:
public org.extensiblecatalog.ncip.v2.service.NCIPInitiationData createInitiationData(NCIPMessage initMsg)
   throws BindingException {

   org.extensiblecatalog.ncip.v2.service.NCIPInitiationData initiationData;
   if (initMsg.getAcceptItem() != null) {
      initiationData = createAcceptItemInitiationData(initMsg.getAcceptItem());
   } else if (initMsg.getCheckInItem() != null) {
      initiationData = createCheckInItemInitiationData(initMsg.getCheckInItem());
   } else if (initMsg.getCheckOutItem() != null) {
      initiationData = createCheckOutItemInitiationData(initMsg.getCheckOutItem());
   } else if (initMsg.getLookupItem() != null) {
      initiationData = createLookupItemInitiationData(initMsg.getLookupItem());
   } else if (initMsg.getLookupRequest() != null) {
      initiationData = createLookupRequestInitiationData(initMsg.getLookupRequest());
   } else if (initMsg.getLookupUser() != null) {
      initiationData = createLookupUserInitiationData(initMsg.getLookupUser());
   } else if (initMsg.getRenewItem() != null) {
      initiationData = createRenewItemInitiationData(initMsg.getRenewItem());
   } else if (initMsg.getRequestItem() != null) {
      initiationData = createRequestItemInitiationData(initMsg.getRequestItem());
Then, the performService method of the MessageHandler class uses the configuration files to detect which connector service will process this request. Out-of-the-box this will be one of the ‘dummy’ services that come with the XC Toolkit core.
public NCIPResponseData performService(NCIPInitiationData initiationData) {
NCIPResponseData responseData;
NCIPService<NCIPInitiationData, NCIPResponseData> service = null;
if (supportedServices != null) {
service = supportedServices.get(initiationData.getClass().getName());
}
// TODO: The DummyService shouldn't require this special handling - it should return the Unsupported Service error itself
if (service != null &amp;amp;amp;amp;amp;amp;amp;amp;amp;&amp;amp;amp;amp;amp;amp;amp;amp;amp; !service.getClass().getName().equalsIgnoreCase("org.extensiblecatalog.ncip.v2.service.DummyService")) {
try {
responseData = service.performService(initiationData, serviceManager);
The eXtensible Catalog Organization has written documentation to explain these classes and relationships in much more detail. You can find this documentation on their Google Code site [6].
This is where the XC Toolkit core functionality needs the connector code (to replace the dummy connector classes). The connector code must consist of one Class for each supported service. The connector Classes are the bridge. They are responsible for communicating with the catalog, parsing those results and returning a response object back to the MessageHander.performService method as you see above.
The Symphony Connector Code & Configuration Files
To replace the ‘dummy’ connector services with the Symphony Connector services, replace the ‘dummy’ configuration file that comes with the Toolkit with the Symphony configuration file. Place the Symphony (or your own) configuration file here:
[NCIP_ROOT_DIR]/NCIP-Instances/ncipv2/driver/driver_config.properties.
This will cause the Toolkit to call the Symphony (or your own) service classes instead of the ‘Dummy’ service classes. The configuration file for the connector also contains other values that allow the services to be customized for each SirsiDynix customer, e.g. Perl script url (Figure 9):
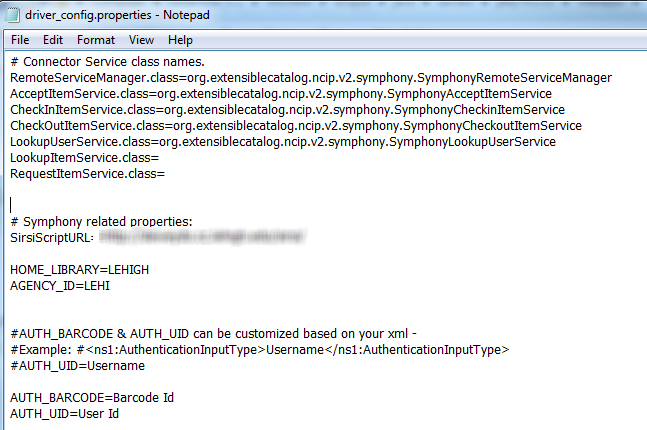
Figure 9. driver_config.properties file for the Symphony connector
In Eclipse, set up the Symphony (or your own) Connector code in its own ‘Java’ project as shown in Figure 10:
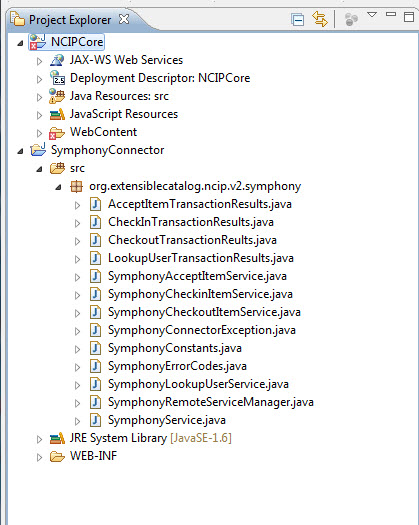
Figure 10. Illustrates the NCIPCore and SymphonyConnector projects within Eclipse
As you can see there are classes for each of the four services needed for the project here at Lehigh:
- SymphonyAcceptItemService
- SymphonyLookupUserService
- SymphonyCheckinItemService
- SymphonyCheckoutItemService
In addition to the service classes there is a SymphonyRemoteServiceManager and several other classes created to hold results, errors or constants. The Service classes (one for each supported service) and the SymphonyRemoteServiceManager class are part of the framework suggested by the Extensible Catalog Organization for any connectors developed to extend the Toolkit. This framework is consistent among the other connectors that have been developed to date. The eXtensible Catalog Organization does an excellent job of explaining the framework and guidelines for connector development [7].
In the Symphony implementation, the service classes validate the input (when needed) and then makes a call to the SymphonyRemoteServiceManager which calls the API and parses the results:
@Override
public CheckOutItemResponseData performService(CheckOutItemInitiationData initData, RemoteServiceManager serviceManager) {
   final CheckOutItemResponseData responseData = new CheckOutItemResponseData();
   UserId userId = this.retreiveUserId(initData);
   userId.setAgencyId(new SchemeValuePair(SymphonyConstants.AGENCY_ID));
   ItemId itemId = initData.getItemId();
   responseData.setUserId(userId);
   itemId.setAgencyId(new SchemeValuePair(SymphonyConstants.AGENCY_ID));
   responseData.setItemId(itemId);
   CheckoutTransactionReults checkoutTrans = new CheckoutTransactionReults();
   try {
      validateUserId(userId);
      validateItemId(itemId);
   }
   catch(Exception exception) {
      if (responseData.getProblems() == null) responseData.setProblems(new ArrayList<Problem>());
         Problem p = new Problem(new SchemeValuePair(SymphonyConstants.CHECK_OUT_PROBLEM),SymphonyConstants.CHECK_OUT_INPUT_PROBLEM,exception.getMessage(),exception.getMessage());
         responseData.getProblems().add(p);
         return responseData;
      }

      try {
         checkoutTrans = this.callSirsi(serviceManager,userId,itemId);
         checkSirsiResponseForErrors(checkoutTrans);
      }

private CheckoutTransactionReults callSirsi(RemoteServiceManager serviceManager,UserId userId,ItemId itemId) {
   SymphonyRemoteServiceManager sirsiServiceManager = (SymphonyRemoteServiceManager)serviceManager;
   CheckoutTransactionReults checkoutTransaction = sirsiServiceManager.checkoutItem(userId, itemId);
   return checkoutTransaction;
}
The call to the Symphony API is accomplished by calling the URL of a Perl script which makes the direct API call:
public CheckoutTransactionReults checkoutItem(UserId userid,ItemId itemId) {
CheckoutTransactionReults checkoutTrans = new CheckoutTransactionReults();
try {
URL url = new URL(SymphonyRemoteServiceManager.scriptUrl + "checkoutItem.pl?id="+userid.getUserIdentifierValue()+"&amp;amp;amp;amp;amp;amp;amp;amp;amp;itemid="+itemId.getItemIdentifierValue());
StringTokenizer stringTokenizer = this.callURL(url);
heckoutTrans = this.parseCheckoutResults(stringTokenizer);
}
catch(Exception e) {
checkoutTrans.setStatusCode(SymphonyConstants.SIRSI_FAILED);
}
return checkoutTrans;
}
Parsing the results…
private CheckInTransactionResults parseCheckInResults(StringTokenizer stringTokenizer) {
   CheckInTransactionResults checkInTransaction = new CheckInTransactionResults();
   Hashtable<String,String> ht = new Hashtable<String,String>();
   ht = this.stringTokenizerToHashtable(stringTokenizer);
   checkInTransaction.setUserId((String)ht.get(SymphonyConstants.SIRSI_USERID));
   checkInTransaction.setCallNumber((String)ht.get(SymphonyConstants.SIRSI_CALL_NUMBER));
   checkInTransaction.setAuthor((String)ht.get(SymphonyConstants.SIRSI_AUTHOR));
   checkInTransaction.setTitle((String)ht.get(SymphonyConstants.SIRSI_TITLE));
   checkInTransaction.setStatusCode((String)ht.get(SymphonyConstants.SIRSI_MESSAGE_NUMBER));
   return checkInTransaction;
}
…which are then returned to the Service class. The connector service class populates the response data object which will be returned back to the Toolkit Core Code. The Toolkit Core code will then transform the response object into XML to send back as the response.
Setting up the Symphony Project in Eclipse
It can sometimes be difficult to get multiple projects ‘talking’ to each other and deployed to Tomcat within Eclipse. For those that wish to duplicate this setup, please find below the configuration settings I used get this all working. The SymphonyConnector project needs to know about the NCIPCore project (Figure 11):
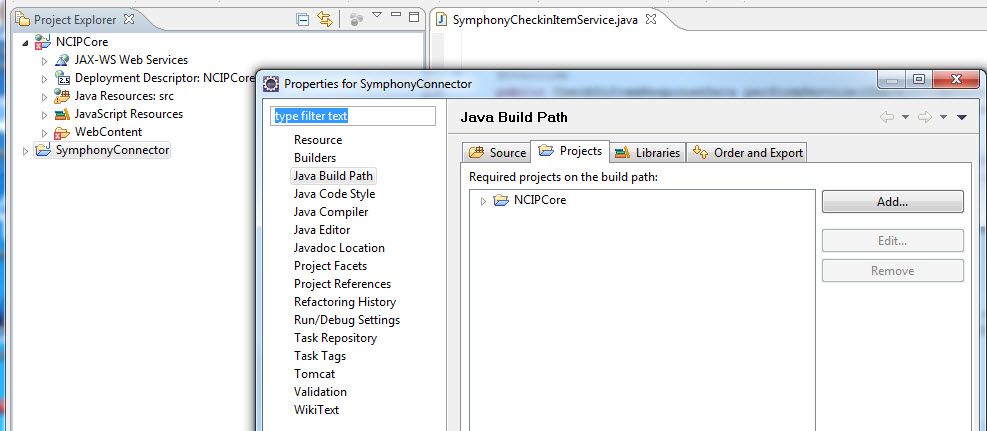
Figure 11. Adding the NCIPCore project to the build path of the Symphony Connector project
The NCIPCore project does not need to know about the SymphonyConnector project (Figure 12):
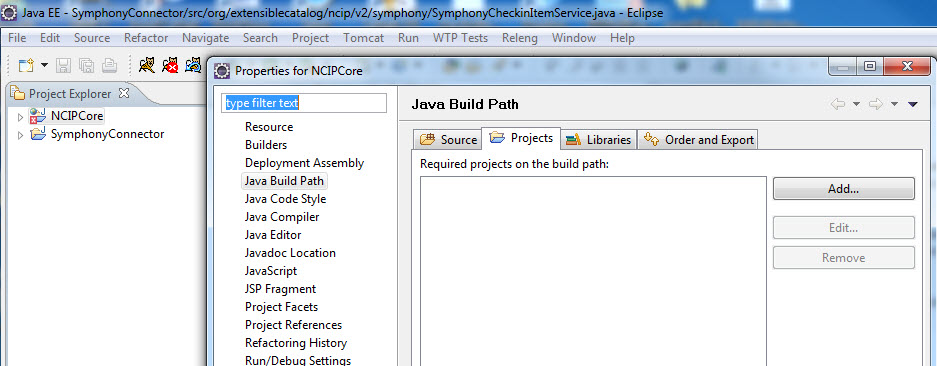
Figure 12. Projects on the build path of the NCIPCore project
I have included both of the projects in the Tomcat ClassPath (Figure 13):
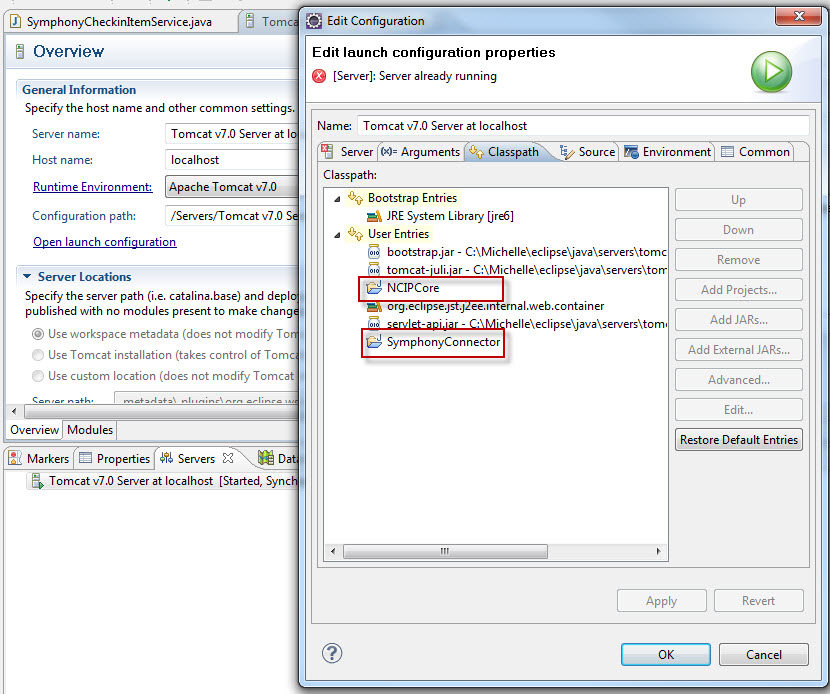
Figure 13. Tomcat Classpath
Testing
Much of the testing was done using an enhanced version of the index.html file that comes with the core Toolkit. As shown below in Figure 14, I added JavaScript that allowed me to ‘toggle’ between each of the four service calls. This saved me the steps of cutting and pasting.
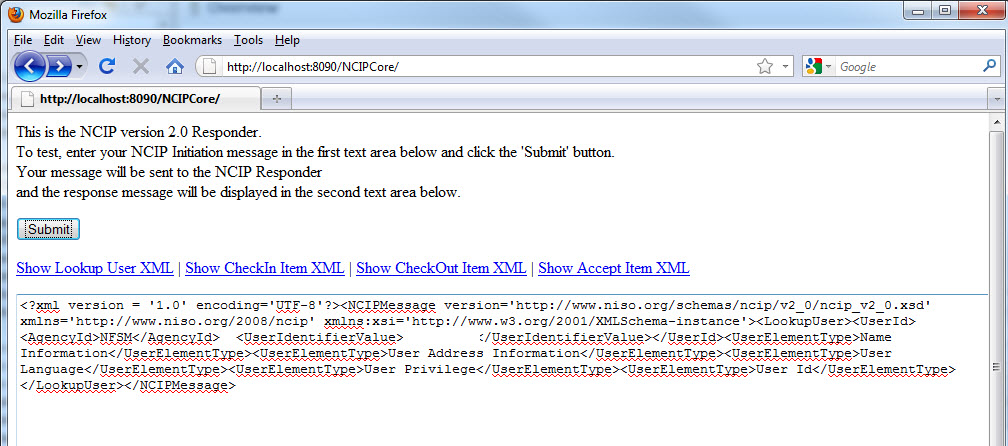
Figure 14. A modified version of the Toolkit test page
The JavaScript required for this functionality:
   <script type="text/javascript">
   xmlArray = new Array();
   xmlArray['LookupUser']="<?xml  version = '1.0' encoding='UTF-8'?><NCIPMessage  version='http://www.niso.org/schemas/ncip/v2_0/ncip_v2_0.xsd'  xmlns='http://www.niso.org/2008/ncip'  xmlns:xsi='http://www.w3.org/2001/XMLSchema-instance'><LookupUser><UserId>   <AgencyId>NFSM</AgencyId>   <UserIdentifierValue>123456789</UserIdentifierValue></UserId><UserElementType>Name  Information</UserElementType><UserElementType>User Address  Information</UserElementType><UserElementType>User  Language</UserElementType><UserElementType>User  Privilege</UserElementType><UserElementType>User  Id</UserElementType></LookupUser></NCIPMessage>";
   xmlArray['CheckinItem']="<?xml  version = '1.0' encoding='UTF-8'?><NCIPMessage  version='http://www.niso.org/schemas/ncip/v2_0/ncip_v2_0.xsd'  xmlns='http://www.niso.org/2008/ncip'  xmlns:xsi='http://www.w3.org/2001/XMLSchema-instance'>  <CheckInItem><ItemId>  <AgencyId>Your Agency  ID</AgencyId>   <ItemIdentifierValue>39159999985</ItemIdentifierValue></ItemId><ItemElementType>Bibliographic  Description</ItemElementType><ItemElementType>Item  Description</ItemElementType></CheckInItem></NCIPMessage>";
   xmlArray['CheckOutItem']="<?xml  version = '1.0' encoding='UTF-8'?><NCIPMessage  version='http://www.niso.org/schemas/ncip/v2_0/ncip_v2_0.xsd'  xmlns='http://www.niso.org/2008/ncip'  xmlns:xsi='http://www.w3.org/2001/XMLSchema-instance'><CheckOutItem><UserId>   <AgencyId>Your Agency ID</AgencyId>   <UserIdentifierValue>123456789</UserIdentifierValue></UserId><ItemId>   <AgencyId>Your Agency ID</AgencyId>   <ItemIdentifierValue>39999995</ItemIdentifierValue></ItemId></CheckOutItem></NCIPMessage>";
   xmlArray['AcceptItem']="<?xml  version = '1.0' encoding='UTF-8'?><NCIPMessage  version='http://www.niso.org/schemas/ncip/v2_0/ncip_v2_0.xsd'  xmlns='http://www.niso.org/2008/ncip'  xmlns:xsi='http://www.w3.org/2001/XMLSchema-instance'><AcceptItem><RequestId><AgencyId>Relais</AgencyId><RequestIdentifierValue>REG-12345679</RequestIdentifierValue></RequestId><RequestedActionType>Hold  For  Pickup</RequestedActionType><UserId><AgencyId>Your  Agency  ID</AgencyId><UserIdentifierValue>123456789</UserIdentifierValue></UserId><ItemId><AgencyId>Your  Agency  ID</AgencyId><ItemIdentifierValue>39999995885</ItemIdentifierValue></ItemId><ItemOptionalFields><BibliographicDescription><Author>Author</Author><Title>Title</Title></BibliographicDescription><ItemDescription><CallNumber>Call   Number</CallNumber></ItemDescription></ItemOptionalFields><PickupLocation>Your  Pickup Location  code</PickupLocation></AcceptItem></NCIPMessage>";

function  changeXML(serviceType) {
   document.getElementById('ncipDoc').value = xmlArray[serviceType];
}

</script>
The clickable links that call the JavaScript changeXML method:
<a href="javascript:changeXML('LookupUser')">Show Lookup User XML</a>  |
<a href="javascript:changeXML('CheckinItem')">Show CheckIn Item XML</a> |
<a href="javascript:changeXML('CheckOutItem')">Show CheckOut Item XML</a>  |
<a href="javascript:changeXML('AcceptItem')">Show Accept Item XML</a>
For performance testing the services, I use JMeter [8] which is an Apache open source project that allows me to create repeatable tests for valid input, invalid input and also stress testing (Figure 15):
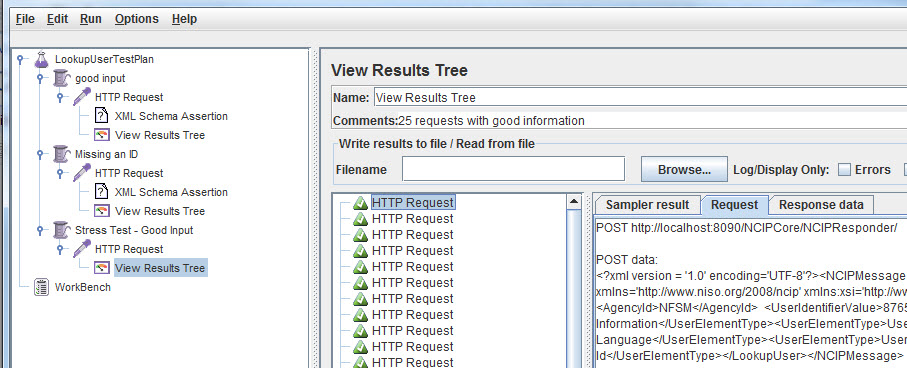
Figure 15. Apache JMeter
Deploying the software (to Jetty 7.2.0)
Our implementation of the Toolkit and connector is deployed in our production environment using Jetty. I do not ‘package’ the NCIP Core code from Eclipse to deploy. Instead I simply download the .war file provided by the eXtensible Catalog. I do package the Connector code from eclipse by exporting the project (class files only) as a .jar file. The Toolkit .war file is placed in the webapps directory of Jetty. The connector code, packaged as a .jar file, is placed in the [NCIP_ROOT_DIR]/NCIP-Instances/ncipv2/driver/ directory together with the driver configuration file. (NCIP_ROOT_DIR represents the directory your environmental variable points to.)
Open Sourcing the Connector Code & Perl Scripts
All of the Symphony Connector Java code has been open-sourced. It can be found on the XC NCIP2 Toolkit Google Code Website [9].
The Perl scripts that are called by the Java connector code have also been made available to any Symphony API customer on Symphony’s ‘sirsiapi.org’ site [10]. A user id and password provided by Symphony are required to access this site. This is the best we could do as far as open-sourcing these scripts, due to the use of the proprietary SirsiDynix API. The scripts consist of a call to the Symphony API and a return of the resulting string to the Java method calling it as show below in Figure 16:
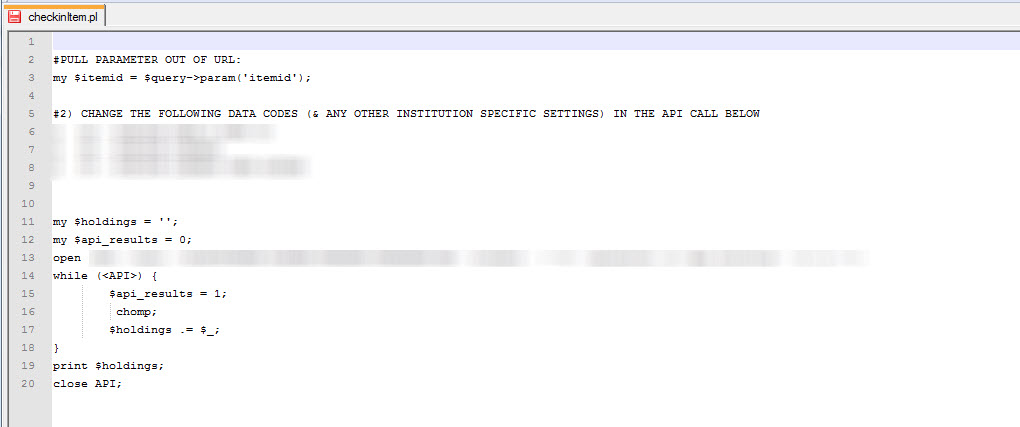
Figure 16. Perl script that calls the proprietary SirsiDynix API
Results of the Project and Getting Involved
We have been using the Toolkit and the connector code in a production environment (on Jetty) since late March 2011. Since then, the services have been called approximately 4,000 times without any downtime or issues. While this is not a terribly high volume, we have been happy with the stability and performance.
In the end, I can’t help but to reflect upon the simple process of the Symphony connector code. It validates input, calls an API, parses the results and constructs and populates the response object. There are approximately fifty services that make up the entire NCIP protocol. The code that makes up the Symphony connector – just four services – is reliable and does exactly what we needed it to do support our patrons use of the Relais EZ-Borrow software. However, as the Symphony connector code grows to fully support all of the NCIP services, I would like to see the design be considered so that it scales in a clean and elegant manor. I am thinking along the lines of mapping the XML elements to the Sirsi API codes to maximize reuse of the Java clases.
If you are interested in getting involved with the XC NCIP2 Toolkit project, there is a bi-weekly conference call managed by Randy Cook [11] who is the project manager for XC. Randy and the developers that work on this project have been wonderful to work with and extremely responsive to all of my questions. This is a worthy project with the potential to benefit any organization looking for a way to access their catalog using NCIP.
Software List
Eclipse Java EE IDE for Web Developers, Version: Helios Release, Build id: 20100617-1415
Apache Tomcat 7.0.2
Jetty 7.2.0
Apache Maven 2.2.1
Apache JMeter 2.4 r961953
Subversion 1.6.12
References
[1] Pennsylvania Academic Library Consortium, Inc. http://www.palci.org/
[2] Relais International http://www.relais-intl.com/relais/home/index.htm
[3] SirsiDynix http://www.sirsidynix.com/
[4] eXtensible Catalog Organization http://www.extensiblecatalog.org/
[5] eXtensible Catalog XC NCIP 2 Toolkit Google Code Website – XML Samples http://code.google.com/p/xcncip2toolkit/wiki/SampleXML
[6] eXtensible Catalog XC NCIP 2 Toolkit Google Code Website – Class Diagram http://code.google.com/p/xcncip2toolkit/wiki/ClassDiagram
[7] eXtensible Catalog XC NCIP 2 Toolkit Google Code Website – How to Write an ILS Connector for an NCIP Service http://code.google.com/p/xcncip2toolkit/wiki/WriteConnector
[8] Apache JMeter http://jakarta.apache.org/jmeter/
[9] eXtensible Catalog XC NCIP 2 Toolkit Google Code Website http://code.google.com/p/xcncip2toolkit/source/browse/
[10] Sirsi API Voluntary Code Repository (*Password Protected Site*) http://sirsiapi.org/
[11] Extensible Catalog Organization – Randall Cook http://www.extensiblecatalog.org/about/people/randall-cook
About the Author
Michelle Suranofsky is a Sr. Developer at Lehigh University in Bethlehem, PA. Before joining Lehigh in 2010, Michelle worked for 10 years developing and maintaining Web applications primarily with Java at Chubb Insurance. She can be contacted at mis306@lehigh.edu.

Subscribe to comments: For this article | For all articles
Leave a Reply