by Devin Becker and Erin Passehl-Stoddart
Introduction, or the Difficulty of Oral History in the Digital Age
In today’s libraries, museums, and cultural institutions, oral histories are viewed as important primary sources that are utilized by everyone from students to researchers to genealogists to family members. Historian Donald A. Ritchie acknowledges that historians have generally conducted interviews to acquire information that would otherwise not have existed, including the small but telling details that previously escaped notice and were overlooked in the historical narrative (Ritchie 2011) [1].
New technologies are helping to advance the preservation, access, and use of oral histories. The medium, however, is in a transitional moment. Some oral histories are now born digital, but many still exist in previous formats of audio cassette tapes, minidisc, mini-DV, etc. Moreover, while oral histories are gaining in popularity as historical resources, they remain underutilized resources due partly to the difficulty researchers have had in gaining access to oral history collections (Boyd 2011) [2]. This is especially true of oral histories stored in analog forms, such as the Latah County Oral History Collection, where the expense and staffing needed to migrate audio cassette tapes over to a digital format is often prohibitive. Many times oral histories contain multiple components, including audio, transcripts, indexes, and sometimes additional materials such as photographs or handouts. It is therefore necessary for information providers to, as Doug Boyd argues, “make the individual components of the collections all work together in a user-friendly, efficient, useful, and intuitive manner; be engaged and discovered more easily, more widely and effectively distributed, and more responsibly preserved” (Boyd 2011) [3]. All of these components are addressed in the new open-source plugin developed at the University of Kentucky named OHMS (Oral History Metadata Synchronizer). This article will address the steps taken by the Digital Initiatives Department at the University of Idaho Library to preserve and make accessible the Latah County Oral History Collection.
The Latah County Oral History Collection
The Latah County Oral History Collection consists of audio interview recordings and transcriptions for over 300 interviews that were collected in the 1970s. The interviews feature the recollections of long time residents of Latah County who lived in the area as early as the 1890s. Latah County is located in the northern Idaho panhandle, which is a rural area of the state that produced much of the wheat, lentils, peas, oats, barley, and timber in the United States. It is the only county in the United States to be created by an act of Congress in 1888. Early settlers came seeking wealth through prospecting, mining, lumbering, and farming (originally through grazing, later as soil for agriculture) (Hubbard 1957) [4]. It is also the home of the state’s land-grant university, the University of Idaho.
In the early 1970s, the Latah County Museum Society Board of Trustees selected an oral history project committee to facilitate oral recordings of citizens of Latah County, Idaho. One of the main reasons behind conducting these oral histories in Latah County was the idea that “by hearing people tell of the range of circumstances they faced, the choices they made, and the traditions that have given them strength, [we] can discover the dominant concerns of American working people during the last century” (Schrager 1978) [5]. The funding originally came from a grant by the Idaho Bicentennial Commission to design questions for oral history interviews, conduct the oral interviews, and present an oral history tape and slide program throughout the county during the bicentennial celebration. The project later received additional funding from the Idaho Commission on the Arts and Humanities to extend the scope of the project to include interviews from 1976-1978, as well as the creation of transcripts, photography of narrators, and the creation of a series of oral history booklets for elementary school social studies (Schrager 1978) [6]. By the end of the project, the collection included approximately 570 hours of recorded audio interviews on cassette tapes featuring over 200 narrators from 1973-1978. By cooperative agreement, the collection was transferred to the University of Idaho Library Special Collections for public reading, listening, and preservation.
Initial Digitization, Ingest, and Metadata
The digitization of this collection began with a request from a patron who desired to use the audio from the cassettes for a documentary film. We did not at that time have the expertise or capacity to digitize the audio cassettes, but we were able to quickly digitize and publish the contents of all the transcripts in the collection. To do this, we used a guillotine to cut the bindings to the bound transcripts and then used an auto feed scanner to scan each transcript. We produced high-resolution TIFF files for each page and large OCR generated PDF files for each transcript. We deposited the TIFF files into our digital archive, then extracted the individual interview transcripts from the larger PDFs into smaller PDFs and named the files according to the interviewee’s name and the date/number of the interview (some participants were interviewed numerous times).
Digitization of this collection was prioritized for many reasons, not least among them was the thorough descriptions collected about each interview and interviewee during the initial recording of the interviews. This metadata was only available via the typed version of the Guide to the Latah County, Idaho Oral History Collection, which listed each interview participant along with his/her biographical information and a brief synopses of each interview in which he/she participated. Each synopses also included one uniformly formatted line that listed the date of the conversation, the length of the recording of the conversation, the length (in pages) of the transcript of the interview, and the initials of the interviewer [7]. We extracted all this information by copying the OCRed text from our PDF, after which we worked to convert this text into an XML file.
To transform the text document into a valid XML document we used regular-expression-enhanced find-and-replace strategies to tag the individual name, birthplace, origin, birth year, and occupation of each individual, as well as a nested listing of each interview he/she participated in, which included tags for the date, audio length, page length, interviewer, and synopsis. This initial XML file used common HTML tags such as <p> and <a> so that we could then create a listing of these interviews and people online. Eventually, the file was transformed using XSL into a tab-delimited spreadsheet that we used to upload the corresponding interview transcripts into our CONTENTdm instance. We accomplished the digitization, clean up, description, and upload of transcripts into CONTENTdm that users could publicly search, read, and browse in approximately one month.
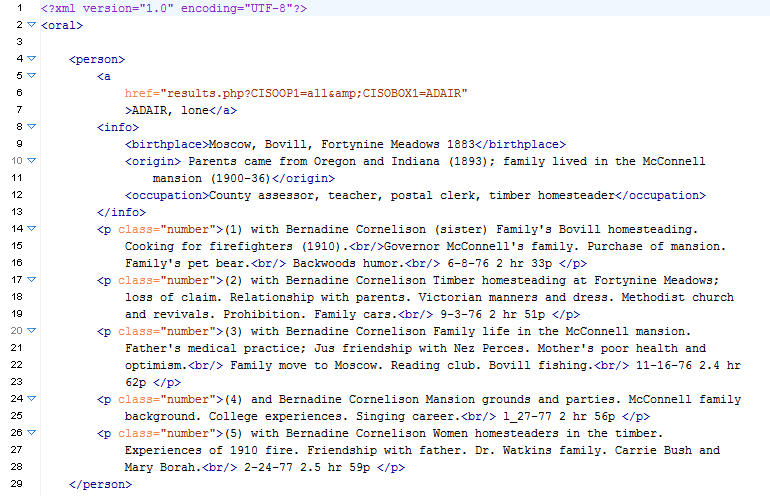
Figure 1. Initial XML file generated from the guide to the original collection.
Digitizing the Audio Files
The stories contained in these oral histories were consistently compelling, depicting as they did the exhilarating stories of the hardships and trials many early homesteaders, loggers, and miners endured while living here, but the digitization of the audio recordings and building of the collection website took some time. After considering sending the tapes out to vendors, we finally decided to use some older hardware and software in the library to digitize the audio cassettes.
Since audio cassette digitization occurs at a 1:1 time ratio (one hour of effort to digitize one hour of recording), this conversion of 569 hours of interviews required several staff over the course of 18 months. The procedure for digitizing these cassettes involved multiple steps:
- The tapes were recorded onto a Macintosh desktop computer using Peak Audio. Each side was saved individually as a Sound Document 2 (.sd2) file (a proprietary format developed by Avid Technology).
- Once all the tapes in an archival box were recorded, the .sd2 files were converted to Audio Interchange File Format (.aif) using Peak Audio and the files were copied to a Windows 7 machine for editing and preservation.
- Using WavePad Sound Editor, the individual side recordings were trimmed for dead air and then combined into full interviews. Interviews were converted from .aif format to .mp3 format using a batch process in WavePad.
A common problem we encountered was broken and/or deteriorated tape cassettes, which required additional staff effort. Over the course of a year and a half, however, we were able to digitize the vast majority of the tapes and ingest them into CONTENTdm as MP3 files.
Discovering the Oral History Metadata Synchronizer (OHMS)
As the digitization process came to a close, we saw a presentation by Doug Boyd at the 2014 Northwest Archivists Conference about the development of an open-source software application for oral histories called the Oral History Metadata Synchronizer (OHMS) (Boyd 2014) [8]. OHMS is a web-based system that provides users with word-level search capability and a time-correlated transcript or index, connecting the textual search term to the corresponding moment in the recorded interview online (Boyd 2013) [9]. OHMS originally began in 2008 as a way to work with oral history transcripts for the Kentucky Digital Library; it was later redesigned with an indexing component and was distributed as an open-source product with funding from the Institute of Museum and Library Services (IMLS). In its current form, OHMS exists as a plugin that can work with content management systems such as CONTENTdm.
The OHMS system uses XML files containing an interview’s metadata together with a PHP viewer to create the interface. Several Javascript files are used for audio/video players to connect the recording with that interview’s metadata, transcript, and index, which are all full-text searchable. This is the most important aspect of the OHMS system, namely that it presents and connects the text and recording of the oral history interview on the same web page, which in turn allows the user to stay on one page while exploring both the audio and textual recording of the history.
To help administrators create the XML document that drives the system, OHMS operates an online tool that uses forms and tagging features to help users properly describe and timestamp an interview [10]. The OHMS tool allows an interview’s metadata to be uploaded as an XML or csv file. It can then be enhanced by adding minute by minute timestamps to the transcript. Administrators can also define and describe sections of the interview to create a linked index, which can also be enhanced with links, maps, and other features. After enhancement and conversion with the tool, these correctly tagged XML files will then run on one’s own system after being downloaded from the OHMS account.
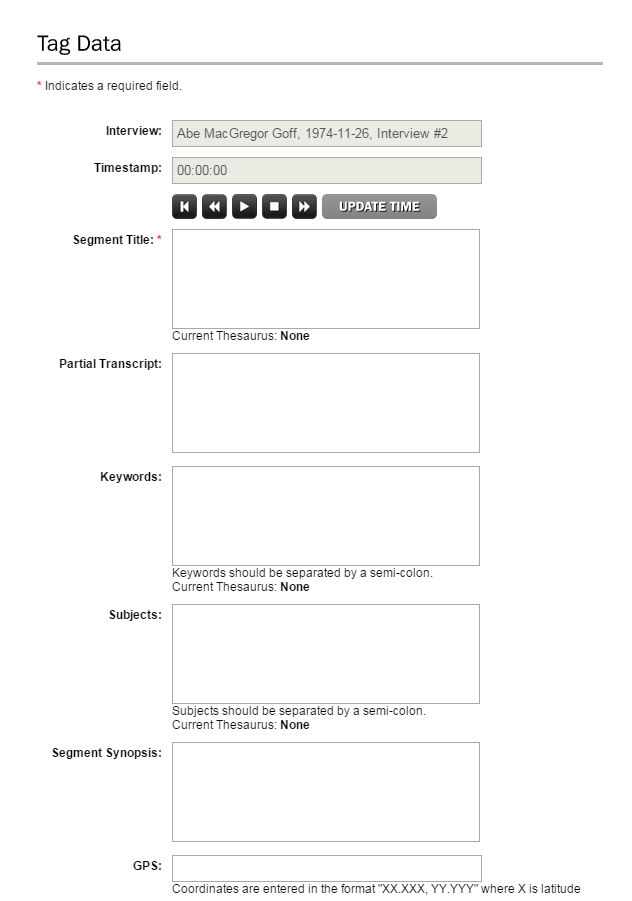
Figure 2. Forms for filling out an index section via OHMS online application
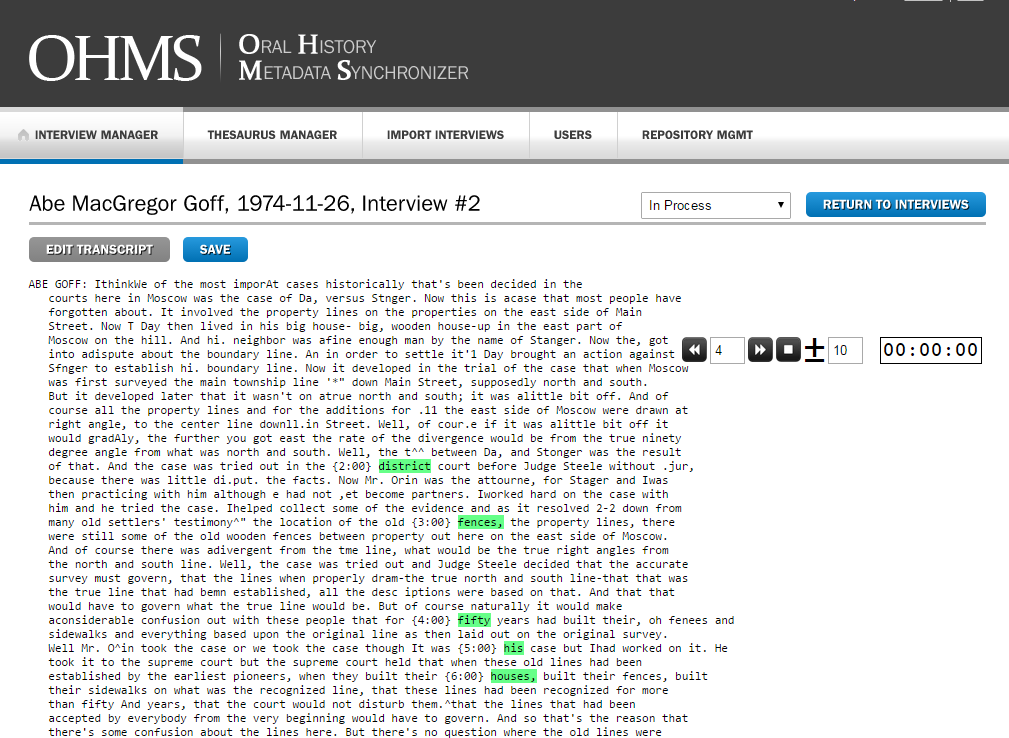
Figure 3. The tool that helps users add timestamps to the transcript.
OHMS Implementation
After downloading and installing OHMS onto our web server, we customized the system to fit with the design of our other digital collections. Both the installation and customization of the OHMS system proved to be exceptionally easy to perform. We did not end up using the OHMS online tool because we discovered that it was easier for our purposes to edit the XML files directly. We created our XML files, however, from an initial model file that was uploaded into the OHMS tool, enhanced via its features, then downloaded back into our system. We decided to go this route because we already had indexes for most interviews and initially felt that adding minute timestamps to the audio would be too time consuming.
Modifying the OHMS system
The OHMS system allows for the incorporation of a number of different playback systems, from YouTube to Brightcove. Since this collection was solely audio, the main playback mechanism we were concerned with was jPlayer, a common javascript application built for the playback of mp3, mp4s, and other audio files online (that is included in the distribution).[11]
Appearance/Client-Side modifications
Files modified:
- ohms-viewer/css/viewer.css
- ohms-viewer/tmpl/viewer.tmpl.php
- ohms-viewer/js/viewer_other.js
- ohms-viewer/tmpl/player_other.tmpl.php
We had two goals when designing the appearance of these interviews: 1) To fit the display into our digital collections template and 2) to create interactive controls and web site architecture that promoted easy discovery of and access to the interviews themselves. To accomplish the first we revised the viewer.css file and the viewer.tmpl.php to accommodate our web site backgrounds, layouts, and colors. Within viewer.tmpl.php, we simply erased the boilerplate html containers included and replaced these with the html of our customized header and container for the collection; we also included links to our custom CSS and JavaScript files to better fit with our design. After doing this, we adjusted the viewer.css file so that the html would display at the proper size in our container. We then made a small change to the player_other.tmpl.ph to properly layout the jPlayer skin.

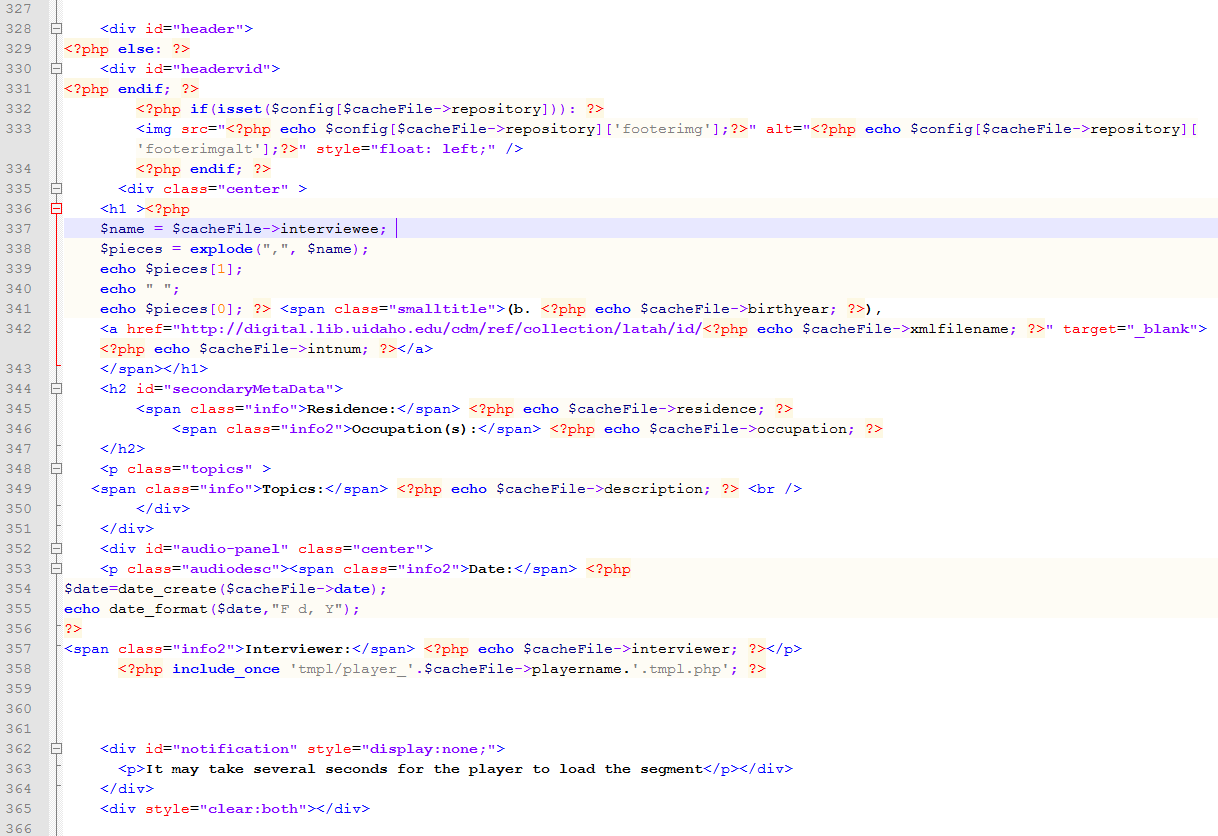
Figure 4. viewer.tmpl.php file (gist)
Back-end/Server-side modification
Files modified:
- ohms-viewer/lib/Version3CacheFile.class.php
- ohms-viewer/lib/Transcript.class.php
- ohms-viewer/config/config.ini
The customizations we made to the back-end php and config files were relatively small in nature; they were based on both the design of website we planned for the collection and the collection’s metadata itself. The first file to set up is the config.ini file. There was ample documentation on how to do this via the OHMS site (Weig 2014) [12].
The other back end customizations we performed were based on our own metadata needs for the collection and the needs of those who would be enhancing our metadata, namely our student workers. For the most part, we were able to fit the fields of the metadata in our collection to the template established by the OHMS system. The OHMS metadata template includes options for basic fields such as title, date, interviewer, interviewee, length (in time), file name, rights, keywords, subjects, and other fields. However, our collection did contain several idiosyncratic fields that were original to the project that we wanted displayed, namely birth year, family origin, residence location, occupation, and interview number. [13] To enable these fields to then display via our viewer, we added several classes to the array defined in Version3CacheFile.class.php file.
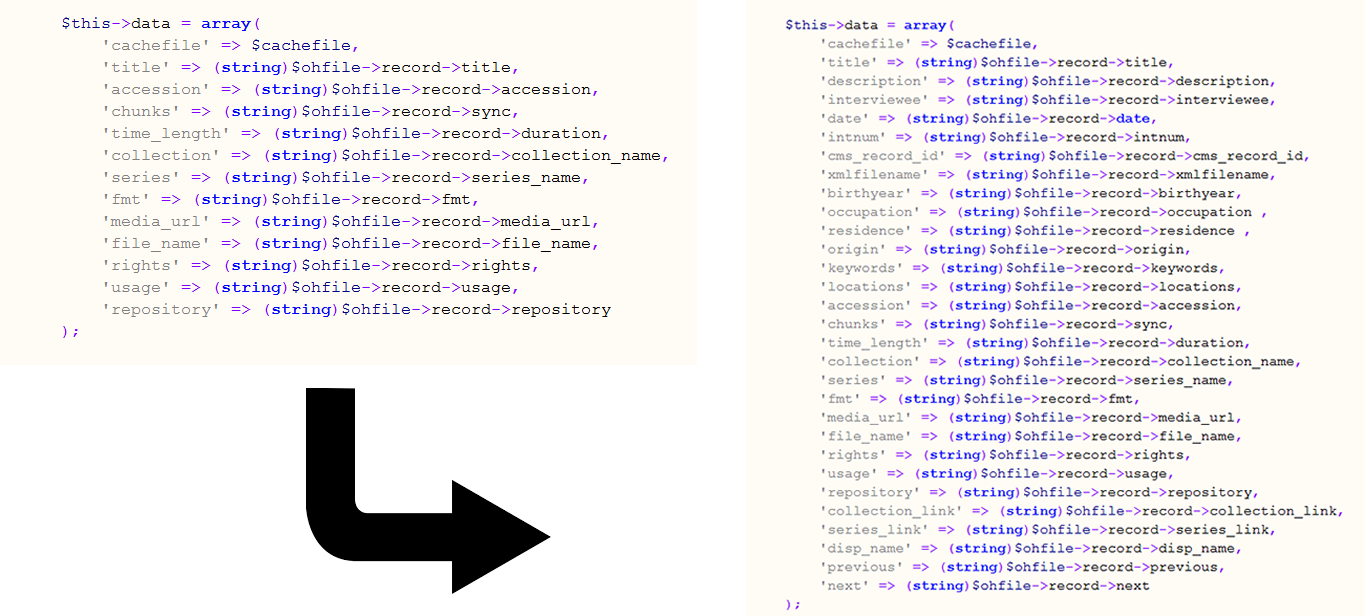
Figure 5. Adjustment of Version3CacheFile.class.php file (gist)
We also needed to address the metadata for the index of each interview. Out of the box, OHMS and jPlayer use seconds to determine its timestamps, so for each point listed in the index portion of the XML file, a corresponding second is required. Given that our original metadata for the indexes was recorded in minutes, we decided to adjust the Transcript.class.php file to multiply the “point” field by 60 to accommodate the input of minutes in the XML file rather than seconds. This eventually allowed our student workers to expedite their work with the indexes.

Figure 6. Adjustment of Transcript.class.php file
Using Student Workers to Create Complex Metadata
The Digital Initiatives Lab at the University of Idaho Library employs between four to eight student workers and interns. These students assist with scanning, file management, and the creation of metadata for many digital collections, gaining technical skills along the way. For this particular project, students participated in active learning tasks through the preparation and processing of oral history interviews, including the editing of complex xml files (Wilton 2011) [14].
In order to bring student workers into the metadata creation and wrangling of xml files workflow, we first tested out specific tasks and goals on staff and created a guide to assist with students who were not familiar with xml editing. Eventually, students were assigned specific interviews in batches of approximately ten xml files. Students worked in oXygen with surrogate files, for which they received brief introductions to the software before starting work. Students were assigned four goals for each xml document: create a searchable index with corresponding timestamps, create a searchable transcript, and assign keywords and locations for each individual interview using Getty Art and Architecture Thesaurus.
Creating a searchable index with corresponding timestamps
Many indexes found in the transcript PDF file listed minutes and brief descriptions on each side of a cassette tape; students copied and pasted the time segments and synopses into “points” in the xml document. A point consisted of slots for time, title, and synopsis. Students counted how many points were in each index and created the correct number of points in the xml file.
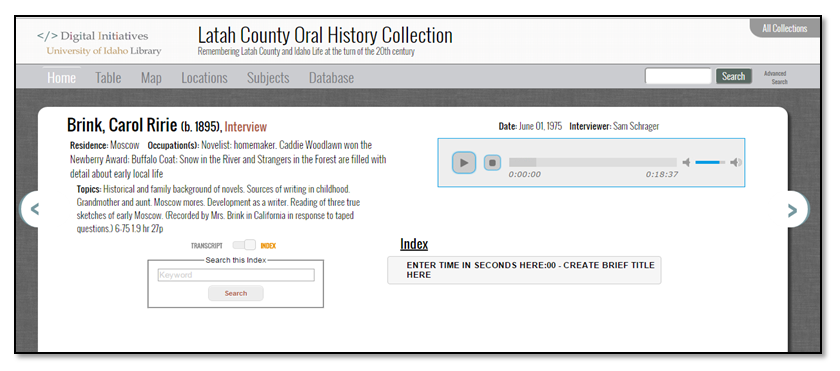
Figure 7. Screenshot of uncustomized xml file viewed in the test server.
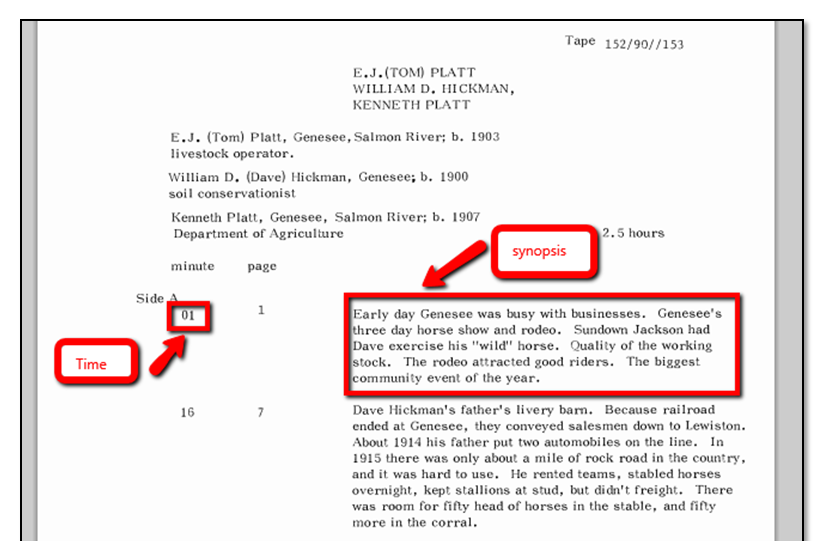
Figure 8. Screenshot of index from PDF transcript.
The timestamps needed to be manually adjusted to correlate with the digital length of time versus the 30 minute increments found on the original cassette tapes. We created a timestamp cheat sheet to help students adjust correctly depending on the side of the cassette tape they were working on.
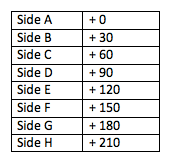
Figure 9. Cheat sheet for adjusting time based on cassette side length.
Students were then asked to create a title for each synopsis, since that wasn’t part of the original metadata. We asked them to create a phrase or a few words that describes the corresponding segment within a minute or two. Students were asked to skip this process and make a note in their progress spreadsheet in cases of garbled OCR text from the transcript upon copying and pasting into the xml file, as well as in cases where there was no transcript at all or a transcript without an index.

Figure 10. Screenshot from oXygen editor of XML file looking at a point (timestamp, title, synopsis), created by students.
Next, while the interview was still fresh, students assigned keywords and locations for each interview. Students entered this information in their progress spreadsheets and used a controlled vocabulary text file that contained entries from Getty Art and Architecture Thesaurus. Location keywords were generated from the original metadata but then added to by students to include not only where the narrators were born or lived, but what areas the interviews discussed at length.
Creating a searchable transcript
Students then created searchable transcripts within the xml file when they were available for each interview. If there was no transcript, students were asked to copy in the phrase “Transcript not available” in the transcript tag; they then skipped to indexing. If a transcript existed, students copied the OCR text from the PDF and dumped it into a text file using Notepad++. Upon the dump, the student workers deleted all text that occurred before the actual transcript began. Students then cleaned up the OCR text by getting rid of a number of common symbols by using Find/Replace. Common symbols included < , > , & , • , £ , © , and ® . Students also did a quick scan through the text file to delete any large text strings errors. We did not have students check the text against the transcript, as that was too time consuming. These files were saved as ‘scrubbed’ text files.
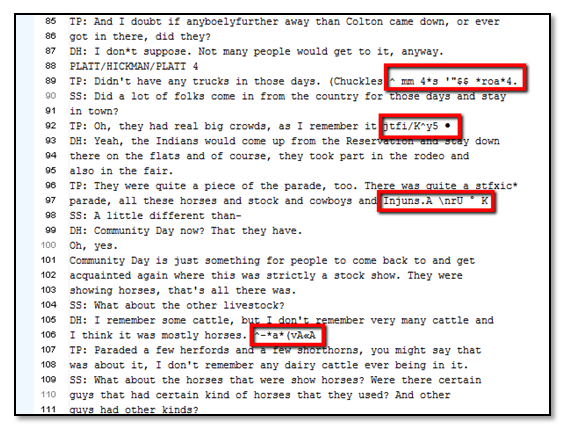
Figure 11. Text file filled with OCR errors.
Students tracked how much time it took per interview so we could get an estimate for the project, as well as which students worked faster and could take on the harder files. Times ranged from five minutes (interviews with no transcript or index) to 80 minutes (large, complex interviews with multiple issues), with the average time of approximately 32 minutes per interview for student workers.
Once students completed these steps, the digital projects manager completed quality control checks on the xml files. This included adding breaks between speakers listed by their initials in the transcripts to make for a more readable document online; copying the final scrubbed transcript into the students’ interview xml file; performing checks on the titles, keywords, and locations; and finally grabbing the code and moving it into the final xml files located on the server, which students do not have access to. Students then clicked on the synopses to confirm that the xml file was indeed working correctly.
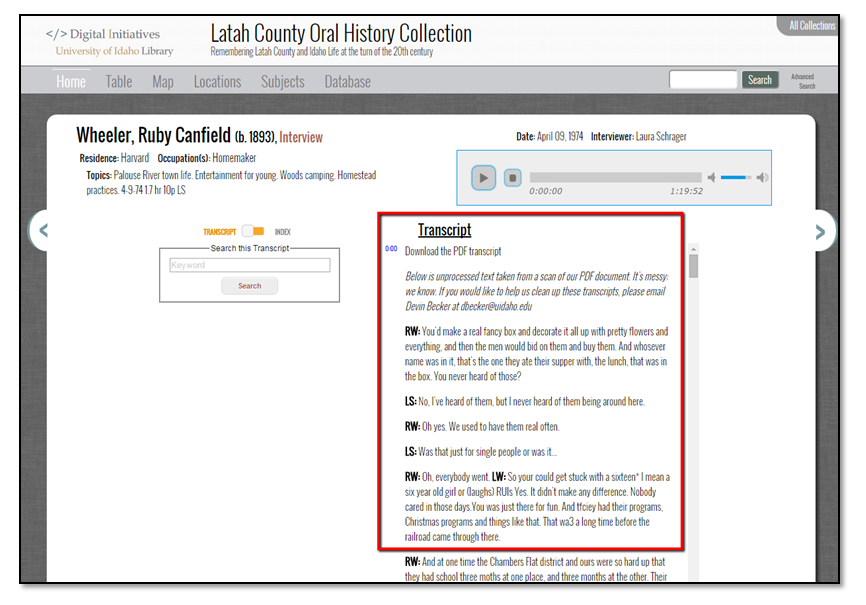
Figure 12. Final view of transcript in viewer with OCR corrections and breaks.
Issues with the process/metadata
Staff provided quality control checking on keywords and locations generated by the student workers, as consistency proved to be an issue when considering the subjectivity of classification coming from six different people. As more interviews were completed, additional keywords were added to speak for the multitude of topics found in each interview.

Figure 13. Excel spreadsheet of all interviews and corresponding keywords and locations.
Another issue that occurred through student generated metadata was that certain audio files did not match up with the corresponding transcript and/or index. We left these files towards the end, and the project manager decided it was worthwhile to listen to certain interviews and figure out where the errors occurred, or in some cases, to listen to the audio in real time to generate points (minute, title, and synopsis) for some interviews. These files took significantly longer to adjust and were done on a case by case basis.
Building out the Website using XSL Templates
Once the student work and quality control was completed, we were ready to design the discovery interface and information architecture for the collection. We are committed to providing several different modes of access—timelines, subject clouds, maps, and other collection-determined modes—to each of our digital collections. These interfaces are always driven by the metadata provided in the collection, and the Latah County Oral History had metadata both related and unique to our other digital collections from which to determine our means of discovery. For instance, we knew we would want to provide a map for users to browse the locations covered by the interviews, as well as subject clouds from which to discover the breadth and extent of the locations and keywords present in the collection.
Before these visualizations were produced [15], we wanted to address the more idiosyncratic metadata we had for the collection, which included the biographical information and list of interviews for each interviewee. As noted above, the original metadata for this collection included information on each interviewee’s family origins, residence, occupation, and year of birth. We wanted users to be able to quickly search and access individuals and their interviews by these attributes and by their name. We also wanted to provide similar means of browsing sequentially between interviewees as we did for the interviews themselves. So we first constructed a page that listed each interviewee, along with their biographical information, and linked to a main page for each person. Next, we needed to create each person’s page, so we built a basic template page in XSL for any interviewee, listing, much like the original guide did, his/her name along with biographical information and a list of each interview he/she participated in together with its synopsis.
Figure 14. XSL file for producing a page for an interviewee
This structure of information and the subsequent sites created via the template established in XSL was based on the structure of our updated, master XML file, which nested all the individual XML interview files within the information we obtained from the initial processing of the OCRed guide to the collection. To build this master XML file, we first joined all the interview XML files together, then deleted the transcript field entirely to limit the size of the file. This very large XML file sometimes caused Oxygen to crash, but we were able to use it carefully along with the customized XSL sheets to create pages for each individual with the information listed above. The XSL file and operation extracted the relevant information for each individual and interview and displayed that according to our layout.
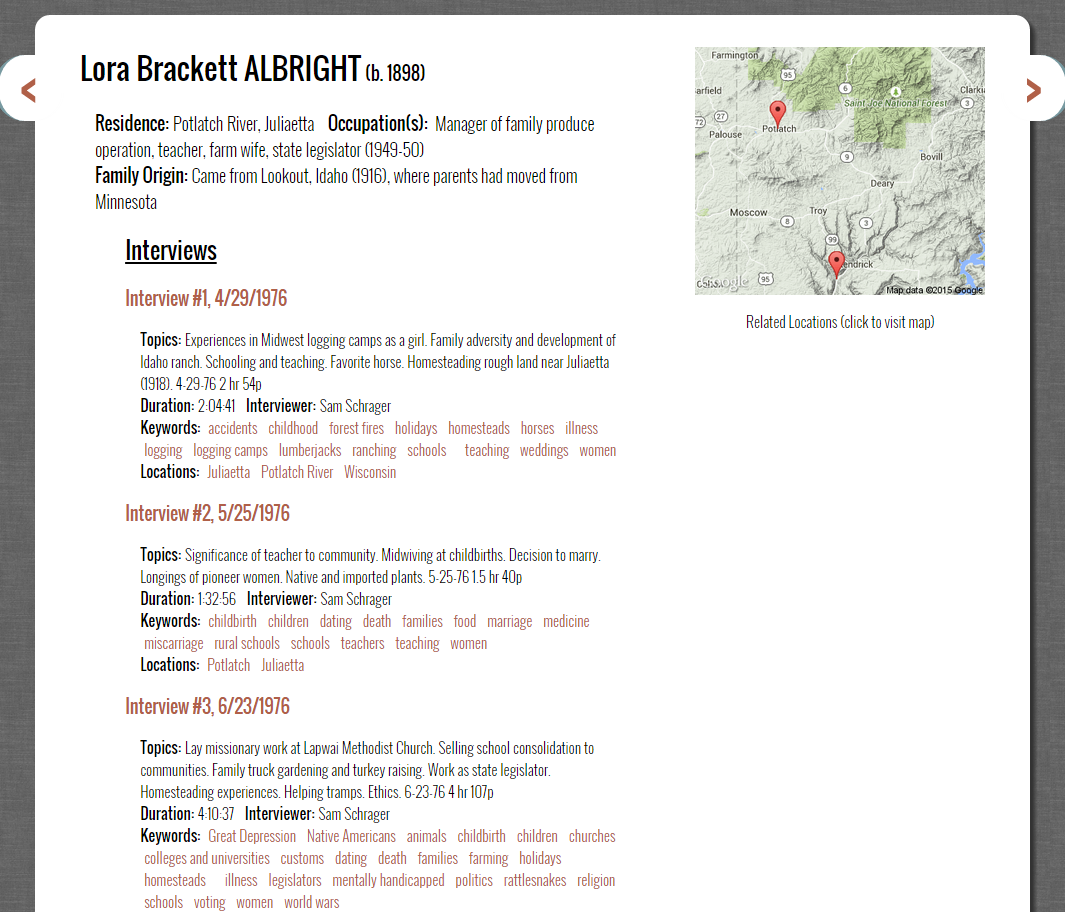
Figure 15. Typical page for an interviewee.
We also wanted to have some piece of visual interest on each page, so we used the location data we had to create automatically generated Google Map images of Latah County with markers based on the latitude and longitude of each location referenced in the interview. The “src” for each image looked like the following, with each latitude and longitude coordinate creating the red marker you can see in the image above:
We were also able to use some images from the Latah County Historical Society of the interviewees to add to select pages. To do this, we simply added a field to the large XML file that listed the location for the image on our web server. We then added an xsl:choose command in the XSL sheet to say that if an image was present, then put the html code to display the image on the page.
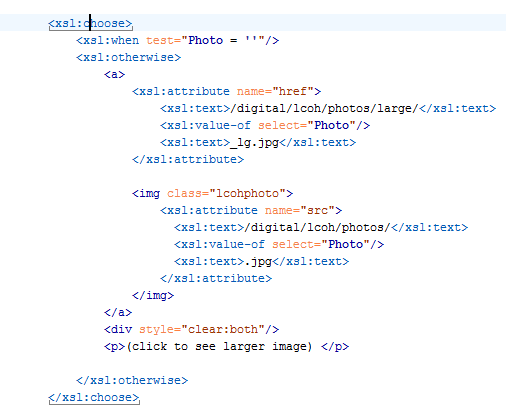
Figure 16. XSL Choose code for adding a picture to a page.
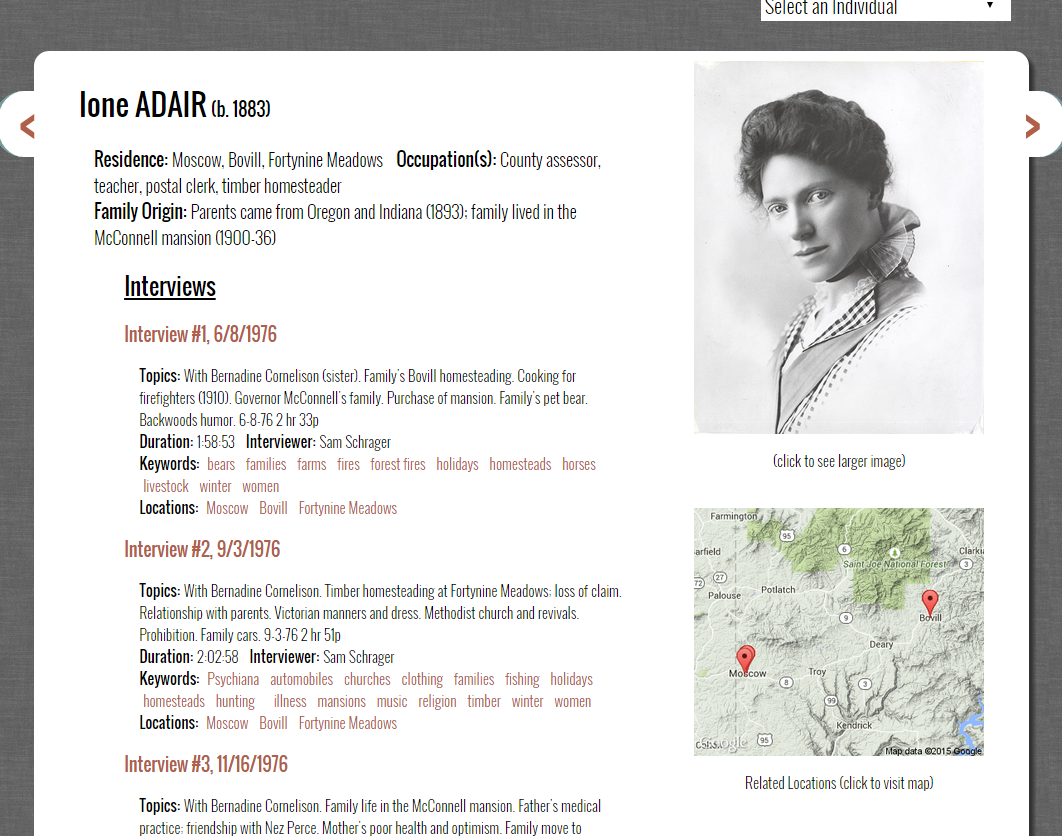
Figure 17. Page for an interviewee with a photo.
Building the Front Page and Central Feature Using Isotope
Having built the majority of pages for the collection, including pages for each interviewee and interview, we finally needed to address the central issue of this project, namely how to structure the site as a whole so as to use our extensive metadata to drive discovery of the interviews. Essentially, we had created the wide foundation of our collection and now needed to organize the site and design our interfaces to best point users to individual interviews of interest, at which point they could further search and browse the interviews’ content themselves using the metadata created by the original directors of the projects and enhanced by our students.
In order to spark curiosity and encourage use of the collection, we also needed to provide a user interface that was engaging visually and interactively while at the same time intriguing a user via the interviews’ metadata. Unlike most of our collections, the Latah County Oral History collection had no inherent visual objects to design around, so this was a particularly challenging aspect of the design process. Ultimately, we decided to use Isotope, which is a javascript application created by Metafizzy, a small web development shop led by David Desandro that dynamically arranges and filters html objects.
Isotope adjusts the layout of objects on a web page based on the width of the browser being used to view the page. The application is not simply for images, however, as it also offers means to filter the html objects appearing on a screen based on classes and other variables added to the connected html objects. We have used Isotope in the past to create image galleries for our digital collections [16], but this collection represented the first time we had attempted to implement Isotope’s filtering capabilities.
For the Latah County Oral History Collection, we wanted a user to be able to search and browse the interviews using keywords or locations in order to quickly discover those in which he/she was interested. To create these filterable objects, we again extracted the requisite information from our large XML file using a customized XSL file, structuring the information in each container to contain the interviewee, interview number, date of the interview, short synopsis, and a list of the assigned keywords and locations. We tried several different means of filtering before we decided that a search box best fit our purposes. This would allow a user to input any word they might think of to limit the selection of interviews presented. We also wanted to include suggested keywords and locations to guide the user’s browsing, as well as connect the keywords and locations listed for each interview to encourage discovery. To do this, we added additional jQuery code to enable the value of any “vocab” link to replace the value represented in the search box. This enabled us to utilize the search box function and use our keywords and locations to limit the interviews listed.
Figure 18. jQuery for filtering objects via replacing the value of the text box with the value of the “data-filter” attribute within a link (gist)
Once we had this function built, we added lists of suggested keywords to the side of the Isotope container, as well as a short introductory paragraph. At this point, we also wanted to enable a dynamically filtered list of interviews based on the incoming url. To address this issue, we added additional jQuery commands to extract any text after a hash symbol in the url. Upon the loading of the page, this extracted text was then inputted into the search box itself, filtering interviews based on the text entered. For instance, the url http://www.lib.uidaho.edu/digital/lcoh/index.html#railroads will filter the interview records displayed on the main page so that only those records that include the word “railroads” in their html will display. This development also enabled us to link all of our additional visualizations, including our locations map and subject tag clouds back to filtered front pages as well.
Figure 19. jQuery code allowing filtering based on hash substring.

Figure 20. Example of a filtered front page for interviews related to “murder”
In the end, this feature enabled a circular architecture for our web site, one in which almost all links in the collection lead back to a filtered homepage. We went with this feature because we wanted our users to be focused immediately and continuously upon discovering the interviews themselves, especially since the metadata available via OHMS on the interview pages themselves would further allow for deep investigation and speedy discovery of pertinent portions of the interview.[17]
Site Release and Next Steps
The Latah County Oral History Collection website officially launched in April 2015 with a public program open to the community. Over 80 people attended the informational event that featured the history of the collection, its new digital presence, and how students have already made use of the website through research. Latah County Historical Society announced that it received a grant to continue collecting oral histories from the county and encouraged people to sign up or refer family and friends. This partnership between the Latah County Historical Society and the University of Idaho will continue to ensure these future interviews will be preserved through the digital collection for future citizens and students to enjoy.
Notes
[1] Ritchie, D. 2011. Introduction: The evolution of oral history. In: Ritchie, D, editor. The Oxford handbook of oral history. Oxford: Oxford University Press. p. 12.
[2] Boyd, D. 2011. Achieving the promise of oral history in a digital age. In: Ritchie, D, editor. The Oxford handbook of oral history. Oxford: Oxford University Press. p. 291.
[3] Boyd, D. 2011. Achieving the promise of oral history in a digital age. In: Ritchie, D, editor. The Oxford handbook of oral history. Oxford: Oxford University Press. p. 295, 286.
[4] Hubbard, CR. 1957. Mineral resources of Latah County. Moscow (ID): Idaho Bureau of Mines and Geology. http://www.idahogeology.org/PDF/County_Reports_%28C%29/C-2.pdf, p. 1-2.
[5] Schrager, S. 1978. Guide to the Latah County, Idaho oral history collection. Moscow (ID). p. x.
[6] Schrager, S. 1978. Guide to the Latah County, Idaho oral history collection. Moscow (ID). p. xiii.
[7] This points to a national trend in digitization here that is often little acknowledged. So much of the metadata used in many digital collections across the US and abroad was gathered by the excellent librarians and volunteers that worked in the library and Special Collections and Archives departments of their respective libraries and archives years before any digital collections were born.
[8] Boyd, D. 2014. One bourbon, one wine, one beer: academic alcohol archives that document the cultural history of a community. Northwest Archivists Annual Conference; 2014 May 30; Spokane, Washington. http://northwestarchivistsinc.wildapricot.org/ConferenceSchedule2014.
[9] Boyd, D. 2013. OHMS: Enhancing access to oral history for free. Oral History Review; 40(1): 95–106. Available from: doi:10.1093/ohr/oht031.
[10] To use the tool, users first need to create an OHMS account through Kentucky by signing up for access.
[11] One thing to note about jPlayer: We initially were serving our MP3 files off of our CONTENTdm Server, which was an IIS Windows server. However, jPlayer had difficulty reading the length of the MP3s coming from this server, so we moved all the MP3s to our production web server. This cleared up the problem.
[12] Weig, E. 2014. Installing & Customizing the OHMS Viewer. http://www.oralhistoryonline.org/wp-content/uploads/2013/06/OHMS-Viewer-Installation-v3-2-13.pdf
[13] When we originally developed the metadata schema for this collection, we based it off of a basic Dublin Core schema we often used in our CONTENTdm system, then added these original fields to the collection.
[14] Wilton, J. 2011. Oral history in universities: from margins to mainstream. In: Ritchie, D, editor. The Oxford handbook of oral history. Oxford: Oxford University Press. p. 477.
[15] We use Google Fusion Tables to create our maps and TagCrowd.com to create our subject clouds, and we did the same for this collection, collecting latitude and longitude coordinates to add to our Google Fusion Table for each of the locations pertinent to Latah County and then cleaning and processing the lists of keywords and locations via TagCrowd.com’s interactive interface. For more information on this process, see previous work from the department, particularly, Devin Becker’s article “Each Item Its Own Time and Place: Using Google Fusion Tables and Simile Timeline to Map the Ott Historical Photograph Digital Collection” (COinS)
[16] See the University of Idaho’s Northwest Historical Postcards Collection: http://www.lib.uidaho.edu/digital/postcards/.
[17] As many who work with digital collections can guess, the development process for this website and digital collection was not the smooth, sequential process we present above. We present the narrative here as such, however, to expedite and assist others who might like to envision or apply the procedure. In reality, the metadata was being created at the same time as the interface, and so the complete website had to be overhauled several times throughout the process to include new metadata and additional information several times. Thankfully, having our XSL style sheets expedited the process of updating the collection each time new additions or revisions were added to the general XML files.
About the Authors
Devin Becker is the Digital Initiatives and Web Services Librarian at the University of Idaho. His first book of poetry, Shame | Shame, won the A. Poulin Jr. Poetry Prize and was recently released by BOA Editions, LLC.
Erin Passehl-Stoddart is the Head of Special Collections and Archives at the University of Idaho.

Subscribe to comments: For this article | For all articles
Leave a Reply