by Jill Strass
The Challenge
The tool we are describing came into existence as part of an effort to digitize, and make keyword-searchable, a student-written newspaper at a small college. The paper started in 1887 as a literary magazine, nearly standard-letter in size. The issues were bound into books. The plan was to scan the pages of the books, save them as TIFF files, and then upload them into a database. To do the upload, we needed to create a tab-delimited file in a very specific format for the database.
This specialized database (OCLC’s CONTENTdm) allows for the display of images and text. It also has a module that takes scanned text and makes it keyword searchable (OCR). The format of the spreadsheet instructs the database on the display of images in a digital-book format. This means that images of pages of text, like a printed book, are displayed in a specific order. When the user does a search, items appear in a hit list, and there is a finding aid that shows the user what issue and volume a page appeared in.
We selected our metadata for the project with the supposition that our users would wish to browse by date, issue, volume, and year. We also imagined they would like to be able to search by keyword. We opted for both Dublin Core and OAI-compliant metadata.
We had no programmers to assist us, and there were approximately 8000 pages we could digitize given the scanner we had. We had student labor for scanning, but didn’t wish to put the onus of creating metadata into student hands. We decided that we needed a single point of data entry, as this would increase the efficiency of workflow and reduce possibility for data-entry errors. We figured out that this single point of data entry could be the filename of the scanned image.
With the filename containing all our metadata, we needed to develop a way to generate metadata automatically from the filename. From the metadata generated from the filename, we needed to find a way to display metadata so it was automatically arranged into the OCLC-specified, non-MARC format.
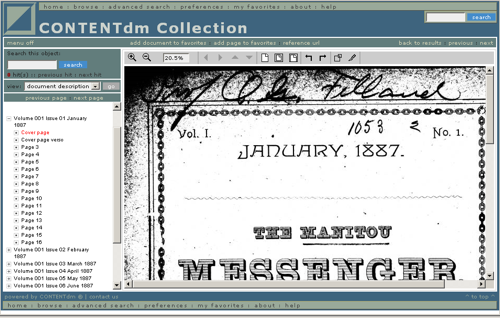
Here is the main browse page from Volume 1, Issue 1 of the Manitou Messenger:
A list of all issues of the newspaper can be selected from https://contentdm.stolaf.edu/cdm4/browse.php?CISOROOT=/mess.
The Tools
In a perfect world, we would have used a scripting tool to generate the specially formatted tab-delimited file that CONTENTdm demands for hierarchical documents. The only tool we had available — and had sufficient knowledge of — was Excel. Our choice was reinforced when, after sending out a plea on a listserv, Jane Cullinane and Glenn Sherman at the Connecticut State Library were kind enough to share their spreadsheet knowledge . They answered our plea for how to convert an encoded filename into a serials-type statement. By serials-type, we mean that the statement was translated from the encoded filename, into plain English to indicate the volume, issue, year, month, and page number. And their answer to the problem of how to generate metadata from an encoded filename was to use Excel.
The RIGHT/LEFT command was the crucial bit of knowledge we needed to extract values from filenames and generate all kinds of metadata from the filename.
What We Did
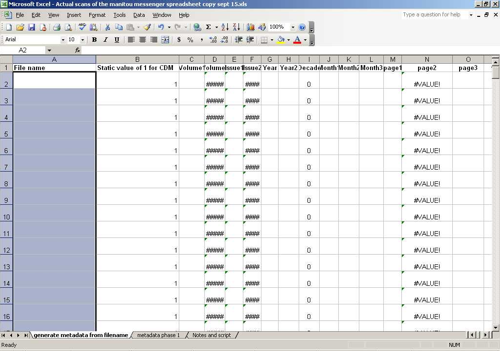
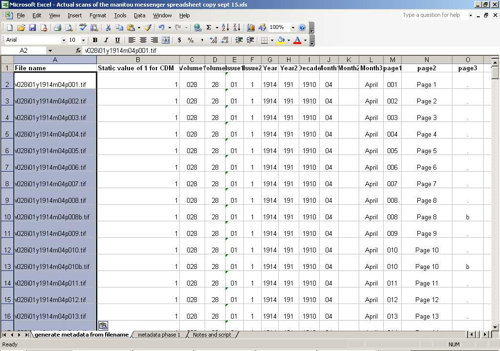
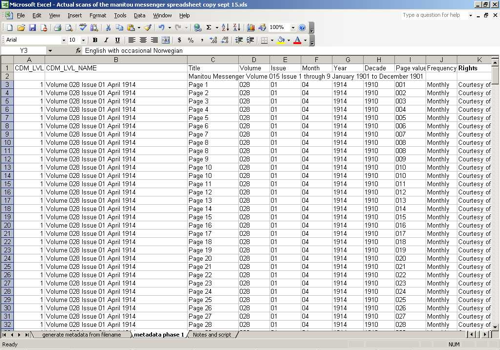
We decided to encode our metadata with each filename and extract the information from the filename into an Excel spreadsheet. The tool we made with Excel is a spreadsheet which has a bunch of formulas on one worksheet. On the second worksheet, the extracted data is rearranged into the correct format for upload into CONTENTdm. To generate actual metadata, the end-user only has to cut and paste a list of filenames into a column in the first worksheet, then cut and paste using the Paste Special command, and select Values only for pasting into a new spreadsheet. This final sheet is saved as a tab-delimited text file and uploaded into CONTENTdm. Screen shots below illustrate how the spreadsheet looks as it is in use.
Generating the Metadata with Excel: Extracting Values from the Metadata
Our file naming convention evolved into this:
v001i01m01y1901p001
This stands for Volume 1, Issue 1, January 1901, Page one.
Now comes the fun part. We needed a way to convert the information from the filename into fields that could be exported as metadata. The first step to doing this was to convert the information encoded in the filename into plain values. For example, v001 stands for Volume 1 or it could stand for 001, or 01, whatever we thought would be best for the format of the metadata.
To extract metadata from the encoded filename, we used the RIGHT/LEFT command. This allows you to tell the computer exactly which characters you want to take from a field. What we did was take parts of the filename, which represented bits of metadata, and extracted each bit into a separate field.
=RIGHT(LEFT(A2;4);3)
To figure out how this command is constructed, let’s go back to algebra and go into the parenthesis first. LEFT(A2;4) means that we go into cell A2, which is where we put our filenames. Then inside A2, we go to the far left of the cell. Then we take the first 4 characters, reading left to right, which would be v001. The rest of the command tells us to take the 4 chosen characters, and only take the 3 characters starting from the RIGHT to the left, which leaves us with 001. It is this value of 001 that is recorded in the spreadsheet and used as metadata to represent the volume number.
We repeated this process for all parts of the filename, so we had numerical values for:
- volume
- issue
- month
- year
- page number
Generating the Metadata with Excel: Generating Metadata from the Values We Extracted
We obtained the values from the filenames, which we could use as actual data. We also needed to express some of them in a way that would be useful for display purposes. One example is the title field. In CONTENTdm, this field is used as the top level for a book-like collection of images. We used the book-like configuration for the newspaper as it allows us to display by volume, issue and page.
When the newspapers are displayed online as volumes, we needed to show serial-like information so users would know which volume or issue they are accessing from a display list: we needed to express the title, volume, issue, month and year.
We used this command in Excel, which is entered by hand:
=”Manitou Messenger: Volume “&B2&”, Issue “&D2&”, “&K2&” “&F2&””
In this command, we were able to display the title, Manitou Messenger. This command allowed us to add the title information without data from the filename: the title itself is generated from text from the command itself. The quotation of text is combined with numerical data extracted from the filename. Using the &B2& command, we were able to take the volume information from cell B2 and display it, same with Issue, Month and Year. We strung all these values together in the command above, which allowed us to generate a title to represent the newspaper at the issue level in an online environment.
Other Tricks for Generating Values
Getting a textual name for a month to display
To get the name of the month to display from the m02 (month is February), we used the scheme from the aforementioned Connecticut State Library spreadsheet, which consists of an IF statement:
=IF(I65=”01″;”January”;IF(I65=”02″;”February”;IF(I65=”03″;”March”;IF(I65=”04″;”April”;IF(I65=”05″;”May”;IF(I65=”06″;”June”;J65))))))
This statement (which divides the year in half, the rest of the year appears in a separate formula) takes the value, which we have extracted from the filename into separate fields, and then assigns the textual name based on the value in the field for month.
Getting an original publication date field (YYYY-MM) to display:
Take the value for the year and month and display in a single field with a hyphen to separate them.
=G2&”-“&J2
Getting to display the decade for an object
Take the year field, only display the first three characters from the year, and add a zero at the end of the field.
=””&G120&”0″
Generating the tab-delimited file
We generated metadata by pasting a list of filenames into fields which then populated all the fields we needed for metadata. This happened as the filenames were transformed by formulas using the RIGHT/LEFT command and the aforementioned tricks for stringing together text, characters and extracted metadata. See figures 1, 2, and 3 above for a visual on how this worked.
When we had irregular numbering and oddities, we had to hand-edit the metadata. This was done during the QA process when proofing image filenames. Proofing the filenames was easier than we anticipated; mis-named files revealed themselves as we generated metadata. It was very easy to see where there were inconsistencies when the filenames were translated into numerical fields.
We generate a tab-delimited file from the spreadsheet by taking the filenames of images, copying and pasting them into a column of the spreadsheet, and then selecting a worksheet within the spreadsheet which contains the manipulated raw data which has been rearranged to suit the needs of the tab-delimited file. The worksheet is then copied and the paste-special command is used to paste values-only into a new spreadsheet. The new spreadsheet is saved as a .txt file, in a tab-delimited format. We use this .txt file to upload metadata and filename info into CONTENTdm.
CONTENTdm then takes the tab-delimited file, generates an index, and links between images and text, and creates a flat-file database that allows users to see images and text together or just plain text. CONTENTdm also has an OCR function, that takes a .tiff file and converts it into a keyword-searchable file. In our case, we used Excel to generate the tab-delimited file used for book-like documents (hierarchical). This format allows for images to be bundled together so “pages” follow each other in sequence when browsing, and groups of pages are linked together to give a searcher context when selecting pages out of a hit list from a search.
Possible Improvements
This process could have been more elegantly handled with any scripting language. One of the things that needed automation was the numbering scheme for when special pages appeared that didn’t get ordinary page numbers, like the table of contents, advertisements, plates (fancy pictures) and other irregular paging. The naming scheme for these pages was irregular due to the complexities of the pages themselves and to human error. It would have been nice to automate this aspect of page naming, but we couldn’t find an elegant way to do so, and so special page-naming issues were done by hand, albeit they were easy to identify as the scanning folks were instructed to give them letters after the page number, which tipped off whomever was data-wrangling.
Another issue that might be problematic in other computing environs is our file-naming convention. Since the filenames are more than 8 characters long, they might present problems on different platforms and servers. At the moment, all we are using is a Windows environment, but it is something to consider if you have a multi-platform situation.
Future Applications
This tool will enable you to generate metadata from any digital object. We have used a filename as the point of encoding, but it could be a unique ID or any field. The encoding for this project was to reflect serial-like information – (title is given elsewhere in the metadata), issue, date, page number, but this method can be used for any situation where you have an object that has different facets that you’d like to express as potential access points for a search or browse function. It can also be used to generate metadata for any purpose.
Summary
- We were able to get by without a programmer and generate metadata for over 8000 images, using one person, on the fly.
- This technique can be used for any set of data where the data is highly patterned and represents anything that can be expressed numerically.
- It uses the RIGHT/LEFT command in Excel, or any spreadsheet, to extract specific parts of a filename and expresses that part as a numerical value.
- It uses different ways of stringing data and text together for creating online display information.
- The results were converted into a tab-delimited file and used to batch-upload text and images into a database.
And it all started with the kindness of strangers, Jane Cullinane and Glenn Sherman.
About the Author
Jill Strass has been in computing and libraries for 15 years. She’s worked in corporate, public, and academic libraries as a reference, cataloging and tinkering librarian. She’s managed projects involving the transference of print to online platforms. She’s developed and applied taxonomies. She’s worked with databases on both ends (both querying and building) and is especially interested in how systems fit together.
Visit the Manitou Messenger, a student newspaper for St. Olaf College. It’s still fresh out of the CONTENTdm box and is not a finished product. Jill wrangled with metadata standards and CONTENTdm to figure out how to get the newspaper online. She then created a tool to generate the metadata, supervised the scanning, and uploaded the records.
Author email: jillmeister@hotmail.com


Jennifer Parsons, 2008-12-29
First of all, I enjoyed this article a great deal– thank you.
Secondly, I wonder if something like the metadata harvesting-and-parsing technique used here could be employed to help library and archival students better understand metadata. Using a familiar program like Excel can help ease people into the idea of how it is created, used, and reused. Otherwise, too often metadata can be seen as a “black box”– a mysterious, hypertechnical discipline that is only peripherally related to what a librarian does.
Monica Rivero, 2009-02-19
These are great tips. We use excel for data processing quite a bit as well. I find it very flexible especially for processes that are somewhat manual or ad hoc in nature and when a full script would be overkill. As an example of excel’s diversity, another way do to parse out data is to use the Data>Text to Columns or use the vLookup formula to match up designated values for your parsed data.
Enjoyed reading it!
Andrew Marlow, 2009-02-22
What you have done is very interesting. It confirms my belief that there is a desperate need to amend the metadata standards such as dublin core so that collections can be organised by journal, volume, issue and article.
Furthermore, this organisation is for the collections own sake whether or not there are any citations. In the few cases I have found where others have expressed this need the metadata is unfortnately expressed as citation data. I think journals, volumes, issues and articles are independent of citation.