By Brandon Patterson, Ben Engel, and Willis Holle
How It Started
In early 2020, hospitals were close to the end of their supply of Personal Protective Equipment (PPE) due to COVID-19 and healthcare workers ran the risk of being exposed to the virus without proper protection. The J. Willard Marriott Library and Spencer S. Eccles Health Sciences Library at the University of Utah sprung into action and provided access to several dozen 3D printers that could print face shields, mask ear protector, Powered Air Purifying Respirator (PAPR) hoods, and various lab equipment. Before COVID-19, these printers were used by students and library workers who used a flashdrive to complete printing projects. In doing repetitive 3D prints during the national lockdown, we decided we could automate this process. A lead developer went to work creating a system where a file could be uploaded to a form, checked for errors or bugs, and trigger the print automatically. We officially launched this service in fall semester 2021 after some debugging and test runs with the code. The automated system was well-received by students, staff and faculty. It also provided additional benefits to the library including all-hours access to printing, decreased dependence on staff, and decreased filament waste and costs.
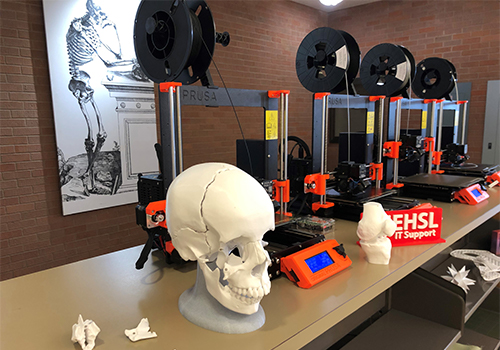
The libraries have a fleet of Prusa i3 MK3S+ using 1.75mm PLA+ filament (Image 1). They are housed in locations where trained staff can unload prints and reset printers for the automated system to begin again. Technology has been purchased through student computing fees and staff support is provided through library funds. In addition to the Prusa machines performing automated prints, the Marriott Library also has Lulzbot TAZ 6 and Gigabot 3+ machines that are reserved for hands-on printing only. The service has seen hundreds of prints since its inception.
Image 1: Prusa printer automated 3D printer “farm” along with printed anatomy pieces like “Yorick the Skull”.
Technical Guide
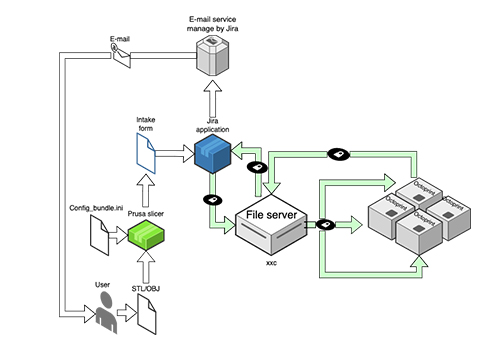
 Figure 1: Flowchart representing the steps to getting a 3D object printed automatically
A visual overview of our 3D printing process is referenced via the flowchart above (Figure 1). It begins when a user creates a 3D model (STL/OBJ) file, using the PrusaSlicer with a downloaded configuration file, then the G-code file gets submitted to an intake form we had created. This intake form then opens in a ticketing system (we use Jira) with accompanying files and information. The file server then accesses Jira via their API and downloads all of the uploaded G-code files. Once the files have been downloaded, an Octoprint API sends the files to the printer. The system monitors the printers over that Octoprint API and updates Jira as needed. When a print is downloaded, started, or finished, Jira is updated and notifies the user through email of their updated print status.
Everything related to 3D printing always starts with a model, these 3D files need to be translated via a slicer into something the 3D printer can read and re-create, and our system is no different. We require our users to use a program called PrusaSlicer. We use PrusaSlicer because of its easy integration with our system. It lets us distribute config bundles to every user who wants to use our system, these config bundles are very important to the health and safety of our printer farm. We limit use to only PLA plastic as the default support material, provide a cost per gram, and most importantly, a start and end G-code is added to every print. These special parts of G-code are critical to the function of this system. A “M0” command is placed just above the last line of the end G-code so that when a print is completed the printer will wait for user input. This will hold the printer out of the ready printers until the previous print has been removed and the knob on the printer clicked by a person to confirm everything was printed correctly.
Once a user is ready to submit their new G-code file they will go to the intake form and upload their file. This intake form can hold a myriad of information, for example we ask what their university affiliation is, if they have a class key, or what printer they are planning on printing the part on. This intake form can be created in a number of different ways, such as a Google form, but we decided to go with a Jira ticketing system as that is what our library uses currently to track similar projects. Once the user submits the form it creates a ticket in the Jira project that was set up for us. If not using Jira, this part will be a bit different but the same ideas will hold.
Now that a file is uploaded to a service that is accessible, an API is used to read the list of open tickets and download the G-code files. In our case we had an issue where Jira would only let us accept files up to 25MB which prompted us to allow users to paste a Google Drive link into the description box and the code allows it to be downloaded just the same. The goal here is to get G-code files into a folder on the machine running our code. In our case we rename the files to the ID number of the ticket it is associated with. This lets us do a few ticket updates later on and keeps project anonymity of the user.
The server now has a folder full of files, these files need to be put onto an open printer, so via the API, each printer is made to check its printing status. Once a print comes back as open, the server will post the G-code file to that printer and tell it to start printing. Because we saved the ticket ID number in the file name of the G-code, we can read that and update the ticket so that the user is notified that their print has started. The server will continue to do this process for every file it has downloaded. If no printer is stated as open it will try again in a fixed interval until an open printer is found.
A printer is marked as open once the M0 command is cleared. M0 is the G-code we placed in the “End G-code” section of the config file. It will wait for user input and then continue the print. If a person does not clear the M0 command by pressing the knob on the printer, Octoprint will report a progress of 99.99% complete and the print will not be marked as finished unless the knob is pressed. This process was put in place so as to not start a new print while an old one is still in place on the platform. This is critical to get right regardless of what system is being used. By default, Octoprint blocks the M0 command and replaces it with a pause. If a pause is not put in place, it would require a login to the printer’s Octoprint instead of a visual confirmation by a person, to mark the print as complete, which is not recommended. When setting up Octoprint for each printer, settings must be changed to remove any mention of blocking or re-mapping the M0 command. Once the printer gets that last command cleared it will trigger another API call to Jira, updating the ticket status to complete, and posting a comment for the user to either pay for their print or give a location for pickup.
Some additional things have been built into our system that are of note. We have made a number of config files so that everything can be changed and more modular. We used Flask, a micro-web framework written in Python, to make a web UI for monitoring and editing the printers live using web sockets, and have included docker compose files to get a virtual print farm going in just a few minutes after testing for debugging.
A link to our Github project can be found here https://github.com/benbeezy/octofarmJira. Note that we are using Jira and it is heavily integrated into our repository as of right now. The goal is to continue work on this project and make it more platform agnostic.
Helping Users and Getting the Word Out
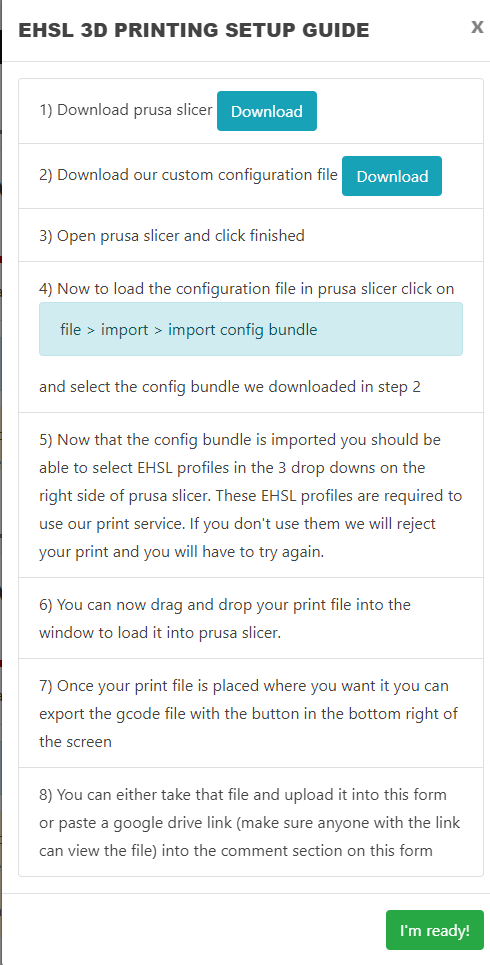
To assist users in utilizing the printer farm, a short guide was created and posted on the intake form (Figure 2). This guide runs each user through downloading the PrusaSlicer software, as well as the specialized config bundle required to use our service. Despite being quite short, this tutorial appears to function exactly as desired and has helped to maintain a very low print failure ratio. For users needing a more in depth guide, a short Youtube video was created that runs users through each step of using the print service and also serves as a brief introduction to operating within the PrusaSlicer software. In addition, to help with any questions that users might have, staff are available for one-on-one consultations.

Figure 2. Setup guide for new users
A key benefit of this software is the ease of expansion and adoption. Given how the printer farm software has been developed, expansion is as simple as adding a new printer IP and an API key to the config file. This ease of expansion has allowed the J. Willard Marriott Library, another library on the University of Utah campus, to adopt this software for their 20+ printers. This serves to show both that adopting the software can be done and in a short time frame, as well as proof that printer farms of dramatically different sizes can use the software without any substantive work required.
To raise awareness of the capability of the automated 3D printing process on campus, a TV display board was installed within the library advertising the libraries printers as well as a QR code leading to the intake form. In addition, multiple emails were sent to the library’s emailing list with information regarding the print farm. Several people have also heard about it through word of mouth. We are currently working with several departments on campus, including the Health Sciences Simulation Center, to continually print replacement parts for their equipment. After several months, we’ve increased the usage and awareness of the library’s automated 3D printing farm.
Conclusion
Overall, automating the 3D printing process at the library has streamlined our 3D printing process. It has made our work in the library more efficient and cost effective. It is more efficient because anyone can start a print at any day and time and we lessen the chance of failed prints simply because less people touch the printers and potentially break them. It is more cost effective because we don’t need to pay staff to start, stop and check on machines as often. There is a downside to all 3D printing automation though because novices may be apprehensive to go online and start a print themselves in preference of physical assistance. There is also less opportunity for an interested patron to learn about the mechanics of a 3D printing machine. Because of this, the library has 3D printers set aside, beside the ones used for automation, for students that would like a more hands-on approach to their learning.
To further improve upon our automation process, we’re interested in making it ticket system agnostic so that we don’t need to rely on Jira, Google Forms or other ways to direct it onto the request. We’re currently working on an update status feature that can automate responses with percentage complete, photos, and other useful information for users that have questions about the status of their prints. Finally, we have one of our libraries that charges for filament to print and we are trying to automate this to charge a user the weight of the filament based on volume x density x cost per gram.
For those looking to start their own 3D printing automation service, here are a few best practices:
- This service doesn’t need to cost extra, use existing equipment.
- Before deciding if this service is right for your library, get stakeholders together (i.e. library staff, patrons that use 3D printing, IT assistance, and others) and have a discussion about whether an automated or part-automated 3D printing service would make sense.
- It is essential to have a good programmer who knows Python. Students may be able to serve in this role. The GitHub in this article can be a great resource and we encourage suggestions to make the code better.
- If your library already has a ticketing system, like Jira, ensure that whoever controls that is onboard. You can also create your own, like through Google Forms, you’ll just need to do a little more coding to sync it properly to talk to the 3D printers.
- You don’t have to go all in. It’s nice to start small, maybe having only a few printers automated. Nevertheless, it’s recommended to always have some spare 3D printers available that aren’t part of the automated “farm” that can be tinkered with (although we found it surprising how many users converted to the automated system after we made it available).
Acknowledgements
Special thanks to the 3D printing team at the J. Willard Marriott Library at the University of Utah: TJ Ferrill, Matt Elliott, Erika Church and Sebastian Jenson.
About the Authors”
Brandon Patterson is the Technology Engagement Librarian at the Eccles Health Sciences Library at the University of Utah. He connects students, staff, and faculty to digital tools and emerging technologies and creates meaningful experiences using prototyping tools, virtual reality, and online learning platforms. He is an health sciences education liaison and coordinates with faculty to incorporate information literacy instruction and technology into their classrooms.
Ben Engel is the technical lead on many projects associated with 3D printing and VR at the Eccles Health Sciences Library. He leads the effort in managing, programming, and navigating equipment and software in these areas. Some highlights include leading development teams to build out four (4) different modules for the School of Dentistry, Department of Surgery, Ophthalmology, and the National Library of Medicine. He’s also created a custom automation system to assist with 3D printing.
Willis Holle is the XR student intern at the Eccles Health Sciences Library at the University of Utah. He assists in 3D printing and XR projects related to health sciences education and is currently studying physics, with an emphasis on condensed matter.


Subscribe to comments: For this article | For all articles
Leave a Reply