by Bryan Elias Hull and Brandon Patterson
Introduction
As audio and video projects increase in demand to meet growing multimedia-centered teaching and learning, libraries adapt to create spaces where these projects can be facilitated. The Spencer S. Eccles Health Sciences Library (Eccles Library) at the University of Utah has seen an increase in demand for multimedia projects because of a push for faculty to create flipped classroom videos, staff to create videos for their workplace, and students making introductory videos for medical school applications (Patterson, et al, 2018) [1]. A technology team at the Eccles Library was tasked with creating a low-cost, DIY multimedia studio space to meet the demand of our patrons. The following article describes the four phases for developing a multimedia space from scratch and include a narrative that may be helpful when considering developing a similar multimedia studio space in your library.
Phase 1
In late 2016, the library began investigating multimedia options for a growing number of faculty requesting audio and video equipment to record lectures for use in their classrooms. The initial scope of the project was to create a mobile audio/visual station that could be checked out as a set for students, faculty, and staff to use at their own workstations or other remote locations. The idea was to allow patrons to record higher quality video for lectures and other video projects with different microphones, headphones, an audio interface, iPad/Apple Pencil, and an iMac computer. Originally, the project was called the Multimedia Design & Innovation Lab or “MDIL” for short (Figure 1).
Due to space limitations within the Eccles Library, the initial request was to make as mobile friendly of an equipment setup as possible. As MDIL started forming and feedback from patrons signified a preference toward a dedicated studio, it became evident that a space would need to be acquired that could serve as the central location to house the equipment.
To obtain additional equipment and software for a dedicated studio space, the technology team sought funding from the campus Teaching and Learning Portfolio (TLP); a University Information Technology Committee that distributes funds collected through a Student Computing Fee (Table 1; Patterson, et al, 2018).
| ITEMS | QUANTITY | PRICE |
| iMac 27 Inch Retina 5K Display Fusion 8GB | 1 | $1,899.00 |
| Blue Nessie – Adaptive USB Microphone | 1 | $80.00 |
| Sony MDRV6 Studio Monitor Headphones with CCAW Voice Coil | 1 | $110.00 |
| Focusrite Scarlett 2i2 Audio Interface | 2 | $149.00 ea. |
| Sennheiser ew 112-p G3 Camera-Mount Wireless Microphone System with ME2 Lavalier Mic – A (516-558 MHz) | 1 | $630.00 |
| Dracast LED500 Pro Bi-Color LED Light | 1 | $500.00 |
| Apple iPad Pro with Pencil | 1 | $880.00 |
| Cables & Adapters | Multiple | $200.00 |
| TOTAL | $4,597.00 |
The library’s technology team also provided equipment already in the library including: a Sennheiser shotgun microphone, GoPro cameras, and Adobe Creative Cloud software that exists through software agreements with the University.
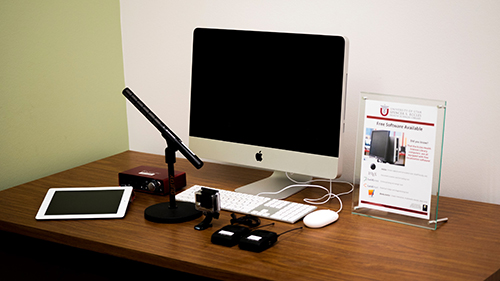
Figure 1. Initial equipment for the Multimedia Design and Innovation Lab
Items for the MDIL were chosen for various reasons based on price, quality, and how user friendly they were (Table 2). The selection of equipment and software was specifically chosen with a few different scenarios in mind:
- Higher quality lecture captures
- Podcast recording
- Mobile video recording
- Student video projects
- Educational support staff projects
| ITEMS | RATIONALE |
| iMac 27 Inch Retina 5K Display Fusion 8GB |
The iMac was chosen for a few specific reasons:
|
| Blue Nessie – Adaptive USB Microphone | The Blue Nessie connects directly to any computer via USB providing a simple option for recording audio, allowing better sounding recordings than typical webcam or internal computer microphones. |
| Sony MDRV6 Studio Monitor Headphones with CCAW Voice Coil | Having a good pair of headphones is important for editing, previewing audio while recording, and being able to critically listen to recordings. The Sony MDRV6 are highly rated on most web shops and reasonably priced. |
| Focusrite Scarlett 2i2 Audio Interface | The Focusrite Scarlett 2i2 allows for professional microphones to be used with a computer seamlessly. The device acts as an audio interface where microphones can be plugged in with either XLR or ¼” inch cables, phantom power provided to microphones that require 48V of power, and gain adjustment on the microphones. There is also a port for headphones that allows you to preview the audio that is coming through the microphones and the ability to connect studio monitors (speakers) to the device. There are several Focusrite Scarlett options with more inputs and other features available. |
| Sennheiser ew 112-p G3 Camera-Mount Wireless Microphone System with ME2 Lavalier Mic – A (516-558 MHz) | Having a lapel microphone is helpful for mobile recordings, lectures where the presenter is the primary focus, and other creative video projects. This Sennheiser lapel microphone pack includes the microphone & transmitter as well as a smaller, more streamlined receiver unit that is easier for mobile applications than a traditional receiver unit. The downside is that all of the equipment utilizes AA batteries that are an additional cost and concern when checking out equipment. |
| Dracast LED500 Pro Bi-Color LED Light | Good lighting is sometimes the difference between a poor quality video and a more professional product. Having a flexible, adjustable, and mobile LED studio light allows for patrons to add an extra level of quality to their recordings. This panel includes brightness and color temperature controls to allow for dialing in the warmth or coolness of the light and the brightness. |
| Apple iPad Pro with Pencil | The iPad contains a decent camera for video recording and can be paired with video editing apps. The device can also be used as a teleprompter through apps. The iPad and the Apple Pencil further expands the capabilities for demonstration, display, and markup depending on the project. |
| Cables & Adapters | The request included a general figure for cables & adapters for the inevitable forgotten cable, adapter, or small item that would be necessary for everything to function properly. Instead of itemizing based on every cable, the team was able to request a general figure for flexibility and the ability to purchase throughout the fiscal year. |
After equipment was purchased in summer 2017, the library created a workstation within an existing Macintosh computer lab that would accommodate the MDIL. Equipment was checked out and used in the space through the iMac computer purchased for the MDIL. Many of the projects for the initial lab setup revolved around audio recording and podcasting. Several student video projects used the space for curriculum and non-curriculum applications.
Phase Two
The second phase of the MDIL saw two primary developments. First, the Macintosh lab was moved to the public computing area of the library in order to dedicate the space entirely to the MDIL. Second, additional equipment was repurposed by the library in order to facilitate more elaborate audio/visual projects (Table 3).
Computer lab to multimedia studio
A 16 x 12 foot room that was originally a dedicated Macintosh computer lab was repurposed to be a dedicated studio space for the MDIL equipment. This allowed for a better controlled working environment for those requesting audio and video support. After approval was obtained by library leadership, the Macintosh computer lab was moved to a public computing space in a different area of the library. After the migration, the team began setting up the space to be a dedicated, self-service multimedia studio (Figure 2).
Round two of equipment acquisitions
Before making a request for more student computing fees, the library’s technology team examined existing library equipment and items that could be purchased through university surplus. This was done to bolster the multimedia lab without going through a lengthy budget request process and to avoid relying on external funding entirely to obtain the dedicated studio.
| Canon Vixia HRF200 HD Video Camera | The library had a pool of camcorders available for checkout. One camera was taken out of circulation to act as the dedicated camcorder in the new studio space. |
| Magnus VT-4000 Tripod | Similarly, tripods were also available for checkout. One was taken out of circulation to be dedicated to the new studio. |
| Elgato HDMI Capture Device | In order to enable recording directly to the desktop, the library repurposed an HDMI capture device originally used for lecture captures to instead act as the recorder for the MDIL. This peripheral device came with its own software “Game Capture HD” that allowed for recording of video and live streaming directly from the camera. |
| Rode Shotgun Microphone | Another shotgun microphone from the library’s equipment pool was included in order to have two shotgun microphones available for simultaneous recording. Especially useful for interviews and podcasts. |
| Sennheiser EW 100 G3 Wireless Lapel Microphones (x2) | To bring the total number of available microphones to four, two wireless lapel microphones, transmitters, and receivers were added to the space in order to allow greater flexibility for recording audio. Lapel microphones are wireless and easy to hide, making them a better choice for recording video than the shotgun microphones. |
| Various cables & adapters as necessary | In order to make sure all the equipment worked, the following cables were also repurposed to the space:
|
| Halogen studio lights | The library acquired two halogen studio lights from the University of Utah Surplus Store that were left by another department to bolster the studio space at minimal cost. |
Initial room setup
All but one desk and two chairs were cleared from the old Macintosh lab to create the new space. A cabinet with locking doors houses equipment that was not in use. The door to the room was kept locked providing additional security to the camera, computer, and lights within the space.
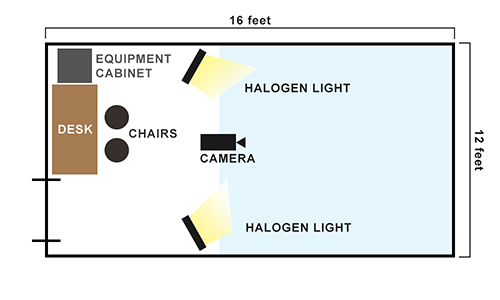
Figure 2. Initial room setup of the MDIL.
The room was set up with a large recording area with the intention of making it flexible for different scenarios (note the light blue area in Figure 2). The “recording space” gave patrons the option to bring in various pieces of furniture from the library depending on the project. This proved to be especially useful as users brought in more comfortable seating for longer on-microphone discussions. The space did not include a backdrop, initially, and used the wall in the space instead which sufficed for most projects.
Initial equipment setup
To continue providing maximum flexibility for patrons, the equipment was configured to facilitate audio, video, and other tasks to be completed simultaneously or individually. The two peripheral devices—the Focusrite Scarlett 2i2 and the Elgato HDMI Capture—served as the inputs for the audio and video feeds respectively. The camera’s HDMI output would be connected to the Elgato device via an HDMI mini to HDMI cable. The shotgun (see Figure 3) or the wireless lapel microphones (see Figure 4) could then be connected to the Focusrite Scarlett 2i2 via XLR cables. This configuration became a limiting factor because the Focusrite Scarlett 2i2 has two inputs allowing for only two microphones to be used at any given time. As we’ll discuss later, a peripheral audio device such as a Focusrite Scarlett 2i4, that has at minimum 4 inputs, is recommended to accommodate multiple microphone configurations. The Blue Nessie USB microphone and the Sony MDRV6 headphones were available in the equipment cabinet. We discovered that the option of letting users configure and plug in microphones themselves was more confusing than it was helpful. This resulted in a less hands-on audio configuration in a future phase saving library staff time spent with patrons troubleshooting audio.
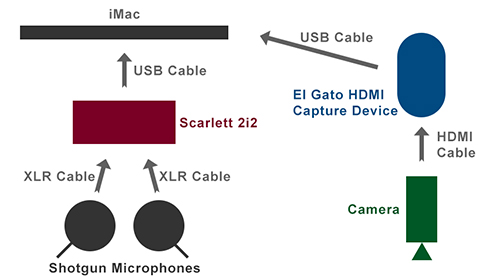
Figure 3. Equipment setup with camera and shotgun microphones.
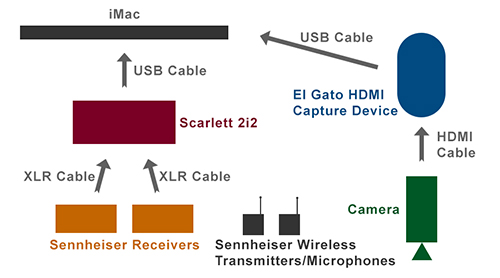
Figure 4. Equipment setup with camera and wireless lapel microphones.
Initial software setup
The iMac was updated to the latest version of Mac OSX and the library’s IT department set up the computer to be network-login enabled. This allowed users with a valid University ID and password to login to the computer with their credentials, instead of using a single user account on the computer. Network login also gave patrons greater privacy for their projects, a necessity in the academic health sciences setting because of laws protecting patient and student information (HIPAA, FERPA, etc.). However, the network login option presented a challenge because user accounts are wiped from the computer after several days. To address this, additional documentation and warnings were placed throughout the space to inform users that they must save their work to a cloud storage service, USB thumb drive, or an external hard drive.
The following software was then installed on the iMac (descriptions provided under “Software Used” heading below):
- Adobe Creative Cloud Suite including:
- Premiere Pro
- After Effects
- Photoshop
- Illustrator
- Audition
- Adobe Captivate (Separate from Creative Cloud)
- Elgato Game Capture HD
- Kaltura Capture Space
- GarageBand
- iMovie
- Quicktime
To ensure that every user had properly installed equipment drivers, the library’s IT group configured network login accounts to have the following basics prepared to minimize any errors or troubleshooting:
- Making the Focusrite Scarlett 2i2 the default audio input device on the iMac. In the System Preferences in the Mac OS, “Sound” is selected with the input device switched to “Scarlett 2i2” as the default. The output remained as the internal iMac speakers, in anticipation that most users would want to hear audio through the computer speakers and would naturally gravitate towards the iMac’s volume controls on the keyboard instead of the Focusrite Scarlett.
- Shortcuts to the LibGuide for the MDIL, the University’s cloud storage system “uBox,” and the University’s video hosting platform “Mediaspace” were added to the desktop.
- Program defaults were made to always utilize the Focusrite Scarlett 2i2 as the audio driver, and the Elgato Game Capture device as the video source.
The software Elgato Game Capture HD was used for video recording because it was the proprietary software of the Elgato HDMI Capture device. The primary function of the software is to record any video source that had an HDMI output such as a camcorder, video game console, or other source. Additionally, the software had a “live stream” option allowing users to livestream their video on various social platforms, live stream platforms, or anything that accepted the Real-Time Messaging Protocol (RTMP).

Figure 5. Screenshot of the Elgato Game Capture software interface.
One advantage of the Elgato software was that it separated the audio from the Focusrite Scarlett 2i2 (shown as “Live Commentary” in figure 5) and the audio coming from the HDMI capture device (shown as “Game Audio” in figure 5.) This meant that microphones plugged into the Focusrite Scarlett could be recorded instead of the audio coming from the internal camera microphone that is fed into the HDMI capture device. This is achieved by muting the “Game Audio” and selecting the “Commentary” button (shown in blue in figure 5), allowing for better sound quality than the internal camera microphone.
Audio recording was achieved primarily through GarageBand or Adobe Audition depending on the user, their skill, and experience levels. With the audio inputs already set up in the System Preferences, the studio was largely “plug and play” where users select which microphones they wished to use and plugged the XLR cables into the Focusrite Scarlett 2i2 and started recording.
Instructional how-to’s
A series of instructional how-to documents and supplemental videos were developed to help users utilize the space without having a dedicated staff person present at all times. The documents & videos outlined the step-by-step procedure for the most popular uses of the space including: video recording with Game Capture HD software, audio & podcast recording with Adobe Audition or GarageBand, lecture & screen capture using Kaltura Capture Space, and how to livestream with Game Capture HD. Each document was printed and placed next to the iMac computer for easy access to users. The documents and videos were also available in a dedicated LibGuide that was linked to on the desktop. Finally, a poster with the general guidelines and rules of using the space was displayed prominently behind the iMac and desk.
Policy & procedure
The space was made available for reservation by either emailing the library’s reference email list or speaking to the library desk staff in-person. If the space was not in use or reserved, patrons had the option to “drop-in” and use the space by speaking to the library desk staff. Once a reservation or request was made, patrons would be let into the space by the desk staff. The patron would be required to sign an agreement prior to using the space stipulating that they held responsibility for not stealing, losing, breaking, or otherwise misusing the space. Once a patron was finished with their allotted time in the space, they would be required to “check-out” with the library desk staff to ensure that all equipment was present and undamaged.
The amount of equipment in the space required that the door to the studio space remained locked at all times. The equipment cabinet in the space had the ability to lock, but the decision was made to leave it unlocked with the assumption that the door into the space was locked at all times.
Posters were put up in the room with the guidelines and rules, including a large poster with images and labels listing the equipment for easy reference for both staff checking the space for accuracy and library patrons not familiar with the devices or cables.
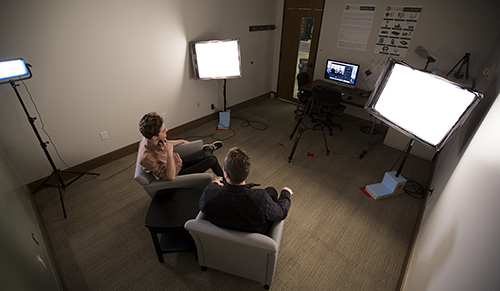
Figure 6. The Media Design & Innovation Lab pictured in December 2017.
Phase Three
The latest development phase focused on converting the space to a “One Button Studio” (OBS) and further expanding the capabilities of the equipment while trying to simplify the recording process for all users. To kick off this transition, the library’s technology team rebranded the space from the “Media Design & Innovation Lab” to the “Tree of Hippocrates Education Studio,” or “THE Studio” for short (see Figure 7). The name was inspired by an offspring of the original “Tree of Hippocrates” that is planted outside of the library and the memorable “THE” acronym.
![]()
Figure 7. Logo for the Tree of Hippocrates Education Studio.
Equipment requests
Similarly to the first phase of development, the library’s technology team sought equipment funding for multimedia equipment and software from the campus Teaching and Learning Portfolio (Table 4).
The primary focus of this equipment request was to:
- Obtain equipment necessary to utilize Penn State’s One Button Studio software
- Allow for the use of a teleprompter
- Slim down the lighting set-up with compact LED light panels
- Provide some sound proofing of the space with sound treatment foam
- Bolster the audio recording capabilities with a mix board
- Add a backdrop to make video recordings more professional and visually appealing
| ITEMS | QUANTITY | COST |
| Auralex Studiofoam Wedgies (Charcoal Gray, 24-Pack) | 1 | $103.00 |
| Rode WSVM Shotgun Windscreen | 1 | $9.00 |
| Rode Dead Cat Wind Muff | 1 | $30.00 |
| Sony FDR-AX100 4K Ultra HD Camcorder | 1 | $1,400.00 |
| MagiCue Mobile Teleprompter Kit with Hard Case | 1 | $360.00 |
| ikan ELITE-REMOTE Bluetooth iPad Teleprompter Remote | 1 | $73.00 |
| Behringer XENYX 802 8-Channel Compact Audio Mixer | 1 | $60.00 |
| SD Cards | 4 | $160.00 |
| Impact Crushed Muslin Background Gray | 1 | $53.00 |
| Impact Background System Kit with 10’x12′ Black, White, Chroma Green Muslins | 1 | $219.00 |
| Blackmagic Design H.264 PRO Recorder | 1 | $428.00 |
| Dracast LED500 S-Series Bi-Color LED 3-Light Kit with V-Mount Battery Plates | 1 | $479.00 |
| Button – Griffin Technology PowerMate Assignable USB Multimedia Controller | 1 | $45.00 |
| Anker 4-port USB 3.0 hub | 1 | $20.00 |
| Cables & adapters | Several | $250.00 |
| Total | $3,689.00 |
Once the approval was granted to the library’s technology team, the equipment was purchased and delivered to the library. In anticipation of the transition to the new “One Button Studio,” the space was closed for a two-week period during the summer semester.
Initial room setup
The desk, equipment cabinet, and the camera remained in the same location as the previous development phase. The older halogen studio lights were removed and replaced with newer LED lights. A backdrop was also added to the space as shown in figure 8.
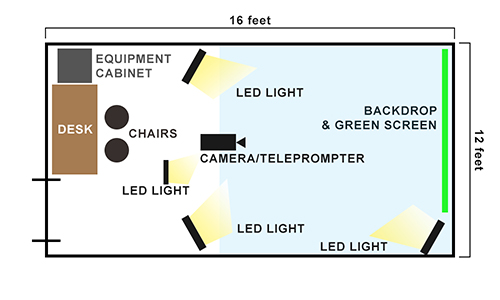
Figure 8. Initial room setup of THE Studio.
To better soundproof the room, Auralex studio foam wedges were purchased and installed in the room by a library colleague with an audio production background. The box of 24 wedges was enough to create two 12-wedge blocks located in line with the camera as pictured in figure 9. While a good start for dampening some of the sound reflections in the room, at least 4 times as many wedges are needed to create soundproofing blocks on all four of the walls. The purchase of bass traps that fit in the corner between walls and the ceiling or floor are also desired for additional treatment of the room.

Figure 9. Teleprompter, camera, LED light panels, and backdrop are pictured in THE Studio, December 2018.
Initial equipment setup
To transform the room into a one-button studio, notable adjustments were made. First, all four of the microphones in the studio were routed through a mix board so that they could be recorded simultaneously through the Focusrite Scarlett 2i2 (See Figure 10). The original idea was to run the microphone audio from the mix board into the camera for the One Button Studio. We soon abandoned this idea because this approach resulted in the multiple microphones being sent to a single stereo output, making multitrack recording in Adobe Audition or GarageBand impossible.
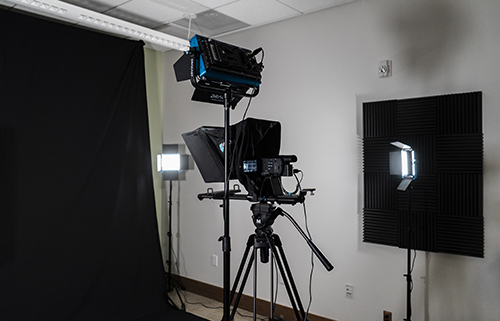
Figure 10. Initial equipment setup of the Tree of Hippocrates Education Studio.
Another adjustment was investing in a new camcorder, the Sony FDR-AX100 4K Ultra, although there was one major hiccup. The Sony Camcorder featured only a powered 1/8” microphone input jack. This was incompatible with the “unbalanced” audio output from the mix board and caused significant audio distortion in video recordings. We realized that an ideal camcorder would be one that has a “line in” input in addition to a microphone input jack so that the unbalanced audio from our mix board could be used with the camera (See Starter Pack for Studio Equipment below).
To gain greater flexibility in the space, we would recommend purchasing one of the Focusrite Scarlett models that have more than two XLR inputs. This allows for multitrack recording with more than two microphones with no need for a mix board to be purchased. Additionally, audio from the Focusrite Scarlett could be run directly into the camera from the headphone jack or the stereo output on the device utilizing either a ¼” to ?” phone cable or a 3.5 mm TRS to dual 1/4″ TS stereo breakout cable.
Equipment set-up for the One Button Studio software included swapping out the Elgato Game Capture HD device with the BlackMagic H.264 Pro Recorder and the older Canon camcorder with the Sony FDR-AX100 camcorder. The Anker 4-Port USB hub and the Griffin Technology PowerMate Assignable USB Multimedia Controller a.k.a. “The One Button,” were also installed and plugged in.
Finally, the MagiCue Mobile Teleprompter Kit was installed on the tripod holding the camera. The decision was made to leave the teleprompter equipment up at all times to make it easier to use the teleprompter and remind users of its availability. The MagiCue Mobile Teleprompter has a glass reflector like most teleprompter systems and a platform that holds an iPad or other mobile tablet. In order to best utilize the iPad as a teleprompter, an app described in the next section, allows for mirrored text to be read on the screen.
Initial software setup
Despite the extensive equipment changes most of the software setup that we accomplished in the second development phase transferred over with only a few minor tweaks and additions. First, a new user account was created that would be explicitly used for the Penn State One Button Studio software with the recommended system and software settings. This includes opening the OBS and button controller software upon login, suppressing on screen prompts and messages, and allowing administrative permissions for disk writing, among other settings. This meant that users that wanted to use the OBS Software would be able to do so by default, without logging into the computer with their university ID or password.
We chose not to purchase the equipment necessary for allowing the studio lights to be turned on automatically by the OBS Software. This was decided because the lights were easily accessible by hand and assumed users would not find too much trouble switching on the lights by themselves. Users would have the ability to change the brightness and light temperature or move the lights around in the space freely.
Finally, a teleprompter app called “Promptster” was downloaded for the Apple iPad Pro. The app was one of the only free app options that provided a text editor, scroll speed setting, text size, and mirrored text options. To make text readable on a teleprompter screen, mirrored text is required as the teleprompter screen reflection reverses what it is being presented to it.
Instructional how-tos
With the changes to the equipment and the addition of the One Button Studio software, all of the instructional handouts and videos had to be edited or redone. While not a difficult task, it proved to be time consuming. Editing the documentation should be taken into consideration when making videos and written handouts. If the interest is flexibility for updates, it is easier to edit textual content over video.
Policies and procedures
With the OBS addition, we saw an increase in patrons using the space. They continue to reserve the space whenever possible as with the previous phase. In order to receive feedback from patrons, we’ve relied on a short survey that is sent after they’ve reserved and used the space. The survey consists of questions related to overall satisfaction, productivity, knowledge of how to use equipment, where to go for assistance, and their likelihood to use the space again. We also collect user demographic information and provide space for added comments or concerns. While response is relatively low (31% response rate of total users), information collected has been valuable in constituting the need for the space to library administration, as well as instigating improvements for the space.
Users have been satisfied with all aspects of the space. On average, users have consistently marked as being satisfied with the space and feeling productive. The indicate understanding how to use the space, where to get assistance and are likely to use the space again. We have been able to make improvements based on comments received like improved lighting, sound proofing, software updates, and guidance via written instructions in the space (survey and results in Appendix 1).
Software Used
The following list breaks down the pros and cons of the software used in THE Studio:
One Button Studio by Penn State (with updates)
- PROS: The biggest pro for this software is that it is one of the only free software options available for simple video recording at the press of a single button. This is a great option for those seeking to make a DIY recording studio that is simple and easy to use for patrons and “non-technical” users. The version 1.2.5 update released in November 2018 greatly improved performance of the video recordings and made the file saving process clearer at the end of video recording. Ample documentation is provided for setting up the OBS software and equipment with several recommendations.
- CONS: Updates are seemingly rare based on the version history in the App Store. The software is only compatible on Macintosh OS X 10.10 or later with a 64-bit processor and will not work on a PC. You are required to use the equipment specified in the setup documentation provided by Penn State. The audio options are limited to the sound feed from the camera and HDMI output. Thus we recommend selecting a camera that has a line-in input instead of just a microphone input. There are no editing options so other software must will be required for users which will likely require consultation from experienced staff members.
Elgato Game Capture
- PROS: Has a plethora of features including: video recording, separate audio source recording, live streaming, basic editing, and more. The program is included with the purchase of an Elgato HDMI capture device and works with any camera with an HDMI output and most streaming platforms.
- CONS: The software only works with a compatible Elgato HDMI capture device which must be purchased. The software is mildly complicated, especially for a user that does not have technical experience or video know-how and will likely require instruction to be utilized by library users. In our experience, the live stream function worked well so long as you had an RTMP address and key. The embedded login functions for live streaming didn’t appear to work as well.
Kaltura Capture Space (Personal Capture)
- PROS: The software easily records audio, screen capture, and webcam in any combination of the three. For the University of Utah, Kaltura is used as the sole institutional video hosting and display solution which offers integration across many platforms including the University’s learning management system (Instructure Canvas) and the University’s video hosting platform (mediaspace.utah.edu)
- CONS: The update from “Capture Space” to “Personal Capture” removed the functionality to record a PowerPoint presentation on its own, without the use of the “screen capture” which is more complicated for presentation recording. The software only uploads to the Kaltura video hosting platform, meaning finding the original recording or downloading a copy is difficult and requires downloads to be turned on in settings.
Adobe Creative Cloud
- PROS: The standard for which most creative software is measured against. The suite includes a plethora of tools such as Photoshop, Premiere Pro, Illustrator, After Effects, and many more. If included in an institution’s licensing agreement with Adobe, it may be available at little or no cost at the departmental or individual level. The individual software are powerful and generally as capable as the user using them with a plethora of instructional information on the web.
- CONS: If the institution does not have a licensing agreement with Adobe, it can be very expensive to pay for. Most library users are going to be intimidated by the idea of the software and will require either extensive help documentation or staff/faculty help to get going on their projects. Similarly, the interfaces are dense and complex, and require a certain level of familiarity with Adobe products to truly get a hang of outside of some basic functions.
GarageBand
- PROS: GarageBand has a much simpler interface compared to Adobe Audition or other similar “digital audio workstations.” It also comes free with Apple computers. The ability to record multitrack, especially when paired with an audio interface such as the Focusrite Scarlett series makes for easy, professional sounding audio recording without much experience. Many audio plugins such as equalizer, compression, reverb, etc. are included in the software at no additional cost.
- CONS: Several functions that are available in Apple Logic Pro, GarageBand’s sister software, such as razor tool, waveform editing, and simple track controls are not available or as prominent in GarageBand. Compared to Adobe Audition, GarageBand is less robust and doesn’t offer as many features for higher production value such as track automation.
iMovie
- PROS: Many users that have a Macintosh may already have some experience using iMovie. The interface and editing functions are fairly rudimentary and straightforward but are lacking in comparison to something more robust like Premiere Pro.
- CONS: Many simple functions that are obvious on Premiere Pro are not always so obvious on iMovie. In many cases the project requires more robust editing than what iMovie provides.
LibGuides
- PROS: As a solution for hosting library information, Springshare’s LibGuides is a helpful tool for creating, editing, and storing information on a subject or topic basis. Part of the LibApps suite, LibGuides offers a “WYSIWYG” editor that makes it simple to make decent looking web pages for your projects. It also allows tie-in with other LibApps products such as LibCal which can handle scheduling for your multimedia studio.
- CONS: In some cases the LibGuides can be cumbersome to use, especially when a particular LibGuide has a lot of information to display. The handling of widgets and boxes in LibGuides is not very intuitive and adds a level of complication when laying out the look and feel of your page. Unless otherwise dressed up through web design and images, the default look and feel of a LibGuide can be lacking.
LibWizard
- PROS: Part of Springshare’s LibApps suite, LibWizard is a tool that helps make forms, surveys, quizzes, tutorials and assessments easily. Data is easy to collect and analyze with LibWizard’s built in data, field, and cross tab analysis tools. It is helpful for creating a “one-stop shop” solution instead of utilizing a hodgepodge of free services such as Survey Monkey or Google Forms.
- CONS: Similarly to LibGuides, an institution must have a license to the LibApps product through Springshare which comes at a cost. Most of the functions are the same as free services like Survey Monkey or Google Forms.
Phase Four
To support the Tree of Hippocrates Education Studio, a student intern with prior multimedia experience from a public library makerspace was hired in January 2018. They helped create closed captions for the instructional videos, worked closely to consult on specific student and faculty projects, and created guides for podcasting. The additional student support was invaluable and avenues for internships are being sought to help provide additional dedicated support to THE Studio. Having interns with video and audio production knowledge will provide one-on-one guidance on projects while also providing the interns an opportunity to expand their skills in multimedia design.
After the first year of operation, more and more clinicians from the University of Utah hospital were using THE Studio. Patient education videos are in high demand and the hospital lacks the equipment, expertise, and coordination to help with such projects. The Eccles Library has partnered with Imagine Perfect Care, a hospital grant-giving entity, so the library can provide further assistance with projects specific to patient education. While only in the pilot stage of this partnership, clinicians have found many added benefits of having a nearby multimedia space to create videos for their patients.
In reflection, we found specific equipment and software as essential to the success of THE Studio. While not an exhaustive nor necessarily an “ideal” list of equipment, the following pieces can help kick start a successful multimedia studio that works with Penn State’s One Button Studio software and allows for the creation of other multimedia projects with different software.
Starter Pack for Studio Equipment:
Computer
- iMac 27 Inch Retina 5K Display Fusion 8GB
Audio/Video Devices:
- Canon VIXIA HF G21 Full HD Camcorder
- Focusrite Scarlett 18i8 or similar Audio Interface (the more XLR inputs the better)
- Blackmagic Design H.264 PRO Recorder (required for use with OBS software)
- Elgato HDMI Capture Device (for use with Elgato Game Capture software; not compatible with OBS)
Microphones:
- Sennheiser ew 112-p G3 Camera-Mount Wireless Microphone System with ME2 Lavalier Mic – A (516-558 MHz)
- RØDE NTG2 Shotgun Microphones w/ windscreens and desk stands
Headphones:
- Sony MDRV6 Studio Monitor Headphones with CCAW Voice Coil
Teleprompter:
- MagiCue Mobile Teleprompter Kit with Hard Case
Lighting:
- Dracast LED500 Pro Bi-Color LED Light
- Dracast LED500 S-Series Bi-Color LED 3-Light Kit with V-Mount Battery Plates
Backdrop:
- Impact Background System Kit with 10×12′ with a variety of backdrops (white, gray, black, green, etc)
USB Devices:
- Button – Griffin Technology PowerMate Assignable USB Multimedia Controller (for OBS)
- Anker 4-port USB 3.0 hub (for OBS)
Cables & Adapters:
- A generous slush fund to purchase those pesky forgotten cables and adapters.
Approximate total price: $5,850
In looking to the future, new equipment and software will be added to complement those already existing in the space. An upgraded camera with a line-in audio port, more robust teleprompter applications, and additional sound treatment foam are set to be purchased. Camtasia, a screen capture and video editing software package is frequently requested and is slated to be purchased. Another future development will be a user-centered reservation system where users can book the studio space based on their availability without emailing or visiting the library staff. This will ideally be done through a calendar on the web and perhaps on a tablet or kiosk outside of the studio space. We look forward to continually evolving and building on the success of the space and continually inquire feedback to support future developments from our students, staff, and faculty.
References
[1] Brandon Patterson, Tallie Casucci, Bryan Elias Hull & Nancy T. Lombardo (2018) Library as the Technology Hub for the Health Sciences, Medical Reference Services Quarterly, 37:4, 341-356, DOI:10.1080/02763869.2018.1514899
Appendix 1
Follow-up Survey with Responses
Overall how satisfied were you with THE Studio
| Satisfied | Somewhat Satisfied | Neutral | Somewhat Dissatisfied | Dissatisfied |
| 13 | 1 | – | – | – |
Overall how productive did you feel you were with the Tree of Hippocrates Education Studio?
| Productive | Somewhat Productive | Neutral | Somewhat Productive | Unproductive |
| 12 | 2 | – | – | – |
I was able to understand how to use the space or equipment.
| Agree | Somewhat Agree | Neutral | Somewhat Disagree | Disagree |
| 9 | 3 | 2 | 1 | – |
I knew where to go to get assistance with the space or equipment.
| Agree | Somewhat Agree | Neutral | Somewhat Disagree | Disagree |
| 13 | 2 | – | – | – |
How likely are you to use the space or equipment again.
| Likely | Somewhat Likely | Neutral | Somewhat Unlikely | Unlikely |
| 13 | 2 | – | – | – |
What is your role at the University?
| Student | Staff | Faculty | Other |
| 3 | 5 | 4 | – |
What is your University affiliation?
| School of Medicine | College of Nursing | College of Pharmacy | School of Dentistry | College of Health | Hospitals/Clinics | Other |
| 6 | 1 | – | – | – | 4 | 1 |
Did you experience any problems with the space or technology?
- The lighting was hard to adjust without getting a huge glare on the TV screen. It would be great if there was more guidance or information on the website for tips with this. It was also not set up for the one-touch. We had to plug some things in and restart the program to get the recording to start.
- It was a bit tough to figure out which cables I was supposed to plug in where. No The button didn’t work to start the recording. But the space bar did.
- The first time I used it, I had to take the flash drive out and re-start the program each time I wanted to record (new recording). This did not occur though the second time I used the studio.
- Microphone wasn’t connected. One button record didn’t work.
- Yes. The equipment worked just fine but we heard a lot of noise/conversations from the office next door. We had to pause our recording quite a bit because the recording are going to go to quite a large audience.
- I think the room is great and I am very happy to have access to it. However, it needs soundproofing. When I was recording, the helicopter landed or took off and it made it on the tape. I also had to pause a few times because of conversations in the office next door.
- No problems whatsoever.
- Great experience
Do you have any recommendations to better the space or technology for yourself or future users?
- More information and troubleshooting information in the room, or at least on the website.
- The podcasting platform I use works only on the phone and not on the computer. Thus, it would be nice if we had a microphone I could plug into my phone.
- Have a table in the taping area
- Have a projection ability for a script. I use the chair from the desk to sit in front of the camera. I am reading off of a script, which I have to hold because there is no where to put. I think this makes it more obvious that I’m reading. Ideally, a teleprompter would be fantastic. But having something that allows you to see and read your script that is situated behind the camera would be really very helpful.
- This is such a great space to assist with education not only academic but professional education as well!! I had a great experience using the studio twice–once with a student and once by myself. I hope to use it again in the future. It’s a great resource to have!
- Provide better soundproofing to the room and if possible move the office that is next to it. However, I loved the how to and instruction documents, I can see them being really helpful for someone that doesn’t have a audio engineering background.
- It was a little tricky recording good sound because the room isn’t sound proof.
- None, except spread the word
- I do not. I’ve already recommended the studio to several colleagues. Wonderful resource!
About the Authors
Bryan Elias Hull is the Digital Publishing Program Manager at the Eccles Health Sciences Library at the University of Utah. Bryan’s work focuses on enhancing scholarly communication through the library’s digital publishing and educational technology platforms and programs.
Email: bryan.hull@utah.edu
Brandon Patterson is the Technology Engagement Librarian at the Eccles Health Sciences Library at the University of Utah. He connects students, staff, and faculty to digital tools and emerging technologies and creates meaningful experiences using prototyping tools, virtual reality, and online learning platforms. He is a health sciences education liaison and coordinates with faculty to incorporate information literacy instruction and technology into their classrooms.
Email: b.patterson@utah.edu

Subscribe to comments: For this article | For all articles
Leave a Reply