by Stacey Wolf
So what is authority control? Why do I want to do it, let alone automate it?
According to IFLA, “authority control (or access point control) refers to the [normalization] of controlled access points (headings) and the provision of alternative and related access points.” (Zumer, 2009) For example, an authority record establishes a certain spelling and form of a name as preferred and lists alternate spellings, forms, etc. of that name, as well as related access points. The same can be true with subjects and titles. By using the same form of an access point (like the author or the subject or the series title), authority control helps users find everything by a certain author or on a specific subject. Authority records contain information that can help users disambiguate names of people, corporate bodies, and titles; this is very helpful with common names, like John Smith. Authority control can also help users identify other subject terms to use by providing broader or narrower terms related to that subject.
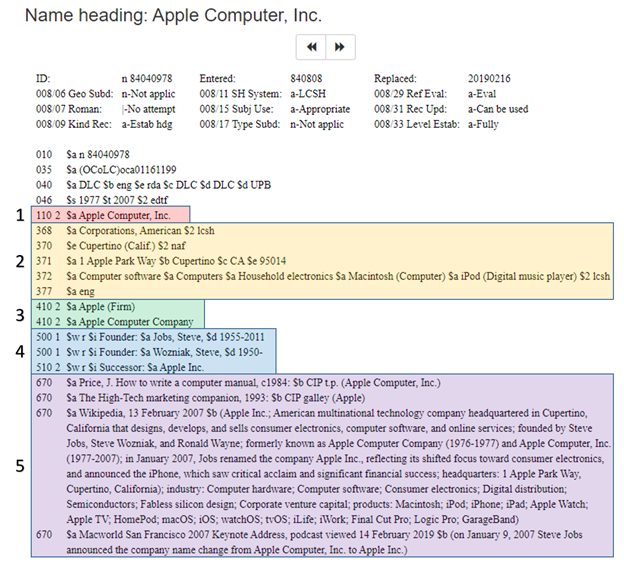
Figure 1. Name authority record for Apple Computer, Inc. (Source: screenshot of the MARC record retrieved from Classweb.org)
Here’s an example of an authority record. You have the authorized access point in box 1 (Apple Computer, Inc.). Other names of the company are Apple (Firm) or Apple Computer Company, as shown in box 2. If you were to search by one of these names, the authority record would redirect you to the authorized form of Apple Computer, Inc. This record also has extra information (in box 4) linking it to the founders of the company, Steve Jobs and Steve Wozniak. It also tells you that this company has changed its name to Apple, Inc., and redirects the user to that record. There is a lot more descriptive information in this record (see box 2), like the company’s headquarters, their fields of activity (like computer software, household electronics, Macintosh, and Ipod). The sources for this information are listed at the bottom of the record (here in box 5).
How we handle authority control at UNT
The UNT library catalog runs on III’s Sierra and we are members of OCLC. We have about 3 million records, adding about 100 thousand records each year, with about 75% of those being e-resources from vendor batch records. UNT libraries has decentralized cataloging, with Media, Music, Government Documents, and Special Collections doing their own cataloging. There are 7 catalogers in the main cataloging and metadata services department who all do their own authority work. One staff person is trained to do the authority work for the rest of the library, sending new names and subjects or problems to that specific department.
When I started at UNT in 2013, I worked with a librarian and another staff person to do all the library’s authority control. Every day, we ran Headings Reports in Sierra, which provide us with a list of names, subjects, and titles used for the first time, as well as other potential issues in the catalog. We looked up in OCLC every new name and subject on the reports, but only downloaded the authority record into our catalog if it had been established with cross references or a see also reference. We validated new names and subjects and made sure the form was correct in the newly cataloged record as well as existing records in Sierra. Sometimes, if a name had changed, we needed to update the authority record and the bib records.
In addition to keeping up with the Headings Reports, we also used the Library of Congress’s updated subject heading lists and OCLC’s Closed dates lists to update our authority records and bibliographic records. This all became difficult to maintain as RDA adoption led to hundreds of thousands of authority records being updated to new standards and our library staffing changed. A three person team working on authority control became a team of one or two, depending on staffing at the time. Also around this time, our library started looking at what other institutions our size do for catalog maintenance. With the addition of a new head of cataloging in our department, we proceeded to explore using a vendor for authority control, so we needed to re-prioritize our current authority work.
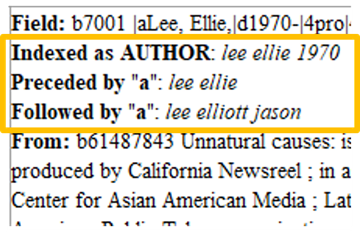
Figure 2. Screenshot from Sierra Headings Reports to illustrate “Preceded by” and “Followed by”
Now, instead of searching for every new name, we have started using the “preceded by” and “followed by” lines to see if there was a potential conflict and only investigate those in OCLC Connexion. If we search for a record in OCLC and find one, we can download it to our ILS if we want, even if there are no cross references. If we spent that time to look for the record, might as well use it; we are no longer concerned about space in our catalog. We are not loading new subject records. We are not bothering to update our authority records as the national files are updated. It took too much time to look up each listed heading in our catalog (in two different indexes for names). We figure the vendor will eventually provide us with subject records and updated records, so we won’t use precious staff time working on that now. Our department of 7 catalogers now do their own authority control work. We still have one staff person doing the heading reports for the whole library, but using the new process, it takes only an hour or two to complete, instead of several hours each day.
Automate!
The most time-effective way to handle authority work is to automate it as much as possible. Working in large batches can often be quicker than individually trying to search for each new name or subject heading. There are a variety of ways to automate authority work. Some tools include OCLC Connexion, MarcEdit, Sierra (or your ILS), Notepad++, Excel, and vendors. OCLC Connexion is where my library finds bibliographic and authority records to download into our ILS. We use Notepad++ and Excel all the time to examine and manipulate our data. Excel is helpful in many ways, especially with the text to column feature and conditional formatting where you can highlight duplicates. Notepad++ is great to use with Regular Expressions and save data in a plain text format.
Sierra
Sierra is where I can run headings reports to identify new names and subjects, invalid uses, and duplicate records. We have a bibliographic maintenance feature that will automatically update bib records to a match new heading over night, but only if the heading in the bib record matches a cross reference in the authority record.
MarcEdit
MarcEdit is a free software that Terry Reese provides to catalogers. It will authorize and validate names and subjects for you so you know you have the right form before ever loading your records. It will provide a report for you to fix variants, or you can set it to automatically correct them. It will even add the URI in $0 for you if you are preparing for linked data in your catalog. The URI is also handy for batch-searching OCLC later for the authority records to add to the catalog. It can even download the authority records that match the validated headings in the file. MarcEdit is a great tool for editing batches of records quickly before loading them into the ILS where making mass changes is much more clunky, mainly because of its ability to use Regular Expressions.
Vendors
Vendors like Backstage and MARCIVE allow libraries to send a back file of all their records which are updated and validated. Each vendor has their own special programming to fix field tags, indicator errors, and incorrect subfield coding; both vendors offer RDA enrichment services, creating hybrid RDA records out of older AACR2 records by adding certain fields. The library can decide on all kinds of customizations they want made to their processing profile, usually based on local practices and policies. Once the records are cleaned up, they are run through as many authority files as you want to validate headings. The library gets the updated bibliographic records back as well as files of authority records.
Both vendors offer a current cataloging service so that you can send newly added bibliographic records to your profile. Ongoing maintenance keeps your authority records up-to-date as national authority files are updated. This can be a wonderful option, if you have the money to spend on it. It can cost tens of thousands of dollars depending on the size of your catalog. The on-going service requires a yearly fee. And you will still need a staff person to run reports, create files, and reload records. So maybe you can afford to do a clean up project, sending your records once, but don’t want to subscribe to the on-going services. Or you can’t afford to even get your records cleaned up. How can you maintain your catalog’s authority files and access points as efficiently as possible?
Batch-Loading new authority records
We’ve used a combination of headings reports, MarcEdit and OCLC to batch load authority records for certain files of vendor records. Once we load a new package of records into our ILS, we run the headings reports and copy the new names to Excel. This data is cleaned up so that just the name remains. We use MarcEdit to validate the names in our vendor file and embed the URI in $0 when possible. Doing this tells us which names are actually in the national authority file and have an authority record to use. The URI provides a link to the authority record for that specific entry, which contains the Library of Congress Control Number (or LCCN). Copy the fields with $0 to Excel to compare the two lists of names. Isolate the Library of Congress Control number from the link in the $0 for those names on the headings report. Run a batch search in OCLC using the LCCN, add any local information you might need, and export the records either directly to your ILS or into a batch file on your desktop to load with Data Exchange. This method could work the same way with subject headings too.
Ongoing Maintenance
As mentioned before, the name authority file and the subject authority files are always changing. Subject headings get new cross-references or have fields deleted. Fictional characters were once created in the subject authority file, but now are in the name authority file. Once the fictional character is established in the name authority file, the subject version and all related records need to be deleted. Names are updated to close death dates. Some are changed to conform with today’s cataloging standard instead of a previous format. So how can you keep those authority records up-to-date?
OCLC provides a list of closed dates for names weekly. Library of Congress provides a list of updated subject records monthly. The problem is, you have no way of knowing for sure if you have these headings in your catalog without searching each name or subject heading one by one. This can be very time consuming, especially when the standards change and there are numerous computerized updates to the records, like when RDA made a change to how dates were recorded. (http://www.loc.gov/aba/rda/pdf/lcnaf_rdaphase.pdf) It also doesn’t make much sense to just load all of these updated records unless you have a load table that will overlay existing records; you still need the system to change the headings bibliographic records to match the new authorized version and to delete blind references for records that don’t have a corresponding bibliographic record.
We stopped updating our authority records when staffing changes made it difficult to keep up and the decision to move forward with a vendor was finalized. However, a few things have changed since then. I’ve learned more about regular expressions and have gotten rather comfortable writing search queries with them. Our Create List feature in Sierra now allows for JSON queries as an input option instead of needing to enter each search command line by line. This makes it so much easier to search for more than a few names at once. With a few simple tweaks to the data in Notepad++, it’s as easy as copying and pasting. We’ve also become more familiar with how to run batch searches for authority records in OCLC.
Given all of these changes, I have developed a procedure for updating these records. Essentially, turn the lists from Library of Congress and OCLC into a JSON query in Sierra to find any records that use the updated heading. Take just those headings and use OCLC to batch search for the new authority records to load. Then update the headings in the bibliographic records to the new form. It can be a little bit time consuming to create the searches, but not nearly as much as searching for each heading one by one.
Subject Headings
Library of Congress releases lists of new and changed subject headings on their website: https://www.loc.gov/aba/cataloging/subject/weeklylists/. The lists show the subject heading, the control number, and then why that heading is on the list. Options include changed heading, new heading, canceled heading, or field added or deleted. Changed headings show both the old and new heading, as well as any other fields affected by the change. New headings show all of the cross-references, see also notes, call numbers, and a few other related fields from the new record. Canceled headings have a note about why it was canceled, usually because it was replaced by another record. Headings with added or deleted fields show those with a note about it.
- Copy the entire list to Excel and isolate the control number.

Figure 3. Isolate the control numbers in Excel
- Use Find and Replace to insert a ^ where the [sp was and to replace the ] with nothing; then use Text to Columns to move everything after the delimiter ^ to its own column.
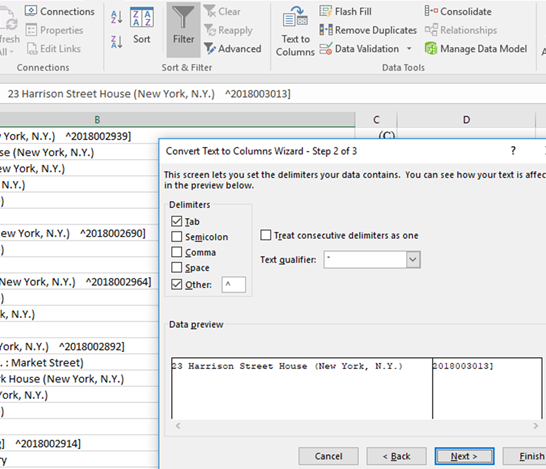
Figure 4. Isolate the control numbers in Excel using Text to Columns Wizard
- Copy this column of numbers to Notepad++ where you will build the JSON query.
- Remove empty lines and then use Replace to add the necessary text around the numbers.
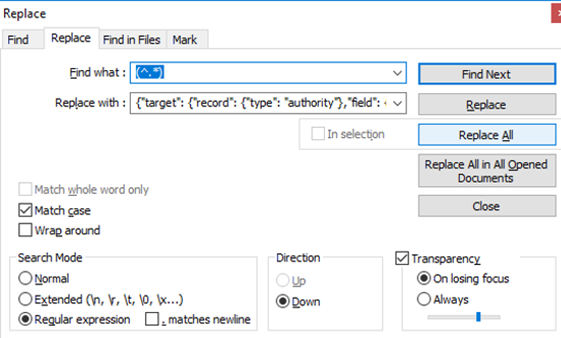
Figure 5. Add the search query terms around the LCCN using Regular Expressions
Find What: (^.*)
Replace with: {“target”: {“record”: {“type”: “authority”},”field”: {“marcTag”: “010”}},”expr”: {“op”: “regex”,”operands”: [“sh\s*$1″]}},”or”,
Check “Regular Expression”
Click “Replace All”
This Regular Expression will find everything in a line; in this case, it is the LCCN. It then replaces with a search query that will find authority records with 010 that have “sh[as many spaces as needed][one LCCN]”. The “or” on the end of the line indicates that there are more searches to perform.
- Add {“queries”: [ before your first search term and ]} after the last term.
- Copy and paste the JSON query into a Create Lists line that holds a large amount of records, or at least the number of record number you have. Store the record type as a AUTHORITY. Click search and work on something else while waiting for the search to finish.
- Once the search is finished, export the control numbers in the 010 fields and save them to a text file.
- In OCLC, under “Batch,” select “Enter Authority Batch Search Keys”. Use the default index of “LCCN (ln:)” and then hit “Import.” Find your text file of 010s and select it. The dialog box under the default search index should have populated with your search terms. Hit “save” and then “close”.
- Next, under “Batch” select “Process Batch.” Check the box to the left of “DefaultAuth” file name (as opposed to “DefaultBib”). Click “Online Searches” in the Process Box and then click “OK”. You should get a “Batch Search Report” that shows you all of the records the search found.
- View these records by using the “Authorities” – “Show”— “By Local Save File Status.” Check the “In Process” box under “Workflow Status” and click “Show Records.” Select all of the records you need to export and hit F5 or “Export”.
- If your load table is set up to overlay, they will overlay the old one. If not, just use the list you created earlier and delete those records in the “Delete Records” function of Sierra. If you don’t have too many in your list, you could replace each one individually and check for local additions (hopefully coded with a $5) that you may not want to lose. Which method you choose may depend on your past practices.
- Check your headings reports for duplicate authority records and blind references. Delete the old authority records that are duplicated by the upload. Resolve blind references (which come from headings changing, like fictional characters). Most of the time, cross-references and other fields are only deleted from or added to the record, not changing the main entry, so there shouldn’t be too many bibliographic records to fix.
Closed dates
Closed dates are a bit more complicated because they can occur in more places. Names can occur in a 1XX Main entry, as a 6XX in the subjects, or as a 7XX added entry. That means you have to search each name three times.
There are two different levels of thoroughness you can work towards. The second level requires more manual work, so it is up to you to decide what is worth it in the end.
Option 1: You can just search the authority records for the closed dates (like we did with the updated subject headings). This will find the authority records of any names on the list in your catalog, but then you will still need to change the corresponding bib records. In our catalog, we did not load authority records for every name, so we may have used the name in a bib record, but not have the authority record. We would never know if we only used this option.
Option 2: You can search your bibliographic records for headings that match the old name. This does a pretty good job returning a name match. You just have to sort through many potentially false matches and there is more manual work to isolate the necessary control numbers.
To build the JSON query for option 1 using just the control numbers:
- Copy and paste the list from the OCLC website into Notepad++
- Deleted the header text and remove any empty lines (EDIT–LINE OPERATIONS–REMOVE EMPTY LINES)
- Sort list so that the control numbers are all together at the end of the document. (EDIT—LINE OPERATIONS—SORT LINES LEXICOGRAPHICALLY ASCENDING)
- Delete everything except the control numbers.
- To search just name authority records in our ILS, include the “n” part of the control number, but the spaces and other letters before the numbers may vary so make those wildcards in the search. Use Search -> Replace (Ctrl-H)
Find What: ^[^0-9]+([0-9]*)
Replace with: $1
Check “Regular Expression”
Click “Replace All”
- Now that you have just control numbers, Use Search -> Replace (Ctrl-H)
Find What: (^.*)?
Replace with: {“target”: {“record”: {“type”: “authority”},”field”: {“marcTag”: “010”}},”expr”: {“op”: “regex”,”operands”: [“n.*$1″]}},”or”,?
Check “Regular Expression”
Click “Replace All”
This will search for the 010 field of authority records to see if any of the control numbers on the closed dates list match authority records in our catalog.
- Add {“queries”: [ before your first search term and ]} after the last term.
- Copy and paste the JSON query into a Create Lists line that holds a large amount of records, or at least the number of control numbers you have. Store the record type as a AUTHORITY. Click search and work on something else while waiting for the search to finish.
- Once the search is finished, export the control numbers in the 010 fields and save them to a text file.
- In OCLC, under “Batch,” select “Enter Authority Batch Search Keys”. Use the default index of “LCCN (ln:)” and then hit “Import.” Find your text file of 010s and select it. The dialog box under the default search index should have populated with your search terms. Hit “save” and then “close”.
- Next, under “Batch” select “Process Batch.” Check the box to the left of “DefaultAuth” file name (as opposed to “DefaultBib”). Click “Online Searches” in the Process Box and then click “OK”. You should get a “Batch Search Report” that shows you all of the records the search found.
- View these records by using the “Authorities” – “Show”— “By Local Save File Status.” Check the “In Process” box under “Workflow Status” and click “Show Records.” Select all of the records you need to export and hit F5 or “Export”.
- If your load table is set up to overlay, they will overlay the old one. If not, just use the list you created earlier and delete those records in the “Delete Records” function of Sierra. If you don’t have too many in your list, you could replace each one individually and check for local additions (hopefully coded with a $5) that you may not want to lose. Which method you choose may depend on your past practices.
- Update names in bibliographic records. This could be done in Global Update or by the system with Bibliographic Maintenance program.
- Check your headings reports for duplicate authority records and blind references. Delete the old authority records that are duplicated by the upload. Resolve blind references.
To build your JSON query for option 2 using old name formats:
- Copy and paste the list from the OCLC website into Notepad++
- Deleted the header text and remove any empty lines (EDIT—LINE OPERATIONS—REMOVE EMPTY LINES)
- Sort list so that the record numbers are all together at the end of the document. (EDIT—LINE OPERATIONS—SORT LINES LEXICOGRAPHICALLY ASCENDING)
- Delete all of the new name entries and the record numbers. They should be grouped together at the beginning and the end.
- Use Search -> Replace (Ctrl-H) and Regular Expressions to remove the “Old: 100 1” information.
Find What: …: 100 1.
Replace with:
Check “Regular Expression”
Click “Replace All”
- Use Search -> Replace (Ctrl-H) and Regular Expressions to remove everything after the last comma or period, leaving just subfield a
Find What: (.*,.*)[,\.].*
Replace with: $1
Check “Regular Expression”
Click “Replace All”
- Repeat step 6 as necessary until we are left with just the $a of the old formats of the names. Search for the delimiter symbol to see if there are any that were missed and take care of those manually.
- Because these names could be in the 100, 700 or even used as a subject in the 600 fields, we want to search in each index so we need three sets of the old names.
- Highlight all of them and copy and paste twice.
- Highlight the first set of names and use Search -> Replace (Ctrl-H)
Find What: (^.*)?
Replace with: {“target”: {“record”: {“type”: “bib”},”field”: {“marcTag”: “100”}},”expr”: {“op”: “regex”,”operands”: [“n.*$1″]}},”or”,?
Check “Regular Expression”
Click “Replace All”
- Highlight the second set of names and use Search -> Replace (Ctrl-H)
Find What: (^.*)?
Replace with: ?{“target”: {“record”: {“type”: “bib”},”field”: {“marcTag”: “700”}},”expr”: {“op”: “regex”,”operands”: [“n.*$1″]}},”or”,?
Check “Regular Expression”
Click “Replace All”
- Highlight the third set of names and use Search -> Replace (Ctrl-H)
Find What: (^.*)?
Replace with: {“target”: {“record”: {“type”: “bib”},”field”: {“marcTag”: “600”}},”expr”: {“op”: “regex”,”operands”: [“n.*$1″]}},”or”,?
Check “Regular Expression”
Click “Replace All”
- Add {“queries”: [ before your first search term and ]} after the last term.
- Copy and paste the JSON query into a Create Lists line that holds a large amount of records, or at least the number of record number you have. Store the record type as b BIBLIOGRAPHIC. Click search and work on something else while waiting for the search to finish.
- Look through the results and compare them to the original list of names. Export the 100, 700, and 600 fields from Sierra. Copy the list to Excel and alphabetize the list (or you can use Notepad++). Remove duplicates from the list. If using Notepad++, remove duplicates with the following Replace
Find what: ^(.*?)$\s+?^(?=.*^\1$)?
Replace with:
Check “Regular Expression”
Click “Replace All”
Compare the names on the list to the list from OCLC. Copy the record number from the OCLC list of matched names and use them to run a batch search in OCLC.
- You may need to investigate some names to make sure that a name without a date in your ILS isn’t the same person as the updated name. You can search by names instead of LCCN in OCLC to help gather the authority records quicker, but it will still take a lot of manual investigation.
- In OCLC, under “Batch,” select “Enter Authority Batch Search Keys”. Use the default index of “LCCN (ln:)” (or “Personal Names (pn:) if you want to search by names, but this will result in more records than you need) and then hit “Import.” Find your text file of names and select it. The dialog box under the default search index should have populated with your search terms. Hit “save” and then “close”.
- Next, under “Batch” select “Process Batch.” Check the box to the left of “DefaultAuth” file name (as opposed to “DefaultBib”). Click “Online Searches” in the Process Box and then click “OK”. You should get a “Batch Search Report” that shows you all of the records the search found.
- View these records by using the “Authorities” – “Show”— “By Local Save File Status.” Check the “In Process” box under “Workflow Status” and click “Show Records.” Select all of the records you need to export and hit F5 or “Export”.
- If your load table is set up to overlay, they will overlay the old one. If not, just use the list you created earlier and delete those records in the “Delete Records” function of Sierra. If you don’t have too many in your list, you could replace each one individually and check for local additions (hopefully coded with a $5) that you may not want to lose. Which method you choose may depend on your past practices.
- Update names in bibliographic records. This could be done in Global Update or by the system with Bibliographic Maintenance program.
- Check your headings reports for duplicate authority records and blind references. Delete the old authority records that are duplicated by the upload. Resolve blind references.
Searching by just the control number, I found 12 instances where we already had an authority record for the name in either our subject or name index. When I searched by the old names (option 2), I found several more that we did not have authority records for. I found at least 18 names that seemed promising for further investigation. A few of them were indeed other people, but there were about 8 names that needed to be updated in the name index alone that didn’t have authority records. This was a small sample size, but I believe it is representative of the amount of names we might miss if only searching by the control number.
A few parting tips
- Google is your friend. If I do not know how to do something in Excel or with Regular Expressions, I google it and can usually find a decent formula or two that can meet my needs.
- In Create Lists, build a search in the classic view, then switch over to the JSON view to find how to write the code. Use $1 or “INSERT VALUE HERE” as your value A and it’ll be that much easier to copy your own values.
- Wait until you have several lists to combine and then set up one search all at once, instead of setting it up weekly
- Try to avoid copying your Regular Expressions from Word because the automatic-formatting might cause problems. For example, a quotation mark gets changed to a slanted quotation mark automatically, which the computer interprets differently.
- Reuse! Reuse! reuse! We figure out how to set up one JSON query and then reuse it whenever practical
- You will run into times where the code doesn’t want to work. Sierra will prevent you from continuing your search with a dialog box. This box shows where the problem is but it’s hard to work with it in Sierra. Use Notepad++ to find the line and column and see what might be wrong. Usually you don’t have enough brackets or too many, or you might be missing a comma or quotation marks. Experience will make this easier.? Even I end up playing with my queries more than I’d care to admit just to get it to work. But once you do, reuse it!
Bibliography
Zumer, M. (2009). National bibliographies in the digital age. Munchen: Saur.
https://www.loc.gov/aba/cataloging/subject/weeklylists/
https://www.oclc.org/authority-records.html
About the Author
Stacey Wolf (stacey.wolf@unt.edu) is the cataloging and metadata librarian at the University of North Texas. She specializes in batch editing e-resource records, juvenile cataloging, and authority control. She is currently leading the effort to join forces with vendor-provided authority control, cleaning up the catalog and getting the most out of the services offered

Subscribe to comments: For this article | For all articles
Leave a Reply