by Keith Engwall and Mitchell Roe
A library website is a complex entity that consists not only of web pages containing static content, but a variety of dynamic content, integrated access to other information systems, and other features that rely on customized code. As websites become more reliant on code, changes to the site run greater risk of errors that may lead to downtime. Therefore, it is good practice to design, implement, and test changes within a development environment prior to releasing them to the production site. Setting up a development environment may, however, be a challenge to some libraries, especially if there are multiple personnel working on the site. Coordinating changes, backing up files, and ensuring that everyone is working on the most recent version adds a layer of complexity that needs to be addressed. This article details how a small medical library designed and implemented a development environment and workflow for a multi-developer team without the need of a development server, and discusses the challenges and benefits of setting up and using this environment for the management of a production library website.
Overview of Library’s Web Environment
In 2011, the Oakland University William Beaumont (OUWB) School of Medicine opened its doors to its first class of students, and the medical library began development of its library website. Initially, the medical library piggy-backed off the university library’s website as a subfolder within that site. Necessitated by specific needs of the various authors of the university library’s site, the library website was managed through Dreamweaver, a web Integrated Development Environment (IDE), and consisted of HTML, CSS and JavaScript. The site was configured to use Dreamweaver’s template system to cordon off and synchronize sections of HTML designated to common elements (e.g. header, footer, navigation, etc.). Eventually, a separate virtual host was set up for the medical library on the university library’s web server. The medical library’s web librarian and technology specialist started building a new site from scratch, using editors of their choosing and replacing Dreamweaver’s template system with PHP modularization (shared elements would be placed within their own files and pulled into pages through include statements). PHP also allowed for the development of dynamically generated content from data files. For example, the medical school’s required textbook spreadsheet was converted into a set of dropdowns, providing a list of required textbooks for each course with links to electronic versions.
The medical library’s team was uncomfortable with the idea of performing development directly on the production site, but no development site was immediately available. Their request for one was delayed by review and approval processes of the university’s central IT service. To move forward, the medical library designed a development infrastructure and a workflow that would effectively accommodate their collaboration on site development.
They decided to use Git, an open-source distributed version control system, to track changes during the development process. Git builds a self-contained repository around a set of folders and files, storing metadata about the files and changes made to them in a hidden folder within the root folder. Each of the web authors would have their own copy of the website repository from which to make changes. To coordinate their changes, the official repository would be stored on the university’s implementation of GitLab, an open-source web-based DevOps platform built on top of Git. Each team member would be able to pull the most recent copy of the repository from the GitLab server, make changes, and push them back to the server. Git would track these changes and maintain a history of them on both the local computer and the GitLab server, interleaving the changes made by each person and detecting conflicts. In addition to providing centralized storage for the repository, GitLab had project management features that allowed them to better track and plan their work. They developed a six-step workflow around these tools, and found that they had everything they needed for a development environment without the need of a centralized development server. The following section will provide more detail about the development infrastructure and the features that informed the design of their workflow.
The Role of Git and GitLab in Website Development Workflow
The core of this development environment is Git [https://git-scm.com/], an open-source, distributed version control system. Git is very flexible and can be set up in a variety of configurations to fit several different development workflows. Git commands can be run from the command line, from a dedicated graphical user interface (GUI) client, or as a set of functions built into an integrated development environment (IDE) or development tool. Git tracks changes made to files and stores them along with metadata as “commits” within a repository. Git only stores changes made within files, and not full copies of the files themselves (except for binary files, such as images), making Git’s use of disk space extremely efficient. A “branch” is like a “version” of the repository. A branch is actually stored as a set of commits tracked by Git until the branch is “checked out”, at which point Git applies the commits to the files, bringing them up to date with the most recent commit in the branch.
In most configurations, each repository has a “master” branch representing the core version of the files. Development branches may be created from this “master” branch to serve as an independent copy of the master branch, providing a safe place to make changes to files without risk to those within the master branch (Figure 1).
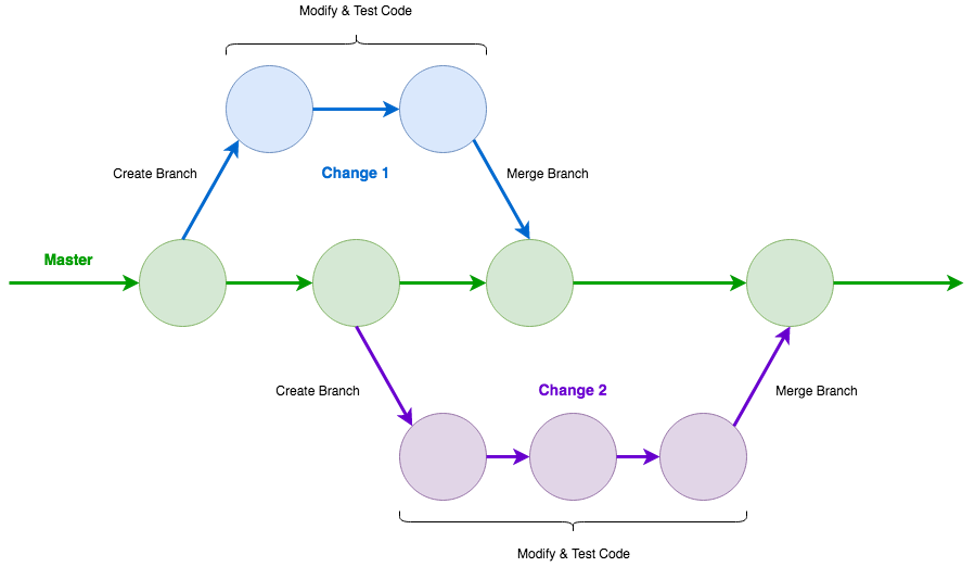
Figure 1. Development Branches in Git.
Once the changes are complete and have been tested, a development branch can be merged into the master branch to apply the changes to the files within. Git can track multiple branches, and will gracefully interleave changes so long as they don’t conflict within an individual file. In such situations, Git will identify the conflict, present the alternative edits, and provide the opportunity to resolve the conflict prior to merging. After the file has been edited to retain the intended changes, the merge may be attempted again and should be successful. Git thus isolates the master branch from these risks, and provides a means to roll back changes from a commit or an entire branch. This allows for relatively quick recovery as well as the information necessary to identify and analyze the cause of the problem.
Git is distributed by design, which means that repositories can be copied (a.k.a. “cloned”) between computers, including the metadata for changes made thus far in the master branch, as well as additional branch metadata, as needed. Git is kept up to date by “pulling” changes from a remote repository. The remote repository is updated by “pushing” changes in a branch, along with the corresponding metadata, to the remote repository. This may be done from development branches, allowing a gatekeeper to oversee the merging of development branches into the master branch. This allows developers to work independently without cluttering remote repositories with branches containing trivial changes, depending on the situation. Git’s feature set makes it extremely suitable for website change management, especially in situations where multiple individuals are collaborating on a site. Although it is fairly technical and may be difficult to master, this may be attenuated by the use of an IDE such as JetBrains PHPStorm [https://www.jetbrains.com/phpstorm/] or Adobe Dreamweaver [https://www.adobe.com/products/dreamweaver.html], which incorporate Git functions within the interface in a way that may be more user-friendly.
As a front-end to Git, GitLab provides a robust interface for Git repositories stored on its server. Users create accounts on GitLab and may create or be invited to participate in Git repositories that are stored on the GitLab server. Access to the GitLab server directly from Git can be facilitated by setting up an SSH authentication key in the user’s profile. Beyond providing functions to work with the repository itself, GitLab extends this functionality through additional integrated tools and features. One key feature that GitLab provides is the Issue Tracker. This acts as a ticketing layer that sits above the repository, facilitating higher-level project management through the creation and organization of task items (“issues”). Issues contain several features often found in task management systems: they can be assigned or claimed, given due dates, and/or attached to project milestones. They contain a title, description, and a comment thread for high-level discussions about the issue (the nature of the problem or desired change, expectations, time frames, etc.). Stakeholders outside of the development team can be given GitLab accounts with limited access to the repository, which will allow them to review, submit, and participate in issues. This ticketing layer integrates with the repository through the creation of branches. Branches created from the issue are linked to the issue. This integration reduces the overhead of project management, resulting in a more efficient work process.
GitLab also provides a set of tools and an additional comment thread from within its merge request interface. Once a branch is ready to be merged, a merge request can be created from the issue. At this point, members of the web team may open the merge request to review the changes made in the branch and discuss the changes if necessary. The merge request interface contains a list of commits made to the branch and a comparison view, which shows the differences in each file between the development branch and the master branch (by default). The comparison view may also be configured to show changes between any two commits from within the branch. Once satisfied, a member of the dev team can merge the branch into the master branch from the merge request interface. GitLab will use Git to handle the merge, and any conflicts detected by Git will be noted in the merge request, where they can be resolved prior to merging.
A Six-Step Workflow for Web Development
After much discussion and some trial and error, the web team settled on a six-step workflow that would be applied for each change to be made to the website (Figure 2):
- Create an issue for a proposed change
- Create a branch to isolate the change until it has been tested
- Make, test, and commit edits to the code until the change is complete
- Review the change
- Merge the branch and the change within back into master
- Push the change to production
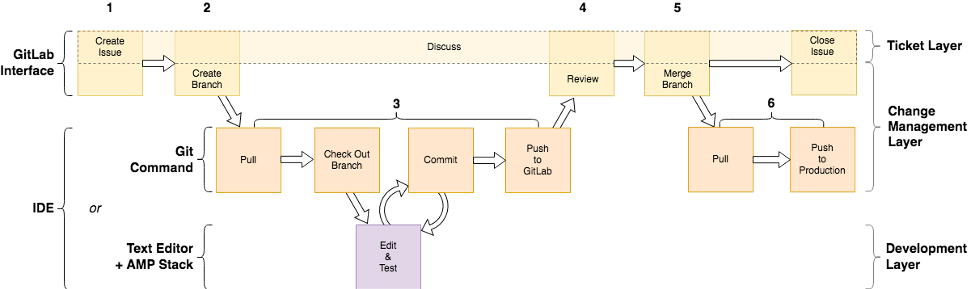
Figure 2. Workflow for Implementing Changes to the Medical Library Website.
This workflow operates across three layers:
- The Ticketing Layer outlines the use of GitLab’s Issue Tracker feature as a ticketing system, allowing for a proposed change to be tracked as an issue with documented discussion available at every stage in the workflow, until the change is pushed to production and the issue is closed.
- The Change Management Layer uses Git and GitLab to create a branch for the overall change from the corresponding issue, track the edits that are made to the code by storing them within commits, and then, once the change is complete and tested, merge the branch back into master and push the change to production.
- The Development Layer is where the change is made via edits to the code and testing of those edits.
This workflow is flexible and allows developers to use the tools of their choice in conjunction with GitLab, whether that be Git, a text editor, and an AMP stack, or an IDE that pulls everything into a single interface. Each of the steps in the workflow are detailed below.
Step 1: Create Issue
When a change needs to be made to the website, the first step is to create an issue. GitLab’s issue tracking feature serves as a ticket layer in the workflow, allowing any stakeholder, whether it be a librarian, a staff member, or one of the web developers; to document an observed need for the website (e.g. problem, desired feature, or content change) by submitting an issue. As with a ticket in a helpdesk system, the person submitting the issue is automatically added to it as a participant, allowing them to receive emails when the issue is updated.
Each issue has a comments section that can be used as a discussion thread for the proposed change. This can be useful both in planning and implementing changes. In Figure 2, this is represented by extending the discussion action across the entire workflow diagram. Developers may request more information from stakeholders, discuss potential solutions with other members of the development team, or link to related issues, whether open or closed. Posts to the thread are emailed to participants, and individuals may be invited to participate from within the text of a post, using social media conventions, by referencing their GitLab username prefaced by ‘@’ (e.g. @engwall).
The issue will appear in the issue list for the website repository in GitLab. Members of the development team can monitor the issue list, coordinating and prioritizing issues as necessary.
GitLab will display the user who last acted on an issue along with the date of the update, and so working on an issue is typically a sufficient way to automatically “claim” it. However, if desired, issues may be formally assigned (or claimed) by selecting someone in the optional “Assignee” field.
Step 2: Create Branch
In order to make changes to the website code for a proposed change, a development branch is first created off the master branch in the repository from within the corresponding Issue in GitLab. GitLab uses Git to create the branch and then automatically links it to the issue within GitLab. The branch title becomes the ID number of the issue followed by the issue title. For example, a branch created from the 23rd issue created for the repository in GitLab, that has the title “Add Chat Feature”, would be given the title “23-add-chat-feature”.
Step 3: Make Changes and Test
Thus far, the branch exists only in the repository on the GitLab server. All of the actual work on a change to the website is done on the web developer’s local repository on their computer. This step has several substeps:
- Pull an update from the repository on GitLab to the local repository. This will update the master branch as well as git metadata about the issue branch and any other branches that may have been created or updated since the last time they pulled from GitLab.
- Check out the development branch to be worked on. As changes are committed to the checked-out branch, Git will store and track them within the branch. This isolates changes and protects the master branch from them until they have been tested and the development branch is ready to be merged back into master.
- Edit files and test changes. The developer has complete freedom over how they choose to edit files and test the changes they make. The medical library team uses text editors (e.g. Vim [https://www.vim.org] or Emacs [http://www.gnu.org/software/emacs/]) to edit files and MAMP to test changes. An IDE (e.g. PHPStorm, Dreamweaver) may not only provide a means to edit files and test changes, but also provide an interface for and/or automate other Git actions in these substeps.
- Commit changes made to files. Changes to files are not stored by Git until they have been committed. Technically, each commit is preceded by an “add” action in Git, which stages the added files for the commit and allows for more precise control over which edits are contained within each commit. However, typically, these two actions are done in immediate sequence, and are thus presented as a single substep. As part of the commit, Git expects a brief text summary that summarizes the content of the commit. This can prove to be very useful during review and troubleshooting.
- Push branch back up to the GitLab repository. Although, technically, this can be done at any time (which can be useful if you want someone else to look at the code in their own repository part-way through working on an issue), typically the branch is pushed to GitLab after all of the edits have been made and all testing is complete. At this point, the code is ready for a final review before being merged and pushed to production.
Step 4: Review Changes
This is an optional but recommended step in the change workflow. A second member of the development team reviews the change before merging and pushing it to production. This may either be done by pulling and checking out the branch on their own computer for testing or, for simple changes, by reviewing the changes to the code directly from GitLab.
GitLab has several tools within its Merge Request feature (like Issues, Merge Requests are another GitLab extension to Git functionality) that facilitate code review, including a list of commits with the summary provided for each commit and a compare feature that will display all edits made, either to all files in the branch over all, to all files between two commits, or to an individual file. Each merge request also has its own comments section, where technical code-level discussions can take place without cluttering the higher-level discussions in the issue. A merge request may be created at the time the branch is created or at any time afterwards. Some prefer to wait until the branch is ready to be merged to create a merge request, as this is fairly intuitive. Others prefer to create a merge request up front in order to have access to the additional functionality. GitLab links merge requests to the issue and its corresponding branch, using a similar naming convention (since a single issue’s branch may have multiple merge requests, the ID used in the merge request title is the merge request number instead of the issue number). GitLab provides a way to tell whether a merge request is ready to be merged by automatically applying a “Work In Progress” (WIP) status to the merge request when it is created (this is also reflected in the title of the merge request, which is prefixed by “WIP”). The WIP status must be removed before the merge action becomes available.
Step 5: Merge Branch
Once the change has been reviewed, and the WIP status removed, the branch can be merged from the merge request interface in GitLab. This migrates the commits from the development branch to the latest version of the master branch, which may contain other changes from other branches that were merged after this branch was created.
Prior to the merge, Git will automatically check for conflicts (changes made to the same lines within the same file), display any that it finds, and prepare them for resolution. Each file with a conflict will have a delimited section for each conflicting set of edits. Once all conflicts have been resolved by removing the unwanted edits and the surrounding delimiters, another merge may be attempted.
There are options to automatically delete the branch and/or close the issue. Typically, these are selected, since this and the next step are usually performed together. Due to the distributed nature of Git, each developer will need to remove any branches from their own repository. All participants will automatically be notified when an issue is closed. An issue may always be re-opened if follow-up discussion is needed. If further changes are necessary, it is best to create a new issue and corresponding branch, and reference the previous issue in the discussion thread.
Step 6: Push to Production
While this step is almost always performed immediately after the merge, it is presented as a separate step because it is distinct from the merge, and the methods used to carry out this step depend on access to the production web server, and configurations of the production environment may vary widely from one institution to another. At OU, the GitLab server and production web server are separated by a firewall, and only specific individuals have access to the web server from their computers. Thus, in order to push a change to production, a member of the team with such access must pull the latest version of the repository to the local repository on their computer and push the master branch from there to the production server.
One of the best features of this workflow is that it will accommodate multiple simultaneous changes in active development by one or more individuals. This allows each issue to be worked on without worrying about what others are working on, which provides a great deal of flexibility in prioritizing and planning and improves efficiency.
Limitations & Challenges
This workflow does have one major limitation. It is designed for an environment where the production web server is not directly accessible from the GitLab server. The developers’ local computers serve as an intermediary between the GitLab server and the production web server. Failure to perform the final step and push a change to the production server means that the issue may be fixed in the code base and closed in the tracking system, but not be represented on the production web site. Therefore it is recommended that the master branch be pushed to the web server immediately after a merge.
There are other challenges that may arise. Like most software, flexibility often comes at the cost of complexity, and Git is no exception. It is elegant, but can be a challenge for new users to get their head wrapped around. This article does not provide the specific Git commands to perform the tasks described therein. Rather, it attempts to describe the tasks performed with Git such that the specific commands can be easily referenced, and provides links to resources that describe the execution of these tasks. The command line version of Git may be suitable for web developers, but may be difficult for those with limited experience with this kind of interface.
Content creators may benefit from the use of an IDE that interfaces with Git (many do). Alternatively, they may submit content changes through the GitLab interface or, if the website uses a content management system (CMS), through the website’s interface. This raises another challenge in that Git is designed to track changes to plain text files. Although binary files (e.g. database files, images, PDFs, etc.) can technically be tracked, even minor changes to a database (e.g. Oracle, MySQL, MariaDB) or to an image file will cause a new version to be stored in its entirety, which can cause a repository to grow prohibitively in size. This also means that individual changes made within a database cannot be tracked. Thus, Git may not be an effective tool for websites using a database-backed CMS, unless the CMS can be configured to use a flat-file database, which is stored as a plain text file. Some CMS solutions (e.g. Grav [http://getgrav.org], Kirby [https://getkirby.com/], etc.) are specifically designed to use flat-file databases.
Other binary files, such as images and PDFs, require separate consideration. Git may be configured, through use of a .gitignore file, to ignore these types of files. They would not be tracked by Git and would need to be uploaded to the webserver separately. If space is not a concern or if these files will not be updated frequently, it is ok to allow them to be tracked by Git. If so, it is recommended to perform image work within its own commit, and only perform the commit once the final version of the image has been selected. This was not a significant issue for the medical library, since most of the images used on the medical library website do not change often. It is, however, something to keep in mind.
GitLab itself also provides its own set of challenges. GitLab is a shared web-based tool and thus must be hosted on a site that can be accessed by everyone who would use it. If your institution does not have its own instance of GitLab, your choices are to install it yourself (which may be non-trivial, depending on your comfort level and access to resources) or to set up accounts on gitlab.com. There are free options for both GitLab software to be installed locally and for hosted accounts on gitlab.com that would provide all of the features described in this article, but there may be factors at your institution that could preclude storing and/or accessing your website files on an external third-party server. In addition, the merge request feature of GitLab can be somewhat counterintuitive. The tools it provides are absolutely beneficial, particularly if an issue is complex or difficult. However, the notion of creating a merge request before a single line of code is edited does not sit well with some. It’s an oddity that can be safely ignored from a practical sense, since the Merge Request can be marked as a “Work in Progress”, which serves as both an indicator of whether or not the branch is ready to be merged, as well as a mechanism to block merging the branch before it is ready. It can be enough of a conceptual disconnect that some may be reluctant to use it at first.
On the plus side, Git can absolutely be used without GitLab. A centralized repository can be set up on any networked computer on which Git is installed. If all else fails, if Git can be used on the production web server, it can provide a measure of protection for the production version of the site on its own, as changes can be made independently of the production web server and pushed there when ready. The changes can also be rolled back via Git if needed, providing a mechanism for elimination of regressions or mistakes. An alternative solution would be required for issue management, but there are project management tools available, such as Trello, that could fill this role reasonably well, though without the benefit of Git integration. Also, there are several Git clients [https://git-scm.com/downloads/guis] that have robust features both for interfacing with Git as well as code review.
Considerations for Testing
This workflow is flexible enough to allow developers to choose how they make and test changes. The medical library made use of two solutions for testing changes made to the website code. Initially, the technology specialist set up a virtual machine (VM) using VirtualBox [https://www.virtualbox.org/], a free, open-source virtualization application owned by Oracle. This VM was installed and run on each team member’s computer. A virtualization app (also known as a “hypervisor”) allows for the installation of an operating system which runs on top of the computer’s main operating system. This “guest” operating system is stored in a file on the computer, large enough to serve as a hard drive for the virtual “machine.” The app acts as a bridge between the virtual computer and the actual computer’s hardware, and provides a virtual network interface between the VM and the computer. The virtual machine can be booted up and run in the background as though it were an independent system connected via network.
VirtualBox sets up a virtual network adapter on the VM and assigns it a localized IP address. By pointing the browser to the IP address of the VM, the developer can view the site just as it would appear on the production server. The local repository can either be stored within the VM and edited by logging in to the VMor on the local computer and mounted in the VM (e.g. via SSH, SMB, NFS, etc.). The test VM was set up using a freely-available version of the production system’s Red Hat Linux operating system (i.e. CentOS), replicating the production environment as closely as possible.
A second, more lightweight option the medical library tried was to install and run MAMP [https://www.mamp.info/], an application for macOS. An AMP stack is a bundle of software containing Apache, MySQL or MariaDB, and PHP, Perl, and/or Python. MAMP (the “M” in which refers to “macOS”) bundles these tools together and provides a management interface for starting, stopping, and changing the services as needed. Other, similar tools include XAMPP [https://www.apachefriends.org/] and AMPPS [http://ampps.com/], both of which can be run on Windows, Mac, or Linux. Depending on the tool used, server applications may run directly on the computer itself or on a built-in VM running a lightweight OS strictly for the server apps. The AMP manager application can be configured to select the folder to be used as document root and to specify software versions to be used. MAMP was configured to use the repository directory as its document root and to use the same version of PHP as the production server. Using a custom URL specified in the MAMP documentation, the web developer was able to view the local copy of the website in a browser. This alternative traded the fidelity of the cloned environment for efficiency and ease of use, under the assumption that so long as the PHP version was consistent, the results would be sufficiently accurate for testing purposes. With their local repositories and development environments set up, the web team collaborated to design a workflow that would meet their needs.
Regardless of what method of testing you choose, it is important to know what versions of software are running on your production server, such as Apache and, especially, the code interpreter (such as PHP, Perl and/or Python, and to configure your test server environment to use the same versions. While this is not straightforward in many AMP stack solutions, including XAMPP and MAMP, it is nonetheless easier than setting up a VM, and although setting up a VM for a test environment may provide the opportunity to set up the most accurate replica of your production environment, the overhead involved in both setup and use make this difficult to recommend.
Looking to the Future
In addition to the protection that Git provides, the ability to retrieve previous versions of the site has promising implications for archival purposes. In most cases, aside from restoring an old backup, web content tends to be ephemeral and requires proactive steps to be taken in order to preserve the style and design of the website at various points in time. However, in many cases, changes to the website can be gradual enough that it is difficult to determine in advance when to preserve the site. However, by default, Git keeps all changes made, indefinitely. Git also can be used to “tag” specific commits as significant. This can be a version number tagged to the final commit after a significant set of changes, or it can be any text that may prove useful in identifying commits that you want to return to later, if only temporarily, by checking out that commit by its tag name.
Some potential next steps for the medical library include retroactive use of tags at strategic points in the history of the website, expanded use of GitLab as a ticketing system for other types of library issues within a separate “helpdesk” repository, and investigation into additional features of Git, GitLab, and/or other Git-related applications that may further enhance the website development process.
Like any production resource, library websites should have a development environment in which to make changes. Although this may seem out of reach, especially in multi-developer environments, it can be achieved using freely-available software and tools. There are free open-source tools such as Git, GitLab, and AMP stacks, that can be used to create isolated development environments without the need of a development server, as well as collaborative environments for sharing information and resources. The workflow is as important to an effective development process as the tools used. Changes should be tracked, coordinated, and documented, and should follow a process that is efficient, open to communication, and flexible enough for the needs of various stakeholders. Through use of these tools and this workflow, the productivity of the web development team increased greatly. Capturing ideas for the website as well as problems became much easier. Whenever the issue list became too long, priorities could be shifted away from other tasks to concentrate on the website. Since every change was documented, reporting on website updates became much easier, and going back through the closed issue list provided an easy way to figure out what changes were made and when. The medical library website has undergone several large scale improvement projects quickly and with great success. One of the best things about using these tools is that they are flexible enough to adjust to a variety of workflows, so even if the workflow described in this article would not fit your library, Git and GitLab should be able to work with whatever workflow meets your library’s needs.
About the Authors
Keith Engwall is the Web and Technologies Librarian for the OUWB Medical Library and is the webmaster for the library website.
Mitchell Roe served as a Technology Specialist for the OUWB Medical Library and was instrumental in the development of the environment and workflow detailed in this article. He currently serves as a Systems Administrator for Oakland University Technology Services.

Subscribe to comments: For this article | For all articles
Leave a Reply