by Michelle Rothrock, Alison Rhonemus, Nick Krabbenhoeft
Background
The Digital Archives program at the New York Public Library—a part of the Digital Preservation unit of the Digital Research Division—works with the born-digital portions of archival acquisitions by the 11 curatorial units of the NYPL Research Libraries. It’s responsible for accessioning and transferring digital materials to storage for further archival processing and maintaining the materials for long-term storage and access.
This means the Digital Archives program works with storage media dating from the early years of personal computing—like floppy disks in all formats and sizes—to modern-day storage solutions. The program has the equipment, software, and processes for working with all of the more common storage media in NYPL’s collections.
A recent acquisition by the New York Public Library for the Performing Arts brought thousands of CD-Rs and DVD-Rs, containing mostly (99%) photos in JPG or raw files, to the Digital Archives lab. Writable CDs and DVDs, like all optical media, are a risky format for preservation. Faced with potential obsolescence and fragility, many institutions choose to migrate the contents of optical disks to more stable storage.
Many programs take a disk-by-disk approach to imaging or transferring optical media, but to deal with a collection of this size, NYPL developed a workflow using a Nimbie USB Plus Disc Autoloader NB21-BR and a customized version of KBNL’s open-source IROMLAB software to batch disks for transfer. This workflow allowed the disks to be migrated quickly with much less hands-on time for staff. But was quality being sacrificed in the name of efficiency? Without reviewing every transfer individually—defeating the purpose of working in batches—the authors of this paper weren’t sure if the transfer process was capturing every file.
We set out to answer that question by analyzing the metadata generated by the software used to transfer. In this paper, we describe the process of gathering that data and our findings, as well as the impact this had on NYPL’s workflow and how this work touches on issues that apply to digital archives generally.
Approaches to working with optical media
Documentation of optical media migration workflows in digital archives typically approaches each disk individually. (Wilsey, 2013; Pendergrass, 2017) This is certainly in part due to the greater quality control that comes with examining a collection disk-by-disk—Duryee’s Intro to Optical Media Preservation (Kirschenbaum, 2010) recommends viewing every disk in IsoBuster to understand its structure prior to attempting migration—and the fact that failures are easy to identify and re-try when working with a single disk.
However, a disk-by-disk approach is, as the British Library observed in their 2013 article, extremely resource-intensive, requiring a lot of time both in terms of the archivists’ efforts and in terms of the overall project timeline. (Dappert, 2013) The authors at the British Library were faced with a project collection of ~18,000 CDs and DVDs, and needed to quickly migrate the disks to more stable storage—without handling each disk individually. Like NYPL, they chose a Nimbie (though the British Library used a different model—the Nimbie NB11) to handle the disk loading, and used the software bundled with the machine to manage the process. The disk robot worked well, but the authors observed that error-checking was more difficult when working with disks en masse. Their solution was fairly straightforward: by working in smaller batches, they were able to manually identify and deal with problem disks one-by-one.
Johan van der Knijiff’s work at the Dutch National Library (or Koninklijke Bibliotheek van Nederland, KBNL) provided another useful model for NYPL. The KBNL’s collection includes up to 20,000 disks, so a hands-off workflow to speed up the migration process was key. Following the British Library, van der Knijiff used a Nimbie to handle the physical disks. However, the software bundled with the Nimbie came up short, prompting the creation of the IROMLAB (Image and Rip Optical Media Like A Boss) application. Designed to work with a collection that included CD-ROMs and audio CDs, the application bundles software that operates the Nimbie and works with the disks.
First, a user enters the disks’ identifiers into the IROMLAB application before placing the physical disks into the Nimbie, creating a queue. This is a key step in batch processing to keep track of each disk image’s relationship to its existing catalog entry and the physical disk. The software manages the Nimbie via this queue, creating destination folders for each disk as it is loaded. The disk is identified with an application called cd-info, and then IROMLAB extracts either ISO disk images or PCM audio data with IsoBuster or dbPoweramp, respectively. The disk is then ejected and the process repeated with the remaining disks.
Disk images have been the go-to migration process in digital archives for years. (Kirschenbaum 2010) However, logical transfer has become a more appealing solution for many institutions. A 2017 presentation by Keith Pendergrass (Pendergrass, 2017) dove into the ethical and sustainability issues that preserving disk images can present for archives, and pointed out that preserving low-level system data may have little research value. This sparked discussion amongst digital archivists and inspired policy change (as in the case of the University of California Libraries, who mention Pendergrass’s talk as justification for their recommendation to avoid disk imaging). (Dundon, 2020) There are practical reasons some have moved away from creating disk images, too: some institutions found that logical transfer better suited their workflows and took up less of their limited storage space. (Maches, 2020)
NYPL’s approach
Within NYPL’s Digital Archives program, the practice has similarly evolved to prefer logical transfers. Early removable media (like floppies or zip disks) often have complexities that might merit a more forensic approach, but later media can typically be regarded as a generic container. This is especially true for writable optical disks; many users treated these disks as a write-once, read-many backup system.
NYPL’s workflow departed from the British Library’s and KBNL’s by transferring the files on each disk rather than imaging the disks. Given the contents of the collection—photos, in well-known formats—it wasn’t likely that the low-level structural information on the disk would ever be necessary for interpreting the files.
The Digital Archives’ process for migrating files from optical disks uses a disk loading device, the Nimbie USB Plus Disc Autoloader NB21-BR, which can handle up to 100 disks per batch (or more, if a person is available to re-load the input bin as the disks are read).
The Nimbie is used with a local fork of the IROMLAB application. Rather than imaging disks with IsoBuster, our local IROMLAB uses a modified version of bagit-python[1], which bags the files and transfers them to storage. (Unmodified, bagit will only bag files in place.)
Gathering data
With the workflow in place, we were now met with the same challenge that the British Library faced: how successful were these transfers? Though the process generated metadata about each disk, reviewing every log file would take a lot of time—and defeat the purpose of batching the transfers.
We decided to evaluate the process before completing the transfer of the entire collection, working with just the first ~3500 transfers.
Application output
At the end of each batch transfer, we have a batch folder, a manifest file with the status of each attempted transfer (including failed transfers), and folders with metadata about and files from each individual disk.
The batch manifest file is relatively straightforward, containing basic info about each transfer like the date, ID number, and, crucially, whether or not the transfer failed. Here, a failure may mean that the software failed to complete a process for one reason or another—but doesn’t indicate the quality or completeness of the transfer.

Figure 1. A sample of some fields from a batch manifest file.
Each individual transfer folder contains a few metadata files, generated by different pieces of the application. Three of the metadata files—bag-info, cd-info, and transfer—all contain information that provides clues about the transfer’s quality and completeness.
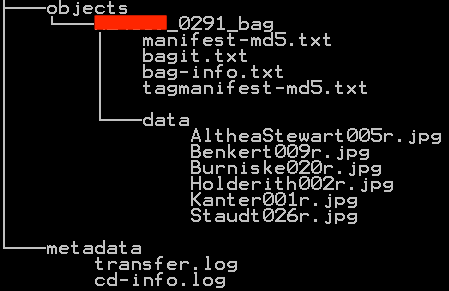
Figure 2. An example of the sub-folders and files found in the folder generated per disk.
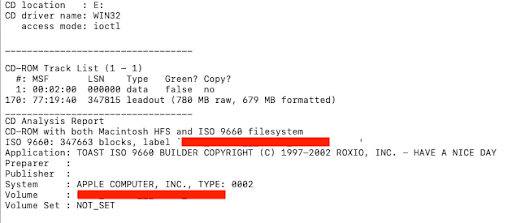
Figure 3. cd-info.log
The cd-info file records some details about the disk. Most relevant here: the size of the raw/formatted data on the disk, given in MB. The difference between the raw and formatted sizes is due to the fact that the disks were originally intended to hold audio tracks, with a brief gap in playback between each. The raw size includes that gap, while the formatted size does not.
![]()
Figure 4. transfer.log
The transfer.log file contains a report of each sequential step of the transfer process, generated by NYPL’s localized version of IROMLAB. Among other things, this file shows how long the disk transfer took (via the timestamps) and the success or failure of each attempt to transfer individual files from the disk.

Figure 5. bag-info.txt
This metadata file includes the Payload-Oxum, indicating the size in bytes of the successfully transferred files and the file count.
Gathering data from the log files
To get a batch view of our batch transfers, we needed to view the data from the various log files in bulk. We used Python to write a script to gather information from each log file, store it with the associated Media ID, and output the results in a CSV format.
Initially, we weren’t certain which information would tell us the most about the quality of the transfers. Our first script pulled the following info:
- the size of the data on the disk, recorded in the cd-info file
- the bytecount and filecount of the transferred files in the bag-info file
- and the start and end times recorded in the transfer log file.
This information was recorded with every transfer, so it was easy to identify from an initial look at individual log files.
With this information, we compared the size of the data on the disk to the size of the data transferred, looking for discrepancies, and also noted any transfers with unusually long transfer durations. When we saw outliers, we did a closer check of the log files, the original disk (using IsoBuster), and the transferred files. Through this process, we identified more information that would be useful to add to our analysis.
Some of the additional info we extracted turned out not to be terribly revealing in itself—for instance, the read time per disk didn’t provide a useful indicator that the disk had a problem—but, eventually, we found that some transfer.log files contained information about files that the software wasn’t able to retrieve from the disk. This turned out to be the single most useful piece of data, reliably identifying problematic transfers.
The final version of the script gathered a count of the individual files that failed to transfer, along with the Media ID of the disk, and output the info into a CSV.
Script walkthrough
The full script, written in Python, can be found on GitHub. (Pseudocode used below.)
The requirements for the script were to:
- Open each cd-info.log, transfer.log, and bag-info.txt file in the directory;
- Identify the media ID associated with each of those files;
- Gather/create the necessary information from each of those files;
- Provide output in the form of a CSV for analysis.
A few Python modules helped us meet these requirements:
- os and os.path, to find files in subdirectories
- re for regular expressions to identify the metadata needed from each logfile,
- datetime to work with the timestamps in the transfer.log files
- csv for the output.
First, the script searches the directory for files with the name cd-info.log. When it finds the file, it records the path to the file (which includes the media ID of the transfer) and adds that info to a list for use in the next step.
list_of_paths = []
for directory_path, directory_names, filenames:
    for filename in filenames that includes cd-info.log:
        join directory_path and filename
        add to list_of_paths
Next, an empty dictionary, dict, is opened to store the extracted info. The first section of this code sets up regular expressions to find the different pieces of information needed here: the media ID and the raw and formatted data from cd-info. The media ID is found in the list of filepaths and is stored in the dictionary as both a key and a value (a necessary workaround for output into the CSV, since the CSV writer only includes values).
dictionary = {}

mediaID_pattern = regular expression to identify the media ID
raw_pattern = regular expression to identify the raw data amount
formatted_pattern = regular expression to identify the formatted data amount

for each_item in list_of_paths:
    if the media ID is found:
        add the media ID to the dictionary, using the key “mediaID”

        with the cd-info.log file open:
            for each_line in cd-info.log:
                if the raw data amount is found:
                    add the raw data amount to the dictionary</td>
The process is repeated for the transfer.log and bag-info.txt files, searching for and storing information from each.
Finally, everything was written to a new csv file.
with a new csv file open:
    create column headers using every key in the dictionary
    for the value of every item in the dictionary:
        add it to a new row in the csv file
Analyzing the transfer metadata
At this point, we had a CSV file containing the aggregated metadata from each individual disk transfer ready to analyze.
Some basic stats:
- 650,327 individual files transferred from 3,488 disks
- On average, a single disk took ~238 seconds (about four minutes) to transfer (though a few disks took much longer; some ran for hours)
- The transferred files consisted primarily of JPGs and CR2 files
However, the fact that the software didn’t flag these disks as failed transfers didn’t mean 100% of the files were transferred perfectly. The data contains a column with a count of files not transferred per disk. Checking out these partial transfers, we see:
- 2,259 untransferred files from 63 disks
- An average transfer time of ~3,209 seconds (53 minutes)
And as for failed transfers, flagged in the batch manifest file—amazingly rare!—we found that only three disks out of the nearly 3,500 failed entirely. Two disks were flagged with “bagging failed”; the last disk appeared to be blank.
Manually inspecting problem disks
From this point, we had a manageable list of semi-successful (partial) transfers to review, to which we added the three failed transfers found in the batch manifest files.
We reviewed these 46 disks and transfers one-by-one, inspecting:
- The physical disk for visible damage, deterioration, or dirt
- The files and filestrucure of each disk, using IsoBuster
- The transferred files, to ensure that these were intact and readable
After inspection, we started troubleshooting. First, disks with visible scratches or dirt were gently cleaned with a lint-free cloth and a solution of alcohol and water. Next, we attempted to transfer the files via IsoBuster’s Extract function[2], using a different disk drive (not the Nimbie). We chose IsoBuster for inspecting the contents of the disk and for a first attempt at recovering lost files due to its common use in other institution’s workflows.
Through troubleshooting, we discovered that the problem disks fell into three categories:
- Damaged disks. These disks typically had long read times, and one or more files were unrecoverable; many of these were visibly scratched. The files that were transferred, however, were good (no half-visible photos or unopenable files).
Eighteen disks fell into this category. Out of these, the NYPL fork of IROMLAB successfully transferred 87.4% of files (a total of 3,360), and failed to transfer 12.6% (485 files).
- Issues with files. Some disks with partial or failed transfers were physically readable, but failed for other reasons—often related to file names or unreadable informational files left behind by software the donor used to organize and burn the photos. This accounted for thirty-four of the problem disks. [3]
- Unknown issues. These four disks were not visibly damaged, and checking the disks with another tool or drive recovered all of the files.
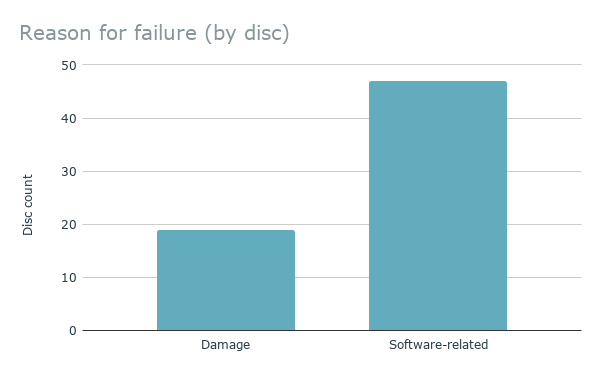
Figure 6. Reason for failure
This graph shows the high proportion of file system issue-related failures compared to failures caused by damage to the physical disk.
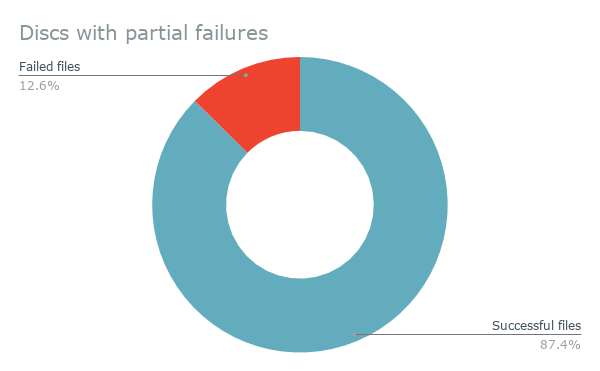
Figure 7. Damaged discs, successes versus failures
Disks with partial failures still had a high rate of recovery for individual files, as shown above.
Damaged disks
We tested damaged disks with IsoBuster and ddrescue to find if these tools could recover additional information. In a sample of eighteen disks, IsoBuster recovered an additional 160 files, compared to the original transfer; ddrescue recovered an additional 141.
| Successfully transferred files | Files that failed to transfer | |
| Original transfer | 3090 | 474 |
| IsoBuster | 3249 | 315 |
| ddrescue | 3240 | 324 |
While we didn’t record the total transfer time for these tests, both IsoBuster and ddrescue spent hours—often longer than an 8-hour workday—on many of these test disks.
In our tests, IsoBuster performed a little better than ddrescue in recovering data. It’s also worth noting that IsoBuster provides more readable feedback on its success than ddrescue does, at least for our purposes. Ddrescue offers a bytecount and percentage of total data recovered, while IsoBuster shows which specific files contained errors.
File system issues
For disks that failed during the batch transfer process for file system-related reasons, IsoBuster provided an easy fix. The Extract function was able to recover 100% of the files from these disks. The IsoBuster software allows a user to inspect the disk through any of its available filesystems and bypasses any operating system-related issues with interpreting file names. It’s also easy to navigate within folders. These features made it possible to recover files with illegal characters in the filename and files tucked away within nested subfolders, two of the issues that seemed to affect IROMLAB’s transfers.
Discussion
We had four key takeaways from our review of the batch transfer process:
- We confirmed that the batch transfer process was a good match for this collection;
- We were able to batch our troubleshooting and identify issues more holistically;
- We identified ways to improve the process;
- We discovered the key skills for making this project work apply to other projects in digital archives, too.
Impact on NYPL’s workflow
We found that the batch transfer process was, overall, very successful. The particular collection—consisting of CD-Rs in good condition with relatively consistent contents and file structures—worked well with this hands-off approach, with over 99% of files successfully transferred. And, through our analysis, we were able to identify that missing <1% and troubleshoot these disks individually.
Inspecting the problem disks one by one, we discovered that most failures fell into one of two categories: file system problems or damaged disks. As discussed above, IsoBuster was an ideal fix for disks with unusual file systems or filenames. Damaged disks, though, were a different story. IsoBuster and ddrescue did help recover some additional data, but this process often took hours of run time. The eighteen damaged disks had a combined run time of 41+ hours in the Nimbie. While IsoBuster didn’t provide data about the time it took to extract, test disks often took more than eight hours, and one ddrescue test ran for over ten days before we decided to interrupt the process. Ultimately, this extra processing time (and staff time, too) only yielded a hundred-odd additional photos—out of a collection of tens of thousands.
This particular collection wasn’t made up of select photos; this was the total output of a working photographer, including every test shot, every angle, and every grimacing subject. A vast majority of these photos were likely never passed on to the client, put in print, or published on the web. Given that, a few photos were deemed an acceptable loss. For the remainder of the collection, we chose not to try to save additional data from damaged disks, given the processing power and staff time necessary to run IsoBuster and ddrescue on each scratched disk.
We also discovered that, like batch transfer, batch troubleshooting can be a big time-saver. When transferring disks one at a time, staff can troubleshoot one at a time, running through diagnostics and possible solutions before moving to the next disk. In this type of workflow, troubleshooting each problem disk as it appears doesn’t slow down the process, since troubleshooting needs to be done at some point regardless.
When transferring disks in an automated batch process, stopping the batch to troubleshoot a single disk pauses processing for every other disk in the queue, so ignoring issues until the end of a batch makes procedural sense. And, by reviewing all of the problem disks at once, we were able to identify patterns of failure that might not have been as apparent working disk-by-disk—for example, the issues we encountered with file systems—and target our troubleshooting methods accordingly.
Moving forward
NYPL’s batch transfer process relies on free and open-source software. Critical components of the workflow, and our workflow analysis, are open-source: IROMLAB, bagit-python, ddrescue, Python, and more. The advantages of working with open-source software meant we could
- Test out additional tools at no additional cost,
- Combine tools into a program built for a specific purpose like IROMLAB,
- And modify those tools to fit even more specific purposes like NYPL’s fork of IROMLAB.
This last point is worth exploring further. Even though IROMLAB was created for a very similar scenario—migrating large numbers of optical disks in a library setting—NYPL had to change several features to meet its needs. These changes began with relatively less complex updates to the interface (such as changing the labels for text entry fields) and developed into adding additional fields, using the data from those new fields to change the behavior of the software, and finally incorporating bagit-python. Because both IROMLAB and the data analysis script created for this project are written in Python, work is underway to incorporate that data analysis directly into IROMLAB. Once that analysis is part of the automated transfer process, it will be easier for staff to identify places where data might be missing and decide if it’s worthwhile to take steps to remedy it. This is key for NYPL’s process moving forward, and could also be useful for other institutions looking to implement a similar process for large collections of optical media. It makes the batch transfer process less opaque, which is necessary for cultural heritage collections where a “pretty good” transfer won’t suffice.
Learning curves
This project involved a lot of learning and a lot of trial and error. In this last section, we discuss some of the challenges that may be common to digital archives projects in general. Digital archivists come from a range of technical backgrounds; we hope that by talking about some of the tech challenges, and tech skills used to help solve them, we can make this project description more accessible and more useful.
Limited documentation. Documentation can never perfectly describe what a tool does. At points throughout this project, we struggled to understand what the software was doing, and if it was behaving as intended—especially when we brought together multiple open-source tools. Reading official documentation closely was a crucial first step, but we often had to supplement the official documentation with blog posts, questions asked on forums, examining code, and testing.
Software, hardware, and OS mismatches. This is a problem many digital archivists know well: software and hardware is often imperfectly compatible with all operating systems. At NYPL, we have a variety of Windows and Mac machines. Finding out that ddrescue didn’t work on our Mac (for mysterious reasons) but ultimately did run on a Windows machine in Cygwin took a surprising amount of work and tinkering. For this challenge, it’s key to be comfortable working in different operating systems, and different shells—or at least be comfortable conducting a series of internet searches on things like “ddrescue install cygwin” “cygwin install procedures” “cygwin package mounting”.
Making metadata useful. As discussed above, a big piece of this project was writing code to bring together information from scattered log files and form a complete picture. This expands a bit on our limited documentation challenge; since we weren’t sure what metadata was being recorded, this part of the process was very iterative. Our early code just grabbed a bit of metadata we knew was available; we then had to analyze the results (using pandas and Excel) to help point us to outlier data that indicated problem disks. Multiple rounds of checking results and rewriting the code were necessary to finally produce a useful set of metadata.
End Notes
[1] The authors are in the process of contributing this feature to the bagit-python codebase.
[2] The Extract function was performed at the track level, which extracted each file individually rather than creating a disk image.
[3] A handful of disks had a single file fail to transfer. In these cases, the file turned out to be a system file that had no research value to retain. Since the desired files were successfully transferred, these disks were ultimately left out of the count of problem disks.
References
Dappert, Angela, Andrew Jackson, and Akiko Kimura. “Developing a Robust Migration Workflow for Preserving and Curating Hand-Held Media,” 2013, 11.
Dundon, Kate, Laurel McPhee, Elvia Arroyo-Ramirez, Jolene Beiser, Courtney Dean, Audra Eagle Yun, Jasmine Jones, et al. “Guidelines for Efficient Archival Processing in the University of California Libraries (Version 4),” May 1, 2020. https://escholarship.org/uc/item/4b81g01z.
Kirschenbaum, Matthew G., Richard Ovenden, Gabriela Redwine, and Council on Library and Information Resources. “Digital Forensics and Born-Digital Content in Cultural Heritage Collections. CLIR Publication No. 149.” Council on Library and Information Resources, December 1, 2010.
Maches, Tori. To Image or Not to Image: Implementing a Staggered Transition to Logical Capture by Default. https://bitcuratorconsortium.org/session-5-imaging/. BitCurator Consortium (BCC), October 16, 2020.
Pendergrass, Keith. One Does Not Simply Keep Disk Images: Ethical, Risk Tolerance, and Sustainability Issues with Forensic Disk Image Retention. https://docs.google.com/document/d/1bYWee4P6Mh0ASq6mthlOiXJYfPt-jWV9Nh-acrBkzq0/edit?usp=sharing. BitCurator Users Forum 2017.
Wilsey, Laura, Rebecca Skirvin, Peter Chan, and Glynn Edwards. “Capturing and Processing Born-Digital Files in the STOP AIDS Project Records: A Case Study” 4, no. 1 (2013): 23
About the Authors
Michelle Rothrock is the 2020–21 Digital Archives Fellow at the New York Public Library. The fellowship is hosted in collaboration with the School of Information at Pratt Institute.
Alison Rhonemus is a Digital Archives Assistant at the New York Public Library.
Nick Krabbenhoeft is the Digital Preservation Manager at the New York Public Library.

Subscribe to comments: For this article | For all articles
Leave a Reply