by Rebecca Hyams and Tamara Pilko
Introduction
Library workers come into their daily work from a variety of different backgrounds, skills, and expertise. Advanced users may already have the coding skills to streamline or automate workflows, but many more of us are left unsure how to get from step one to step three. We may see there are powerful tools that can improve our work (or at least get us through a particular task or project) but may lack the necessary skills and information to actually make use of them as-is. A prime example of one of these tools are the robust APIs provided with Ex Libris’ Alma library services platform. These application programming interfaces allow users (as well as other applications and systems) to interact with Alma’s data directly, and can power innovative workflows and even just ways to get around what is sometimes a lot of clicking and repetition in the interface. While there are a handful of basic guides explaining Alma’s APIs or what APIs even are, there seemed to be little to bridge the gap between “introduction to APIs” and “how to use them to make better workflows” unless you already knew how to script or code.
The authors of this article both found ourselves at this crossroads. We could see that we had work that needed doing that would have required lots of repeated actions in the interface, but not enough background in programming to know how to go about harnessing the power of the Alma APIs without a user interface. Both of us eventually found our way to Postman, an API platform that supports a wide array of workflows. Built with API developers in mind, Postman provides a straight-forward interface for plugging in parameters and data to use APIs in a way that’s flexible and relatively easy to understand with minimal coding knowledge required.
In this article, we will outline how to set up Postman and how we were able to use it to work directly with the Alma APIs to manage data-intensive projects. Of course, the same general process for configuration will be similar for working with other APIs from other vendors and platforms. We will also discuss our individual use cases: cleaning up electronic inventory and loading course reserves data with reading lists and citations. While this is not meant to be an extensive treatise on how to use Postman or work with APIs, we do feel this will help bridge the gap for those out there that find themselves in situations like we did.
What is Postman?
Postman is a downloadable client and web application that was created as a tool to help with the API testing process. It is now a robust platform for API development, with features to support both the building and use of APIs. Postman has tools for documentation, collaboration with teammates or the larger community, and makes it easy to iterate projects and share them. The Postman website (https://www.postman.com/) is the place to start to create a free account and download the app or utilize the web version. For the purpose of this article, and likely many library-based API projects, Postman is a helpful interface that lets you view, send, interact with and use API requests. You can easily see if your request worked and what response was returned.
While this article will not go into depth about API development, there are many great resources out there and we have included some in our citations. For an introduction to APIs in Alma, please see Chad Kluck’s presentation from ELUNA 2019 [1] and the ExLibris Developer Network “API Tips for Beginners.” [2] Postman also offers a Learning Center [3] that has extensive documentation and videos.
Setting up Postman
Basic configuration and prerequisites
Regardless of exactly what API or data you’ll be working with, there are a few things that you will need to do to get started. As of the time of writing, the first step is to create an account with Postman and then download and install either the Postman client itself or the Postman Agent that allows you to use the browser-based version.
In addition to getting set up with Postman, you also need access to the API(s) you wish to use. As previously mentioned, for the purposes of our discussion here we will be using the APIs for Ex Libris’ Alma platform. In order to use the APIs for your Alma environment you will need access to the Developer Network and will need to build an API to generate a key to authorize the connection. Ex Libris has extensive documentation for getting started with the Developer Network and building your own API keys.
Alma’s APIs are divided into various functional areas of the platform (electronic resources, bibliographic information/inventory, users/fulfillment, etc.) and can be configured to be read-only (this is fine for projects where you just want to retrieve data) or read/write. The API documentation gives a breakdown of what data can be accessed via each of the API endpoints and by what methods, as well as sample output that can be useful in working with the data.
Lastly, while not required, it is helpful to have at least enough familiarity with JavaScript to be able to edit small snippets of code. We will provide some examples of code via the example environments we’ve created (linked below), but you may need to adjust it to better suit your own needs. JavaScript is mostly used to pull in or retrieve variables, which is particularly useful if you’re running requests in a chain. It’s also helpful to be familiar with the syntax of the data you’re working with (most likely JSON or XML).
One last thing to keep in mind as you follow along is that Postman is a very flexible platform. You may find that different documentation or tutorials will describe how to do the same thing any one of several ways, all of which may work. We found that we had both taken slightly different approaches ourselves, and while we have done our best to ensure consistency in this article there may still be some minor discrepancies.
For purposes of demonstration (and to easily share our code and other materials in context), we have set up two read-only public workspaces in Postman: Deleting Electronic Collections and Setting up Course Reserves. Both contain documentation and annotated code that should prove useful if embarking on a similar project for the first time and to reference while reading this article.
Lay of the Land: Workspaces, Collections, Folders, Requests
Postman allows you to organize API requests hierarchically. A Workspace contains Collections, which can contain Folders, which contain Requests. Figure 1 shows the basic hierarchy within Postman. Each user has a default “My Workspace,” but it is possible to create new workspaces, including public ones, where multiple users can work on (or simply share) a project. Collections and Folders are useful in keeping requests organized [4] and are a good place to add documentation. Both are also important when you have a file of variables to be used in the request(s), as they allow you to “run” the requests together (a process we will describe below) and make it easy to keep certain requests that are to be run together in order, relative to one another. However, Folders aren’t required for using Postman, particularly if only using one or two API requests that don’t rely on others. Lastly, Requests are the API calls themselves that can retrieve, add, delete and update data. Requests can send parameters, authorizations or body details.
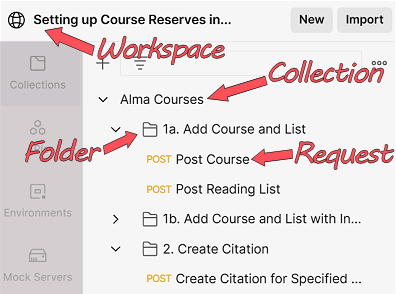
Figure 1. The basic hierarchy in Postman.
Environments and Variables
One of the streamlined parts of using Postman is the ability to use variables. Variables can be used in multiple places and save a lot of extra typing. Not to mention, using variables can help avoid potential mistakes during data entry! In the example request in Figure 2, all three of the highlighted fields are different types of variables:
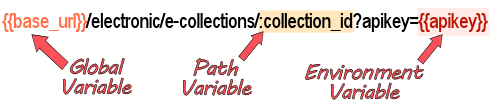
Figure 2. The API Call with different types of variables.
The {{base_url}} is a global variable, meaning that it is used for the entire workspace. One approach is to set a variable at the highest level, so that if it changes, it can be edited in the least number of places. In that case, you could set the Alma API base URL as a global variable.
Environments are where you can store variables to be used in Collections. Environments save you time because you enter information in one place that can be reused in all of your requests. For example, considering Alma, you might have an environment for production as well as one for your sandbox, since they each have different API keys. The environment will also temporarily store any variables that are used by requests, so that as a Collection is run, Postman can reference the environment and use those values. It is easy to switch between environments, so once you have tested in the sandbox, it is only a couple clicks to move your work into production.
Setting up a Request
Once all of the basic configurations have been put into place, it is relatively simple to create a request and make sure that everything is working as expected. There are many ways to create a new request, starting with the “+” found in the main pane of the interface. (You can also hit the “New” button in the sidebar and select “HTTP Request”).
In the example in Figure 3, the request contains two environment variables, one for the base Alma URL and the other for the API key which were set up as part of this “Alma” environment. The drop down ahead of the path allows you to select the method for the request (GET by default, which retrieves data). If everything is working properly, hitting “Send” will bring up the response body which you can then view to make sure the data returned is what you expected.
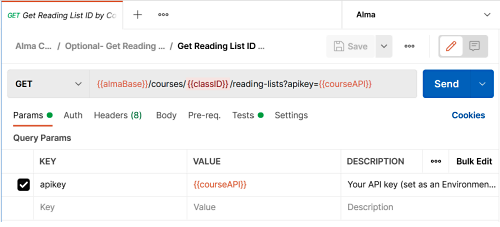
Figure 3. The basic request screen.
Parameters
Parameters have values that are used in the API request URL. Often, an API request will require authentication in the URL itself as well as other IDs. In the case of the Alma/Primo APIs, the API key is sent as a parameter, rather than in a header or elsewhere in the request, and the URL will often also require some kind of identifier like an MMS ID, which is the “Metadata Management System ID” and unique number for the bibliographic record in Alma. Postman contains a tab labeled as Params where you can enter the key (parameter name like apikey) and value, which can be either a variable in curly brackets like {{apikey}} or a static entry like limit=10. Postman divides the params tab into query params and path variables. The main difference between the two is that query params are appended to the end of the URL following a question mark (?apikey=12345), while path variables are part of the URL and use a placeholder preceded by a colon (:collection_id). The params tab displays the data in a table so it is easy to enter and view parameters.
Other Parts of the Request
Depending on the task at hand or API you’re working with, there are more options that can be set up as part of the request. These additional tabs following the params tab are for the remaining parts of the request: authorization, headers, body, pre-request script, tests and settings.
The authorization tab is where you can enter authentication details and Postman will automatically place that information into the request. There are several types of authorization to choose from, including API Key and OAuth. Our examples do not make use of this tab, but it can be a helpful way to enter data in one place, similar to variables. Collections and folders also contain an authorization tab where you can set the details to be inherited by all of the requests contained in it, if you would prefer to set these details more globally.
The headers tab includes auto-generated headers from Postman, and is where you may enter your email address, if working with an API that offers a polite option with additional features, meaning that the user identifies themself and in exchange may get a faster response. This is also a place where you can specify what format you want the response returned in, which is useful in working with the Alma APIs as the default response is returned in XML, but JSON is the preferred format for working with Postman, particularly for parsing the data and using it in scripts, which is discussed shortly.
The body tab is where you can enter information that needs to be sent as part of the request to add or update structured data. This often takes the form of JSON or XML, and can accommodate variables from your workspace. You will likely need to include body data when using a PUT or POST request.
The pre-request script tab is where you can enter code snippets written in JavaScript that are run before the request is sent. These are essential for doing tasks like retrieving a variable that was obtained from a previous request and stored in your active environment. It’s not necessary to know JavaScript, since Postman provides some examples in the right sidebar on this tab that are easily adapted. One example of a pre-request script is this code, which gets a variable from the environment.
pm.environment.get("collection_id");
The tests tab contains code written in JavaScript that is run after the request response is received. Like with pre-request scripts, tests can use variables and Postman provides code snippets that can be easily adapted. You can carry out tests on response data as well as pass data between requests using this tab. For example, the following code was edited from the existing snippet “Status code: Code is 200” available in Postman. However, the ExLibris documentation mentions that a code of 204 indicates that the Alma Delete Electronic Collections request was successful, so the snippet was edited to read.
pm.test("Status code is 204", function() {
  pm.response.to.have.status(204);
});
This will create a green (pass) or red (fail) indicator when the API request is sent in the Postman Collection Runner, discussed below, and makes it easier to identify the API requests that fail and require attention. Tests are also where you can record response data to the console, for human viewing or saving as the request is run. The console is accessed at the bottom of the screen in Postman and provides details about a request, including the results of tests, for you to review. For example, this code logs the “collection_id” variable in the Console: console.log(pm.environment.get("collection_id")); Figure 4 shows the result of the console.log code to display the service_id that was retrieved for this request.

Figure 4. Request Test and its subsequent display in the Console.
Running Collections and Folders Using CSV
With all of the basic pieces in place, you could very well go ahead and run individual API calls, one at a time. For some purposes this might be totally fine, but the real power in using a tool like Postman is that you can run a series of API calls using variables imported from a CSV file. Postman has a tool called Runner that can work on either the Collection or Folder level and will run a series of requests iteratively for each line of the CSV. This is useful when you have a series of requests to run that only differ in specific variables that can be set in the URL path, query parameters or request body. Just note, if you are loading a CSV, it is important to ensure that the column headers match any variable names you’re using exactly.
When you open a Collection or Folder, a series of actions will be shown near the title that include Run (depending on your screen, you may see a Play button in a square instead). This will launch the Runner within the current level. From there you can select which of the API calls in the Collection or Folder you wish to run or adjust their order. Figure 5 shows the Runner screen, set up to run a series of requests.
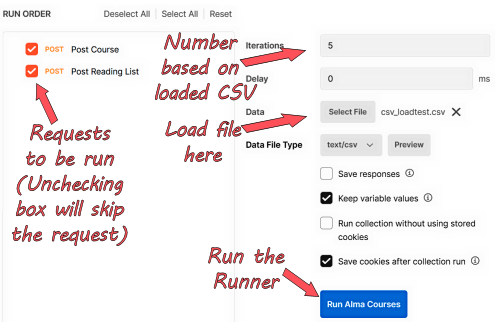
Figure 5. The Postman Runner.
In the Runner there is an option for loading a data file. Loading a file will update the number of Iterations to match how many lines are in the file, and a delay can be set in milliseconds if desired. You can also preview the input file to make sure it looks right before running the calls.
A Note about Number Strings and CSVs
One important thing to note is that when data is loaded in the Runner, Postman makes its best guess as to the format of the data in each of the columns. Usually this is fine, but we have found that long strings of digits such as Alma’s MMS IDs, or 10-digit ISBNs that have vital leading zeros may get reformatted. For Postman to see these values as a string and not truncate them, they must be enclosed in quotation marks.
To ensure the values are enclosed in single quotation marks ends up being a bit of a convoluted process, but is very important. The value can either be enclosed in quotation marks in Excel (or comparable software) or added directly to the column formula if using Alma Analytics. However, when the data is saved as a CSV file, you may then find that your values now have three sets of quotation marks instead of just one. You’ll have to take the intermediary step of removing them in your text editor of choice before using them with the Runner in Postman.
Chaining Requests
The real power from a tool like Postman is that not only can you run a series of requests easily, but you can use data returned from one request to serve as variables in a subsequent one, a process known as chaining. This is particularly useful when the first response returns a value that is directly related to a subsequent request in the series. One example, discussed in more detail below, involves the creation of a Reading List that requires the Course ID for the associated Course as part of the request’s URL. Having a chain set up means that the Course ID created in the first process and then stored as a variable can then be used for the next request’s path to create the associated Reading List.
As mentioned above, this is achieved through the use of tests and pre-request scripts. To set up chained requests the test on the first request needs to include JavaScript to set environment variables based on the (in this case) JSON response body data. Then, the next request has pre-request JavaScript that pulls those same environment variables in to be used again. The Postman Learning Center has a good video explaining this process, that can be found here: https://youtu.be/4fULCou_7Wc [5].
Use Cases
Cleaning up Electronic Resources
At the University of California, Santa Cruz, we encountered two scenarios that necessitated a bulk delete of electronic inventory. Unfortunately the Alma interface does not include an automated or bulk process to delete electronic collections, however, the Alma API includes a request to perform the delete. We discovered that by using Postman it was possible to perform a bulk delete of collections without building or coding a separate tool to send the needed API requests.
Our library migrated from Millennium to Alma in 2018. During migration about 1000 titles were erroneously configured as local electronic collections (databases) instead of local portfolios (ebooks). This led to confusion for users in search results. Similarly, in July 2021, the library migrated from a standalone instance of Alma to a consortial Alma environment with the other University of California campuses, which included a change in our discovery index. This led to many unnecessary electronic collections being activated in our local instance. Both of these projects remained on our to-do list because of the large amount of staff time and repetitive clicking required to correct them without using the APIs.
For the purposes of this discussion, a public version of the setup is available as a Postman workspace here: Deleting Electronic Collections. Included are detailed descriptions of each part of the request and any code that was repurposed in the pre-request script and tests sections. Additionally, these scenarios require an Alma API key with read/write permissions for the Bibs, Electronic, and Configuration areas. As a reminder, you should consider setting up an API key for both the sandbox and production environments of Alma and using the sandbox key first to test the outcome of your Postman projects.
Deleting Database Electronic Collections in Bulk
The first scenario required the deletion of about 1000 electronic collections of the “database” type, meaning the collection only has one component, the collection itself, and no service that could contain portfolios. Additionally, we wanted to retain the bibliographic record, which was then reused to attach to the proper inventory (a local portfolio) for an electronic book. To complete the task, we conducted a bulk delete of electronic collections using a CSV file of IDs and the Delete Electronic Collection API request. Since this scenario only uses one API request, the setup is fairly simple, and has only two parameters, a pre-request script, and a test to indicate if the request was successful or failed.
As described above, once the IDs are compiled into a file, you must ensure that each value is enclosed in single quotation marks with the correct label to match the variable. Here we used a simple label of “ID” to use as the variable in Postman. In the pre-request script, which runs before the API request, the JavaScript snippet (pm.iterationData.get("ID");) “gets” the numbers from the CSV file, identified as “ID” iteratively and makes them available as a variable {{ID}} for the request. The variable value {{ID}} is then used as a path variable in params for the collection_id key. This will result in the collection ID number from the CSV file being entered into the API request URL.
The additional query param of apikey has a variable {{apikey}} that is set in the environment – either sandbox or production, depending on which environment is currently selected. Also, the first part of the URL was converted to the environment variable {{base_url}} to shorten the length of the request in this view and make it more readable.
Once the API request is configured in Postman, you can perform the bulk delete by clicking the ellipsis next to the collection name, selecting “Run collection”, then “Select File”, opening the CSV file, and clicking the blue Run button. Postman will iterate through the IDs and return a pass/fail for each. Once the run is complete, it is possible to scroll through the results, sort by type or export the results.
Deleting Electronic Collections with Multiple Parts
The second scenario required the deletion of all parts of an electronic collection, including the collection’s service (which in this case had no portfolios (ebooks or ejournals)), the collection itself, and the bibliographic record for the collection. To use API requests to do all these deletes, five requests were configured which passed or reused IDs that were obtained and used by other requests. Starting with the MMS ID for the bibliographic record, the steps include two GET requests, two DEL (delete) requests and one POST (update) request.
Before starting, an “All Titles” itemized set needs to be created in Alma and you need to save the set ID, which will be used in request five. Since there are five requests that will be done in succession, they will need to be connected or chained together using variables and some easily adjusted JavaScript code. Also, because the ExLibris APIs default to an XML response but Postman works best with JSON, we chose to specify “&format=json” in the query params for the first two API GET requests to ensure information will be returned as JSON. As mentioned above, it is also possible to set this in the header instead.
As with scenario one, we created a CSV file of IDs, this time with the MMS ID of the bibliographic record and the label “MMS” to use as the variable in Postman. In the first of the five requests for this scenario, the pre-request script gets the “MMS” variable and uses it as the path variable value for the key “mms_id” in params. The tests contain more code than scenario one since the request now returns a response in JSON and we want to extract some information (the electronic collection ID and service ID) from it. The first GET request contains the following JavaScript in its test with markup explaining the function of each line of code.
// Shows if the request was successful "Pass" or not "Fail"
pm.test("Status code is 200", function() {
  pm.response.to.have.status(200);
});

// Parses the JSON from the API response
const jsonData = pm.response.json();

// Logs the jsonData in the Console for human viewing or saving
console.log(jsonData);

// Sets the environment variable called "collection_id"
// from the JSON response property called "id"
pm.environment.set(
  "collection_id", jsonData.electronic_collection[0]["id"]
);

// Logs the "collection_id" variable, the Electronic Collection ID,
// in the Console for human viewing or saving
console.log(pm.environment.get("collection_id"));
The subsequent GET and DEL requests make use of pre-request scripts and tests to both retrieve and set variables in the environment and perform the needed deletion of the Electronic Service and Electronic Collection inventory in Alma. The fifth and final request is a POST request that adds the remaining bibliographic records to the previously set up itemized set in Alma using the MMS ID and Set ID. This request sends data in the body tab in JSON and includes the MMS ID as the variable {{MMS}} that will be added to the set.
While these cleanup scenarios were largely one-time projects, the knowledge gained during the process has already been useful in performing one-off tasks. Additionally, the library is considering the use of the Alma APIs for other types of cleanup, including editing vendor and license information.
Loading Course Reserve Information
At the Borough of Manhattan Community College (BMCC), we maintained a Reserves collection in the library, but never managed the collection using Aleph (through early 2020) or Alma. This meant that information about the courses that textbooks were associated with was nowhere to be found in-system, which led to difficulties when students were looking for course materials. We wanted to both improve the experience for our users and make it easier for library faculty and staff to find the correct information, but had roadblocks in setting things up in a more orthodox way. Most importantly, we lacked the available staff time to enter the data manually, and configuring the Alma Course Loader (that could have pulled directly from the college’s Student Information System) would have involved coordination with multiple other units outside of our library that wouldn’t be able to work on our tight timetable. Additionally, it was clear that most of the information that needed to be entered was identical from course to course and list to list. Instead, it was decided that we would attempt to load the data from various spreadsheets via the API to circumvent the need for the Course Loader and work around the staffing limitations in the circulation department.
The data on courses and associated books and instructors came primarily from two different sources: from faculty (or their departments) in the college’s Student Information System (SIS) or from the information provided to the college’s bookstore. While neither data source was complete and both had various errors and other issues, it was more than sufficient to get us started as we prepared for the next semester.
The Initial Setup
Course Reserves in Alma are comprised of three separate parts: Courses, Reading Lists, and Citations. Courses can have multiple Reading Lists, but Reading Lists cannot be reused between Courses without ExLibris’ Leganto product. Citations, however, can appear on multiple Reading Lists. In an attempt to simplify the inevitable upkeep and maintenance, we decided that courses that used common book(s) would get a single course shell (ex: MAT 301), and courses where the texts differed would be split by instructor (instead of section) as the same instructor may teach several sections with the same book (ex: PSY 101- Duncan). We also decided, for the sake of maintenance, that each course we set up would only have a single Reading List. Since using the API to load data was a totally new thing for us, there was some initial trial and error to get things going, but once that was worked out the project went smoothly.
Again, for the purposes of this discussion, a public version of the setup described below is here: Setting up Course Reserves, and includes more robust documentation as well as example code.
Workflow
While the bulk of the work for this project was actually looking up and correlating data before it could be loaded (a phenomenon noted here), once Postman was configured the data load process itself was somewhat simple and is shown in Figure 6. Courses would be loaded (with or without instructor data) from CSV, and the API request that created the Course was chained to one that would generate a Reading List based on the variables in the Course request and subsequent response. Then, with a Course ID and Reading List ID in hand, those could be plugged into a separate CSV file with corresponding citation information, and then Citations would be loaded in a separate process.
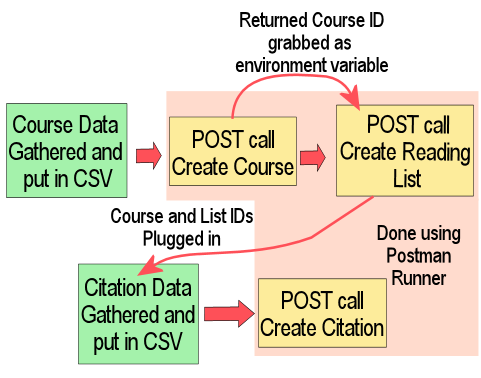
Figure 6. The workflow for loading Course Reserves via API.
The main CSV file used in the first part of the process has eight columns (with an additional three if we needed to include instructor information), each corresponding to a variable that was then set up in the request body. As everything else was the same from request to request, the remaining required fields could be fixed in the request body information. It should be noted that the academic department, processing department, and term values and descriptions must match existing values in Alma, taken from the corresponding tables in the Alma fulfillment configuration. Likewise, any added instructor information must match exactly to the instructor information already in Alma (capitalization and all).
The request body was structured in JSON with anything coming from the CSV input as a variable in curly brackets. In order to get the structure for the request body, an initial GET request was run that was then modified with placeholders for the variables. This was done to ensure that everything was structured in a way Alma expected.
{
  "code": "{{code}}",
  "name": "{{name}}",
  "section": "",
  "academic_department": {
    "value": "{{deptcode}}",
    "desc": "{{deptname}}"
  },
  "processing_department": {
    "value": "COURSE_UNIT",
    "desc": "COURSE_UNIT"
  },
  "term": [
    {
      "value": "{{termcode}}",
      "desc": "{{termname}}"
    }
  ],
  "status": "ACTIVE",
  "start_date": "{{startdate}}",
  "end_date": "{{enddate}}",
  "weekly_hours": 0,
  "participants": 0,
  "year": "",
  "instructor": [],
  "campus": [],
  "note": []
}
Then, regardless of which version of the initial course creation request was run (with or without instructor data), a test was set to grab variables for use in the second request that would generate the associated reading list:
var jsonData = JSON.parse(responseBody);
postman.setEnvironmentVariable("courseID", jsonData.id);
postman.setEnvironmentVariable("courseCode", jsonData.code);
postman.setEnvironmentVariable("courseTitle", jsonData.name);
let codeString = JSON.stringify(pm.environment.get("courseCode"));
let nameString = JSON.stringify(pm.environment.get("courseTitle"));
To make use of these variables, the follow-up request to generate the Reading List then had pre-request code that more or less replicated the end of the previous test. The Reading List code and name were derived from information provided in the first request (already present as variables), and the Course ID generated in the initial request was then fed into the request URL path of the second (Reading Lists must be linked to a specific Course ID, which is part of the request URL for all Reading List-associated requests).
With the Courses and Reading Lists created, it was then time to add Citations. There are many ways to add Citations to Reading Lists in the Alma interface depending on current workflow needs, but for this project many of the Citations were attached using the API. This ended up being especially useful in cases where we had multiple instructor-based Courses/Reading Lists that used the same textbook, as the CSV file could just have duplicate rows for each of those books with the correct corresponding IDs for the Courses and Lists the books belonged to. This part of the process required retrieving two sets of data from analytics: the existing Course and Reading List ID numbers (which can only be accessed by API or analytics) and the bibliographic data to use for the Citation so it would match existing records. The Course and Reading List ID information report used here is shared in the Alma Analytics community folder under Shared Folders/Reports/Constoria/CUNY/Course Reserve and Reading List Information, and the Citation data report can be found under Shared Folders/Reports/Constoria/CUNY/Book Data for Citation Loading via API.
By far, the bulk of the work for this phase of the project was ensuring that the texts requested by faculty were actually in our collection and that we had the correct ISBN for them. Then, once we had the requested titles on the analytics report it was only a matter of putting the correct Course and Reading List IDs in columns alongside the appropriate citations for loading so they could be used as path variables in the request URL. The only other major issue at this stage was ensuring that the MMS IDs of the citations were read as a string (see above) so it wouldn’t be parsed incorrectly.
End Result
In the end we loaded data to create just under 500 Courses and related Reading Lists and a comparable number of Citations. While the initial setup process took a fair amount of time (both in learning how to use Postman and untangle data), it is expected that future upkeep will be very manageable. Now that everything is configured, any new Courses or updates to Reading Lists will be very straightforward to add by using all of the processes that are already in place.
Further Uses
While we have outlined two specific use cases for using Postman, the tool is flexible and can be used with a wide array of other APIs in addition to the Alma APIs. While it is easy enough to send single one-off GET requests for many APIs through a browser, when additional parameters are needed or multiple requests need to be made, using a tool like Postman makes it much easier for a new or intermediate user to construct and send requests, view responses and make use of the data retrieved.
Several organizations and vendors also suggest the use of Postman to interact with their data and APIs, including NISO [6], CrossRef and Web of Science. As an example, we have also been able to do batch lookups for holdings in the Internet Archive using their public API and Postman, which has saved significant staff time for that particular project.
Conclusion
Postman has proven itself an invaluable tool for those of us without a strong coding background who still want to make use of some of the more advanced features that interacting via API would allow. While it does take some effort to get things set up initially (especially if you’re starting completely from scratch), once Postman is set up the payoff is great. We came up with much more efficient workflows that were easy to reuse and repurpose for other projects and have already begun to apply what we’ve learned to other tasks like cleaning up old patron fines and working with patron-facing collections. Basically, if there’s a project full of repetitive work that could take forever to do one at a time in something like the Alma interface, Postman is a handy tool to assist in working with APIs to leverage the mighty power they hold.
Additional resources
For purposes of demonstration (and to easily share our code and other materials in context), we have set up two read-only public workspaces in Postman: Deleting Electronic Collections and Setting up Course Reserves. Both contain documentation and annotated code that should prove useful if embarking on a similar project for the first time and to reference while reading this article.
Citations
[1] Kluck C. 2019. Alma Elsewhere: Using APIs to Sprinkle Data Around Your Organization. Atlanta, GA. http://documents.el-una.org/1913/.
[2] API tips for beginners. 2018 Feb 27. Ex Libris Developer Network. https://developers.exlibrisgroup.com/blog/api-tips-for-beginners/.
[3] Grouping requests in collections. Postman Learning Center. https://learning.postman.com/docs/sending-requests/intro-to-collections/.
[4] Postman Documentation- Introduction. Postman Learning Center. https://learning.postman.com/docs/getting-started/introduction/.
[5] Postman. 2021. Intro to Postman | Part 5: Chain Requests. https://www.youtube.com/watch?v=4fULCou_7Wc.
[6] Working with Scholarly APIs: A NISO Training Series. https://www.niso.org/events/working-scholarly-apis-niso-training-series.
About the Authors
Rebecca Hyams (rhyams@bmcc.cuny.edu) is the Web and Systems Librarian at the Borough of Manhattan Community College, CUNY. She is an avid reader of manga and graphic novels and can easily overwhelm you with title recommendations if given the chance.
Tamara Pilko (tpilko@ucsc.edu) is the Electronic Resources Librarian at the University of California, Santa Cruz. When done bending metadata to her will, she enjoys hiking and skiing in the mountains or traveling and exploring.

Subscribe to comments: For this article | For all articles
Leave a Reply