By Jonathan Bradley
The Challenges with the Old System
The 3D Design Studio at the University Libraries at Virginia Tech for years used a battle-tested queueing system. Created by Jonathan Bradley in 2017, the queueing system was a React app packaged and installed using Electron with a backend API created using Dreamfactory on a Digital Ocean VPS cloud instance. The queue was composed of a form filled out by student workers with the help of patrons, and all of the data dumped into multiple filterable, sortable, and searchable tables that allowed for updating said queue entries. The system also accommodated multiple queues, one for our standard print requests and a “special request” queue that handled particularly challenging patron requests that required input from the studio manager. The system also had a few bonus comforts, such as automatically sending an email to the user when their print was marked as completed in the system and informing them they could come pick it up, connecting to a small receipt printer in the room which is used to label prints for pickup and organize the physical objects, collecting reference question statistics, and checking user requests to make sure that a particular patron only had one job in the queue at a time.
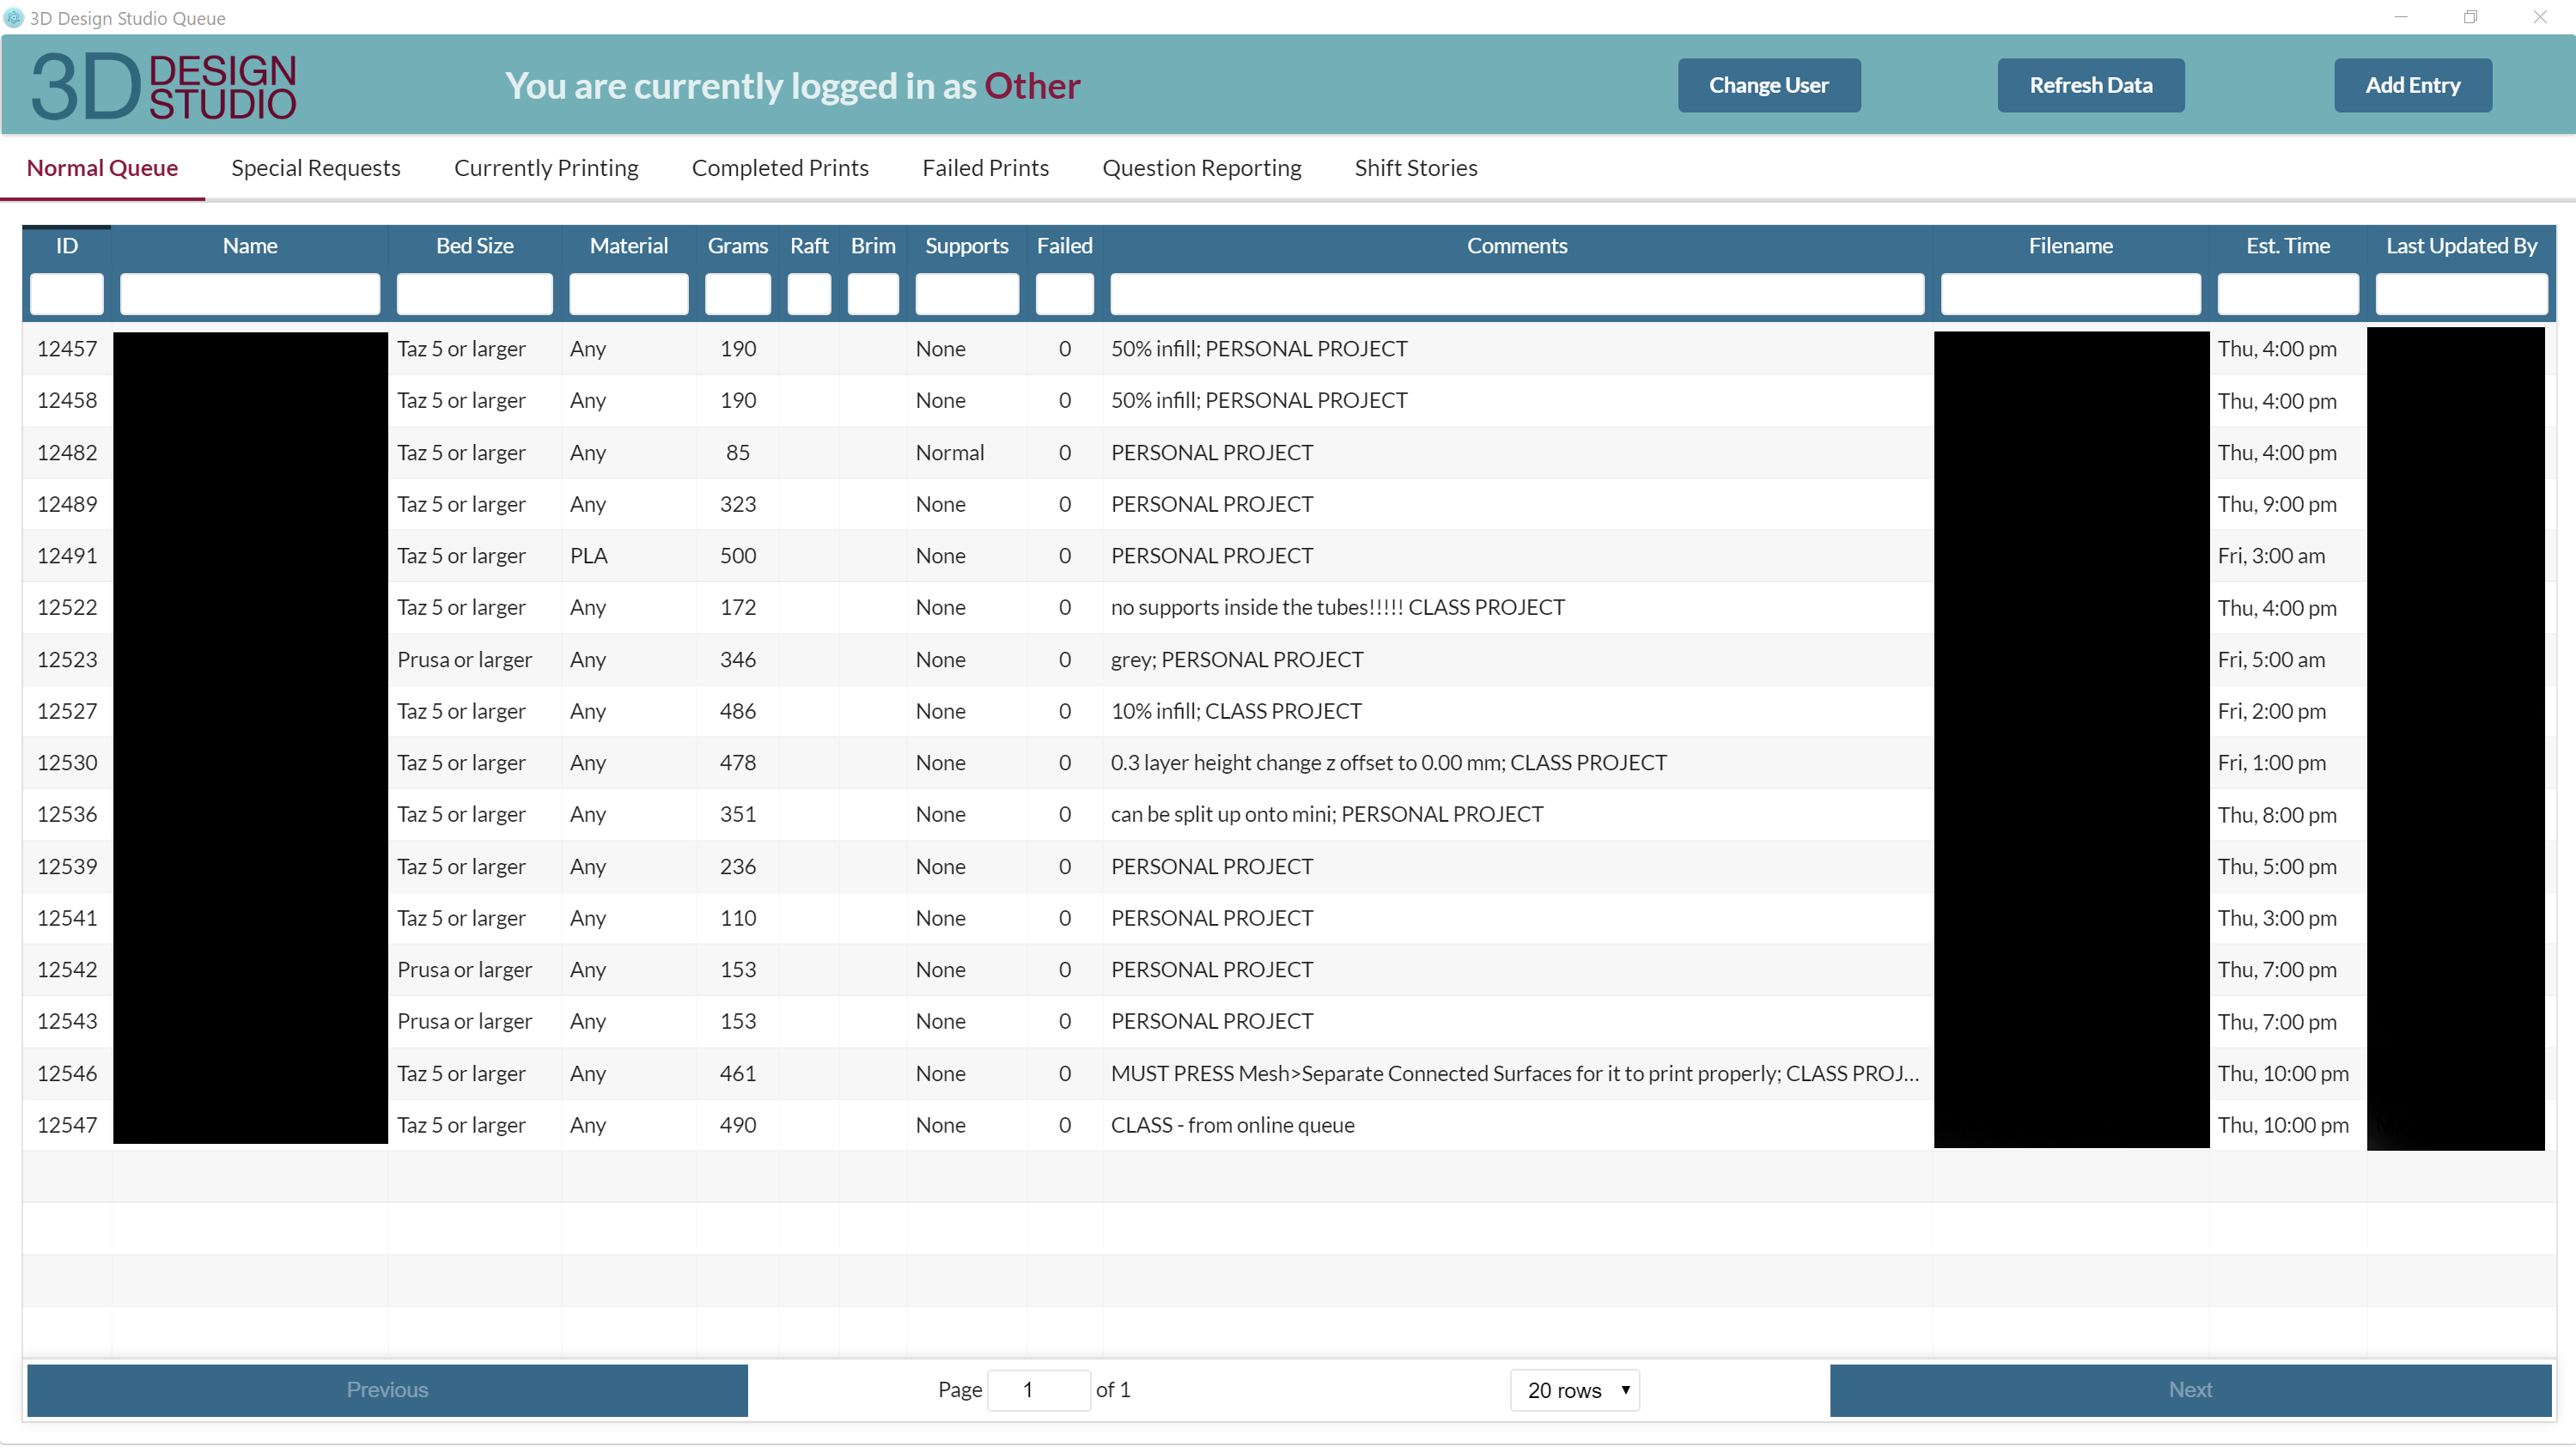
Figure 1. A screen capture of the queueing system for the 3D Design Studio, made using React and Electron
But the system wasn’t without its difficulties. The Electron system itself presented many of these challenges, the main of which was the difficulty of updating. Each time a new build needed to be made, a long build process had to be run. The software that builds Electron, called Electron Forge, was constantly changing, and it was quite common for our app to no longer build just from the changes that had happened between updates to the app. This usually meant that what should have been a small and quick update to the interface became hours of work as the build process was reestablished and dependency versions were adjusted and conflicts cleared. This made updating the app onerous, which resulted in fewer updates in general. But even after the build was completed, the install process meant physically loading the installer on a flash drive and running down to the space to install it on the studio computer. Even though Electron has a Squirrel installer option that can be run on a server to provide updates centrally, from our research, such a server could not easily be setup privately for software not intended to be distributed to the public.
The React app itself was also a problem. In general, over the years, we’ve found that React just isn’t a good solution to most of our software projects, as it is far too involved for the small projects we are creating, and the framework itself requires more overhead than we really need. And finally, our Digital Ocean VPS was presenting an ongoing problem, as a change in University policy meant the payment method we were using for Digital Ocean was not an option anymore. With no alternative way to pay them, we needed to move our backend to a different service.
When we received confirmation in fall 2020 that our proposal to build the Prototyping Studio, a large makerspace that would absorb the 3D Design Studio and greatly expand on its offerings and service model, was moving into construction, we knew this would be the time to fix many of the challenges we were facing. The new service model demanded a change to how we handle patron requests.
Fixing Our Mistakes
The first major challenge we wanted to take on was the change to the service model and ultimately, our data structure. In the 3D Design Studio’s queue, the database had a single table called “queue” that contained a field “type” where we stored information about whether the print was intended to be a resin print, special request, or just a standard print. When we made API calls to Dreamfactory, a server-side software that generates, documents, and manages REST APIs based on a database’s structure, we would filter based on this field in order to generate the individual queues in the system that were displayed to our student workers. And that worked fine for a service that was only offering 3D printers, but with the Prototyping Studio, in addition to offering all of those types of queues, we would also have people coming in to use our CNC machines, laser cutter, vacuum former, pick and place machine, etc. Additionally, patrons might come in to use multiple machines or just have multiple jobs on a single machine that were all contributing to a single project. We wanted to be able to capture how these projects were coming together and the various tools needed to finish them. We changed the primary field in our database from “queue” to “project” and decided that all entries in the system would be a project, and every project would hold the machine jobs needed to complete it. This meant our database now had many tables in it, starting with the “project” table and adding a table for each type of queued machine, including “cnc”, “laser”, “resin”, etc. The database also contains many-to-many join tables for each machine, allowing for each project to contain multiple entries for a machine job, and multiple types of machine job entries, which means now a patron could have a single project with entries for a laser cutting job, 2 resin 3D printing jobs, and a CNC machine job.
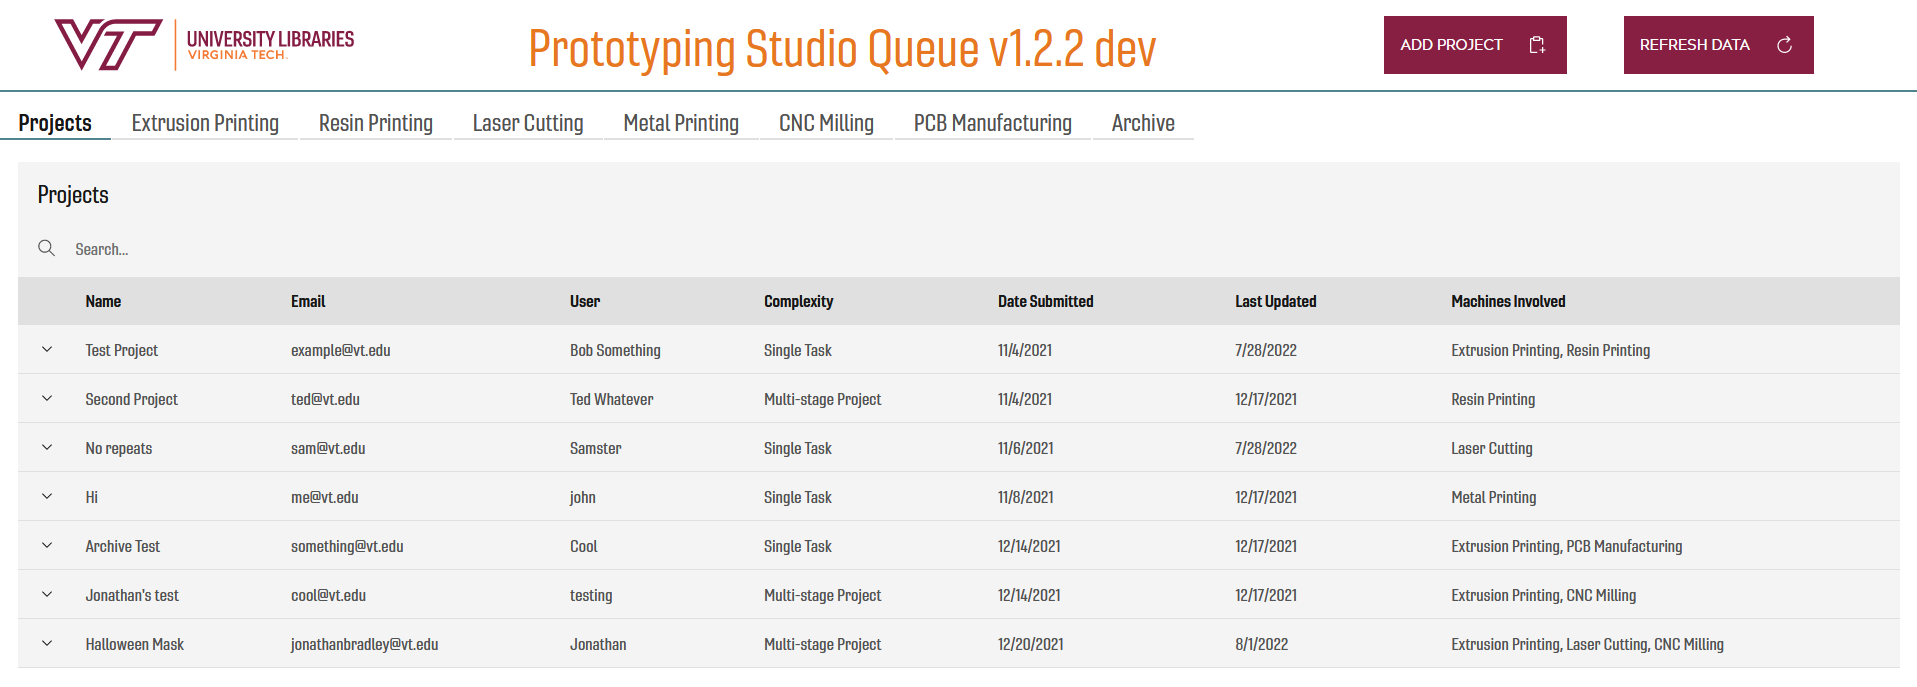
Figure 2. The main screen of the new Prototyping Studio Queue
While we kept the individual tabbed queues from the old system, each one is now filtering jobs out of a single “project” API call to our Dreamfactory instance. But in order to accommodate this, our form for adding projects needed to grow in complexity over the old system. Since a project can contain any number of job types and individual jobs, our form now has checkboxes for selecting the queues needed for the project and templated sub-forms that our student workers can add to any project.
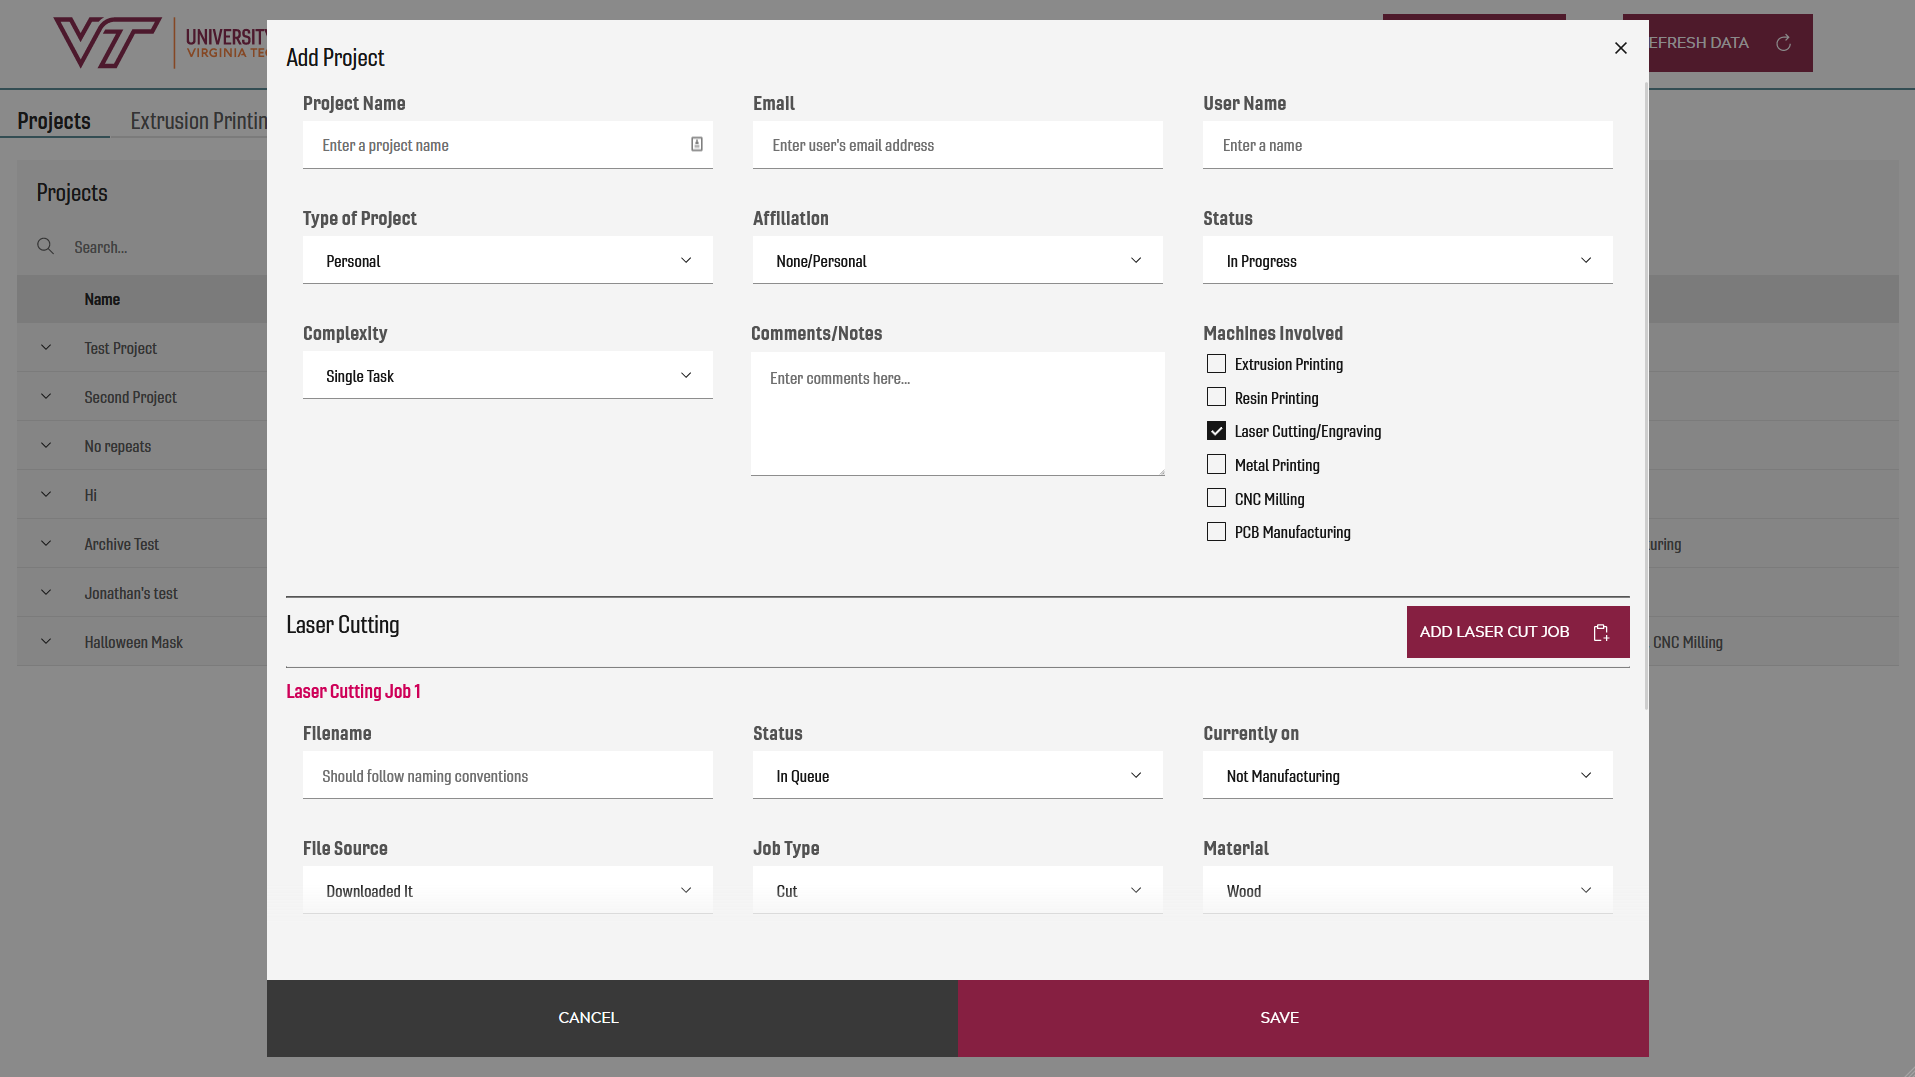
Figure 3. A sample of the form used to gather project information into the queue
With a new data structure in mind, we tackled the problem of our VPS, which we were able to solve by moving our Dreamfactory instance out of the cloud and back on-premises into a VM owned and secured by the University Libraries. By doing this, we were able to also include added security by limiting access to the Dreamfactory instance to Virginia Tech’s internal network, drastically reducing the number of potential attack vectors on the API server.
After the backend was sorted, the question became how to handle front-end concerns for the application. We wanted to avoid using Electron for the reasons listed above. Tauri, a Rust-based alternative to Electron, and Proton Native were both considered as well, but Tauri was still in early beta and both seemed to present similar concerns to Electron. We stepped back and thought about the need in more detail. The app needed to be present on three computers, all within the physical building of the library; all the data would come from API calls; the ancillary functions, like sending emails and printing receipts, were all accomplished via API calls to various endpoints as well; even saving files, an option present in the previous version of the queue but underutilized, was handled via API calls to the Dreamfactory server. We didn’t need our students to log in using any federated system because we can find out which student updated the software based on update timestamps and work schedules if need be, and we both didn’t need and didn’t want the public to be able to access the app. At the core of it, the app didn’t need to do anything outside the capabilities of a simple web application, and I had been playing around more and more with local web apps that run within the browser from the computer’s file system instead of via a server as a means of deploying one-off apps that needed to be on kiosks or other controlled points with no access from the greater internet. This sort of deployment had worked well for our patron satisfaction kiosks we have spread throughout the various studios in Newman Library, and it seemed like it could be a viable option for bypassing some of our greatest hiccups with the previous version of the queue.
The next hurdle was choice for front-end development. I had moved away from using React months prior for new projects given that it was simply far more infrastructure than was needed and often made our projects less maintainable, since not many people in our library were working within the React ecosystem. Since moving away from React, I was forgoing a front-end framework all together for new projects and coding in vanilla Javascript, but I’m a proponent of using the right tool for the job and no more. The Prototyping Studio Queue was going to be far more complicated than a feedback kiosk or a dynamic upcoming events page for digital signage, and the nature of the project, handling large amounts of data that would need to be loaded, displayed, sorted, and filtered frequently and in a user-friendly manner, could actually benefit from some of the features many frameworks offer out-of-the-box, such as two-way data binding, templating, and component-based layouts. In the end, I decided to go with Svelte; I had used it on a couple previous projects, and I really appreciated the way it implements data-binding and how little overhead it adds, leaving a project that doesn’t require much additional knowledge beyond standard HTML/CSS/JS. Its handling of app state via the built-in stores implementation was worlds ahead of the React + Redux solutions I had needed to use previously in terms of simplicity, and its build and bundle up-front strategy for websites was a benefit for a locally deployed site, since websites loaded using the filesystem instead of a server have some additional hurdles, particularly related to fetching additional files, which are treated as having opaque origins by modern browsers regardless of actual location.
The other reason Svelte was chosen was that it had a good community that had already built some component libraries for the framework based on various popular design languages, like Material Design by Google or Carbon by IBM. I often look to component libraries when developing larger projects, as they can take care of much of the implementation of common web elements like forms with validation, date/time calendar pop-ups, tooltips, etc. and in general take the process of design off the shoulders of the person doing the coding and place it on someone with more explicit training in design, which usually results in a more user-friendly experience that follows best-practices in the field of UX. It also frees up more of the developer’s time to work on the unique components that will be required for their particular app, which is always a bonus.
Looking through the potential options for a component library, we eventually landed on using the Svelte implementation of Carbon by IBM for two main reasons. The first reason was that it had a fully-featured data table component, which is the main focal point of a queueing app. Their implementation included built-in search components, sortable headers, customizable cell views, collapsible sub-rows, and many other small quality-of-life touches that can make a big difference in an app where a user is primarily interacting with data tables. The second reason was that out of the options available, Carbon was closest to Virginia Tech’s branding style, meaning with only a few tweaks to the CSS I could get the components to meet branding guidelines for the University.
I would note that even though this application, given its niche use and the lack of any public-facing distribution, didn’t actually have to meet our University’s branding guidelines. I always try to meet them regardless because I find that 1) it is good practice to be in the habit of always trying to meet your University or organization’s defined style, 2) in a component-based development process, the things you build can be reused elsewhere in the future, and 3) it lends legitimacy to the things you build, ensuring your student workers and any patrons who see the application view it as a cohesive part of the ecosystem established by your organization and not some random or potentially sketchy software.
The Structure and Maintainability of the App
A number of features were implemented in the development of this app from the beginning with the goal of making it a simple task to update. The first was the modularization of the major functions. All the named functions within the app are contained in their own file, which is named after the function, in a folder called “lib,” and the functions are exposed the rest of the app via an index file in the folder that imports and exports each function
export { searchTable } from "./searchTable.js";
export { getData } from "./getData.js";
export { resetSchema } from "./resetSchema.js";
export { sendReceipt } from "./sendReceipt.js";
export { sendEmail } from "./sendEmail.js";
export { filterQueues } from "./filterQueues.js";
export { editEntry } from "./editEntry.js";
export { buildSubRows } from "./buildSubRows.js";
export { saveEntry } from "./saveEntry.js";
export { getArchive } from './getArchive.js';
export { addJob } from "./addJob.js";
export { makeActive } from './makeActive.js';
export { closeProject } from './closeProject.js';
export { checkProjectStatus } from './checkProjectStatus.js';
Figure 4. Code snippet from index.js that imports and exports all of the function in the lib folder
This sort of modularization is common in many programming ecosystems and may not seem like much, but I strongly recommend this practice to anyone building apps, especially in Javascript. This allows for easy debugging of your functions and makes them reusable not only within the app, but within other projects as well. I’ve written a filtering function for data tables that has made its way into half a dozen different projects, which was made possible by designing all of the functions to be modular.
The second concern was the nature of the space this queuing app will serve. Given our previous experience with the 3D Design Studio, we know to expect this service to evolve, which almost assuredly means both new machines in need of their own queue becoming part of the service and changes to the nature of the forms and the information we need to run a job on a given machine. In the past, making substantial changes to the forms or adding a new queue would mean a lot of editing code and customizing the solution for that particular scenario, which was something I wanted to avoid moving forward. This app contains a config.js file that exports a JSON object to the app with definitions for all of the queues in an array of objects:
queues: [
    {
      label: "Projects",
      machine_id: false,
      headers: [
        { key: "project_name", value: "Name" },
        { key: "email", value: "Email" },
        { key: "user_name", value: "User" },
        { key: "complexity", value: "Complexity" },
        { key: "timestamp_created", value: "Date Submitted" },
        { key: "timestamp_updated", value: "Last Updated" },
        { key: "machines", value: "Machines Involved" },
      ],
    },
    {
      label: "Extrusion Printing",
      machine_id: "extrusion",
      form: {
        active: "extrusion_jobs",
        definition: extrusionDefinition,
        buttonText: "Extrusion Print",
      },
      headers: [
        { key: "user_name", value: "User" },
        { key: "email", value: "Email" },
        {
          key: "activeExtrusion.currently_on",
          value: "Currently On",
        },
        {
          key: "activeExtrusion.timestamp_created",
          value: "Date Submitted",
        },

        { key: "activeExtrusion.filename", value: "Filename" },
        {
          key: "activeExtrusion.comments",
          value: "Comments/Notes",
        },
        {
          key: "activeExtrusion.printer_size",
          value: "Print Size",
        },
        { key: "activeExtrusion.material", value: "Material" },
        {
          key: "activeExtrusion.print_weight",
          value: "Estimated Filament",
        },
        {
          key: "activeExtrusion.print_time",
          value: "Estimated Time",
        },
      ],
    },
Figure 5. Snippet of code from config.js illustrating the structure of the array of objects that define two example queues
Instead of coding a UI for each queue, the system loads this array and loops through it, building the queue UI tabs based on the data provided. This allows for the creation of a new queue by simply adding a definition to this config file instead of coding an interface for it.
<Tabs>
  {#each config.queues as tab}
    <Tab key={tab.label} label={tab.label} />
  {/each}
  <Tab key="Archive" label="Archive" />
  <main slot="content">
    {#each config.queues as tab}
      <TabContent key={tab.label}>
        {#await $allData}
          <Loading />
        {:then}
          {#key $allData}
            <Table
              fullData={filterQueues($allData, tab.machine_id)}
              headers={tab.headers}
              title={tab.label}
              id={tab.machine_id}
            />
          {/key}
        {/await}
      </TabContent>
    {/each}
    <Archive />
  </main>
</Tabs>
Figure 6. Snippet of code from TabBar.svelte that builds the queues
Similarly, the project contains a folder called Forms, which contains numerous definition files, one for each form. These definition files, too, export a JSON object that contains an array of objects with the required data to build the form, including the type of form question, be it text input, number input, dropdowns, etc., the data the form answer should be bound to, and any restrictions on the input.
export default [
  {
    type: "text",
    id: "filename",
    label: "Filename",
    placeholder: "Should follow naming conventions",
    bind: "filename",
  },
  {
    type: "select",
    id: "status",
    label: "Status",
    bind: "status",
    email: true,
    options: [
      {
        value: "In Queue",
        text: "In Queue",
      },
      {
        value: "Completed Successfully",
        text: "Completed Successfully",
      },
      {
        value: "Failed",
        text: "Failed",
      },
      {
        value: "Remove",
        text: "Remove",
      },
    ],
  },
  {
    type: "select",
    id: "currently_on",
    label: "Currently on",
    bind: "currently_on",
    receipt: true,
    options: [
      {
        value: "Not Manufacturing",
        text: "Not Manufacturing",
      },
      {
        value: "Lazer Face",
        text: "Lazer Face",
      },
    ],
  },
  {
    type: "select",
    id: "source",
    label: "File Source",
    bind: "source",
    options: [
      {
        value: "Downloaded It",
        text: "Downloaded It",
      },
      {
        value: "Made It Myself",
        text: "Made It Myself",
      },
      {
        value: "Edited a Download",
        text: "Edited a Download",
      },
    ],
  },
  {
    type: "select",
    id: "job_type",
    label: "Job Type",
    bind: "job_type",
    options: [
      {
        value: "Cut",
        text: "Cut",
      },
      {
        value: "Engrave",
        text: "Engrave",
      },
      {
        value: "Both",
        text: "Both",
      },
    ],
  },
  {
    type: "select",
    id: "material",
    label: "Material",
    bind: "material",
    options: [
      {
        value: "Wood",
        text: "Wood",
      },
      {
        value: "Acrylic",
        text: "Acrylic",
      },
      {
        value: "Hardboard",
        text: "Hardboard",
      },
      {
        value: "Other/Patron Provided",
        text: "Other/Patron Provided",
      },
    ],
  },
  {
    type: "number",
    id: "length",
    label: "Length of Material",
    invalidText: "This won't fit on the machine.",
    helperText: "in inches",
    bind: "length",
    min: 1,
    max: 36,
  },
  {
    type: "number",
    id: "width",
    label: "Width of Material",
    invalidText: "This won't fit on the machine.",
    helperText: "in inches",
    bind: "width",
    min: 1,
    max: 24,
  },
  {
    type: "textarea",
    id: "comments",
    label: "Comments/Notes",
    placeholder: "Enter comments here...",
    bind: "comments",
  },
];
Figure 7. Code from laserDefintion.js that defines the form for our laser cutter
The folder also contains FormTemplate.svelte, which takes the data provided in the array and loops over it in order to build each form. This approach means that adding a whole new form means only adding the definition file, and updating an existing form is as simple as changing the values in a JSON file instead of re-coding an interface. It also means bugs, like one we encountered where dropdowns weren’t resetting after an entry was saved, need only be fixed in a single place for all forms.
<div
    class="queue-container"
    style={$currentProject[[active]] ? "" : "display:none;"}
  >
    {#each formDefinition as question}
      <div class="question-container">
        <FormGroup>
          {#if question.type === "text"}
            <TextInput
              id={question.id}
              labelText={question.label}
              placeholder={question.placeholder}
              bind:value={$data[index][[question.bind]]}
              required={true}
            />
          {:else if question.type === "select"}
            <Select
              id={question.id}
              labelText={question.label}
              bind:selected={$data[index][[question.bind]]}
              on:input={(e) => {
                question.receipt
                  ? receiptCheck(e, index)
                  : question.email
                  ? emailCheck(e, index)
                  : null;
              }}
            >
              {#each question.options as option}
                <SelectItem value={option.value} text={option.text} />
              {/each}
            </Select>
          {:else if question.type === "number"}
            <NumberInput
              min={question.min}
              bind:value={$data[index][[question.bind]]}
              max={question.max}
              invalidText={question.invalidText}
              helperText={question.helperText}
              label={question.label}
            />
          {:else if question.type === "textarea"}
            <TextArea
              id={question.id}
              labelText={question.label}
              bind:value={$data[index][[question.bind]]}
              placeholder={question.placeholder}
            />
          {/if}
        </FormGroup>
      </div>
    {/each}
  </div>
Figure 8. Code snippet from FormTemplate.svelte illustrating how the form is generated using the definition file
One of the other major concerns to arise concerning maintainability surrounded the global state of the app. Using Svelte already solved many of the headaches related to store-based global state, primarily because it doesn’t require writing additional control functions for saving and retrieving data and it provides some nice shortcuts in the form of the $ operator before a variable, which allows you to access the store value instead of having to first assign it to a local variable. But the nature of this queue, where every project is potentially composed of multiple sub-queues, and those sub-queues may have multiple entries in them, meant that reconciling this complex series of forms prior to saving updates or creating new entries in the database required multiple custom functions. However, we were able to replace these functions and instead use the derived store functionality of Svelte to reconcile them, drastically improving the readability of the code and removing that logic from the inner workings of the app and placing it in the stores.js file where it can be easily found.
export const finalProject = derived(
  [
    currentProject,
    currentExtrusion,
    currentResin,
    currentLaser,
    currentMetal,
    currentMill,
    currentPcb,
  ],
  ([
    $currentProject,
    $currentExtrusion,
    $currentResin,
    $currentLaser,
    $currentMetal,
    $currentMill,
    $currentPcb,
  ]) => {
    let project = { ...$currentProject };
    delete project.cells;
    delete project.timestamp_created;
    delete project.timestamp_updated;
    project.extrusion_jobs
      ? ((project.extrusion = $currentExtrusion), delete project.extrusion_jobs)
      : (delete project.extrusion_jobs, delete project.extrusion);
    project.resin_jobs
      ? ((project.resin = $currentResin), delete project.resin_jobs)
      : (delete project.resin, delete project.resin_jobs);
    project.laser_jobs
      ? ((project.laser = $currentLaser), delete project.laser_jobs)
      : (delete project.laser, delete project.laser_jobs);
    project.metal_jobs
      ? ((project.metal = $currentMetal), delete project.metal_jobs)
      : (delete project.metal, delete project.metal_jobs);
    project.mill_jobs
      ? ((project.mill = $currentMill), delete project.mill_jobs)
      : (delete project.mill, delete project.mill_jobs);
    project.pcb_jobs
      ? ((project.pcb = $currentPcb), delete project.pcb_jobs)
      : (delete project.pcb, delete project.pcb_jobs);

    // console.log(project);
    return project;
  }
);
Figure 9. Code snippet from stores.js of derived store that contains all queues
App Deployment
With the app itself working and ready for use, the question of how to improve the deployment process over the old queue became front and center. Three major concerns stood out, the first being the need for the process to be as easy as possible. Apps that are easy to update are updated more frequently; that’s just a fact of the development world, and it’s a truth I didn’t want to fight against. The second concern was removing the need for manual deployment to the physical computers where the app would live. Carrying flash drives around the building, interrupting service points, running from floor to floor to each computer, all of this amounted to an annoyance that had grown over time. And finally, the third concern was the need for a development version of the application to be available as well. In the past, we’ve had to train student workers using the production queue since it was the only version that our manager had access to, and training using production data is never a good idea.
Eventually it became clear that git was the solution that would fix concerns one and two. Git was already part of the workflow for development of the app, and we had used git pulls as a way of deploying other apps, such as the aforementioned feedback kiosks, so this seemed like a reliable solution here as well. We also decided to simply bundle the development version of the app in with the deployment of the production app, and differentiate the version in both name and visual style.

Figure 10. The header for the development version of the app

Figure 11. The header for the production version of the app
The eventual workflow began to look like this: the developer makes an update to the app, and once tested and ready for production, uses a custom npm script command called “build-all” that builds two versions of the app, one that is passed a “dev” variable and another that is passed the “prod” variable. These variables are used in the build process of the app to decide which API endpoints and keys to use and which template to use to style the app header. Each separate build, after completing, is copied by the script into its own special folder, one called “Production” and the other “Training.” Those two folders are part of their own git repository, separate from the repo that contains the source code, and after the build script is completed, the repo is committed and pushed to Virginia Tech’s install of Gitlab.
Meanwhile, each computer in the building that should have access to the queue, which includes the manager’s, the service point computer, and the developer’s, all go through a one-time setup. On each computer, a Windows batch script is placed in the Windows Documents folder. This script has the information needed to pull the repository down from Gitlab and place it in the current directory. The script is then added to the Windows Task Scheduler to run every night at 2:00am, when it will do a “git pull” and get any updated code from the repository. Finally, two shortcuts are placed on the desktop of the computer, one called “Prototyping Queue” and the other “Training Queue,” each of which point back to the index.html files in their respective folders. When clicked, the app is opened in the default browser, and the user can go about managing queue functions as normal.
This structure means that updates are as simple as running a single bash command to build the app and then committing it to the repository. From there, the app will automatically be updated at 2:00am, or in the case that something isn’t working quite right or the update needs to happen immediately, the user on the computer can simply open their Documents folder and double click on the Windows batch file, which will immediately instigate a “git pull” against the repository.
Using this deployment structure, we’ve been able to manage the app in a much more timely manner, including identifying bugs and then fixing and deploying those changes in a matter of minutes as opposed to the far more involved development pipeline that existed for the previous application.
Looking Ahead
The changes to our queueing system put into place for the new Prototyping Studio have proven to be effective and have saved a great deal of developer time and effort, and the overall gains that could accumulate over the lifetime of the application speak to the benefits of this simple deployment structure for applications that don’t require public-facing servers. The biggest challenge another organization might face in producing similar applications is likely the Dreamfactory server space for API handling. We are lucky enough to have infrastructure in place to fill that gap in the workflow, but that may not be the case for everyone. In those situations, a local SQLite3 database bundled with the app might be a usable stand-in. It is an alternative I have been considering more frequently as of late, but having a readily available and self-generating API on top of said database is a problem I have not investigated fully. I feel confident that a solution could be put together using Deno and its ability to compile scripts to binary executables, but it is possible that an even simpler solution exists as well.
As for our own Prototyping Queue, the issues tracker has no current outstanding bugs reported from our student workers, mostly due to the ability to quickly make updates and deploy them, but we do have some feature enhancements we are looking to implement in the near future. The one currently at the top of our priority list is to enable file uploads from our student workers, which will allow for better tracking of the files needed to complete a project and potentially allow for the collection of “evidence” in the situation in which a patron wishes to add their project to their ePortfolio and needs photos of the prototyping process or other materials collected related to their work to upload later. The other major enhancement we are currently strongly considering is the addition of a data visualization tab that would allow for a quick glance at some anonymous real-time statistics about the various projects in the queue. Both of these, however, are luxuries, not requirements, that we are able to pursue now that we have a queue redesigned with a focus on simplicity and maintainability instead of just having something that works.
About the Author
Jonathan Bradley is the Assistant Director for Learning Environments and Innovative Technologies at the University Libraries at Virginia Tech. In this position, he oversees the Libraries’ six studio spaces, which focus on technologies ranging from virtual reality to media production to maker tools. He also does web development for the studios, creating various tools to gather feedback from patrons and improve the service point experience. He earned his doctorate from Middle Tennessee State University in 2013.

Subscribe to comments: For this article | For all articles
Leave a Reply