Introduction & Background
R is a programming language and software environment commonly used for statistical computing, data analysis, and graphical representation. It provides a wide variety of statistical (linear and nonlinear modeling, classical statistical tests, time-series analysis, classification, clustering, …) and graphical techniques, and is highly extensible.[1]
Python is a computer programming language often used to build websites and software, automate tasks, and conduct data analysis. It is a general-purpose language, meaning it can be used to create a variety of different programs and isn’t specialized for any specific problems. This versatility, along with its beginner-friendliness, has made it one of the most-used programming languages today.[2]
In 2021, Colorado State University Libraries (CSUL) moved heritage materials from DSpace to CONTENTdm. To streamline the process, R and Python scripts were used to handle several time-consuming tasks. Tasks included resizing images in batch regardless of their orientation, matching transcripts with scanned images, creating PDF files based on file names, and building file structures for batch ingesting compound objects.
Setup
If you’re new to programming, you might find it difficult to set up the compiling environment on your computer. Thankfully, there are workshops and classes available that can teach you how to do it effectively and efficiently. For example, Colorado State University collaborates with Software Carpentry (https://software-carpentry.org/) to offer the free workshops “Programming with R” and “Programming with Python” to all employees. Coursera has various Python classes, including entry-level classes, for instance, “Python for Everyone” (https://www.coursera.org/specializations/python). These workshops and online courses normally provide detailed instructions on how to set up the environment for running these programs. If you run into problems, there will be someone to help.
To run R programs, you need to install R software itself (http://ftp.ussg.iu.edu/CRAN/) and RStudio Desktop (https://www.rstudio.com/products/rstudio/download/#download).
To run a Python script, you can use the python command in a terminal, which works on all platforms, including Mac OS, Windows, and Linux. You may also use Anaconda, an open-source Python distribution platform. For editing scripts, you can use Jupyter Notebook, Atom, or even Notepad.
Using R for Metadata Normalizations
Challenges
CSUL previously hosted its cultural heritage materials, data, and traditional institutional repository materials in DSpace, which adapts Dublin Core Standards. For our institutional repository, qualified Dublin Core is our default metadata schema. For example, dc.contributor with qualifiers can be expressed as:
- dc.contributor.author
- dc.contributor.advisor
- dc.contributor.committeemember
At the time of migration, this element had more than 20 qualifiers, which was found to be unsustainable. The migration team decided to adopt the Resource Description and Access (RDA) guidelines[3] for descriptive cataloging.
For example, in DSpace one record’s author field was expressed as:
dc.contributor.author Bright, Donald E.
In CONTENTdm this field would be expressed as:
dc.creator Bright, Donald E., author
With more than 90,000 records to clean up in two weeks, there was no way this could have been done manually. The complexity of the metadata also meant that out-of-the-box software could not be used. Therefore R was chosen for this task because of its data manipulation abilities.
Solution
- Exported all collections metadata from DSpace into CSV files.
- Used an R script to read CSV files and convert dc.contributor.* to dc.creator.
- Updated collections in DSpace using the newly generated CSV files.
- Migrated collections from DSpace to CONTENTdm (performed by OCLC).
How the R Script Works Behind the Scenes
- Reads an exported collections’ metadata file, creates a copy, and adds the dc.creator column to the end if it doesn’t already exist.
- Scans files row by row. If a dc.contributor.* entry is found, manipulate the entry, place the new data in its dc.creator cell, and then delete data in the original dc.contributor cell. Scans for next dc.contributor entry until all dc.contributor.* columns are processed and move to the next record.
- Loops through and processes the next collection’s file in the folder until all CSV files have been processed.
All names from dc.contributor.(qualifier) columns were modified and moved to the dc.creator columns. Some entries had only one author while others could have multiple authors with different qualifiers. The most difficult column to clean is dc.contributor.author. When items are added to DSpace, the system automatically attaches Universally Unique Identifiers, UUIDS to the entry. UUID is used to identify information across a computer system.[4] For example, ff4d344e-a2c5-4bfc-8271-553b416db8f0 is a UUID. The underlined example record in Figure 1 has three authors:
Albertson, Maurice L.::ff4d344e-a2c5-4bfc-8271-553b416db8f0::500||Birky-Kreutzer, Pauline::a588f279-d14b-4941-87f6-fc1ed5741ac6::500
And
Peach Corps (U.S.)
At the time of migration, we could not find software to clean up entries with UUIDS efficiently. However, looking closely, we found patterns. UUIDs begin with “::” followed by either 39 or 41 alphanumeric characters. If there are multiple authors, their names are separated by “||”. A programming script can easily extract names from these entries that contain UUID. Additional “dc.contributor” fields will be appended to the end of the entry if present.
The new creator filed would be:
Albertson, Maurice L., author|| Birky-Kreutzer, Pauline, author||Peace Corps(U.S.), institution
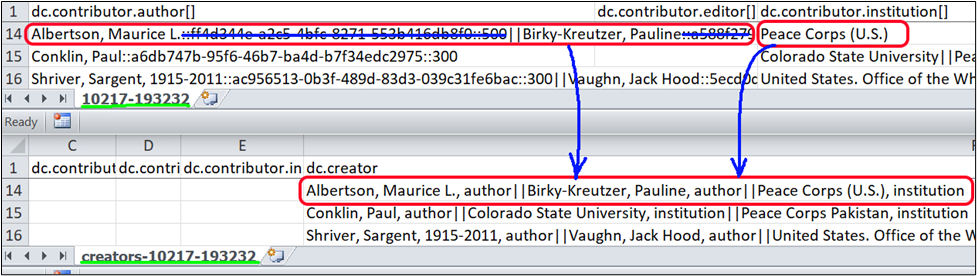
Figure 1. Comparison of the original and the newly created metadata files.
Running R Code Using RStudio
An R script is essentially a text file that can be executed in two ways: through the use of RStudio or via a command prompt. We chose to create and execute R code in RStudio, a free, open-source IDE (integrated development environment) for R. Its interface is organized so that the user can clearly view graphs, data tables, R code, and output all at the same time.[5] The screenshot below displays two sections. The top section is the code display window, while the bottom section shows the running processes. Any errors, warnings, or print statements will be displayed in the bottom section as well.

Figure 2. RStudio interface
Sample code
R has many modules that come with useful functions. For this project, “sjmisc” and “stringr” modules were imported.
library(sjmisc)
library(stringr)
The “setwd” function is used to set a working directory that will house all original CSV files and newly created ones. The “list.files” built-in function retrieves all files from a specified folder.
setwd("~/Desktop/R/batch1")
file_list <- list.files()
The following commands read in CSV files.
orgdata <- read.csv(file_list[[Z]])
newdata <- orgdata[,names(orgdata)!=""]
This command defines a function to modify author names.
add_new_authors <- function(authorList, column, title){
    for (c in 1:total_rows){ … }
To extract author names, the “regexp” function,[6] is used to find the positions of “::”.
positions <- gregexpr(pattern='::', org_names, ignore.case=FALSE)
The “substr” function is used to extract author names from dc.contributor.author field.
authorname <- substr(org_names,name_first_char, name_last_char)
The “paste0” function is used to attach “, author” to an author name.
authorList[[c]] <- paste0(authorname,", author")
For a reason we could not determine, DSpace sometimes creates columns with “[]”. For example, one spreadsheet might have dc.contributor.author and/or dc.contributor.author[] columns. To check for the existence of these columns, we use the “%in%” operator, which is designed to determine if an element belongs to a vector or dataframe. For this script, each CSV file is read in as a dataframe. To check if a column with “[]” exists or not, R uses “..” instead of “[]”. Therefore to check if the dc.contributor.author[] column exists or not, “dc.contributor.author..” %in% is used. If these columns exist, it calls the “add_new_authors” function to create an entry for the dc.creator column.
  if("dc.contributor.author" %in% colnames(newdata))
  {  cList <- add_new_authors(cList, newdata$dc.contributor.author,"author")
     newdata$dc.contributor.author <- ""
  }
  if("dc.contributor.author.." %in% colnames(newdata))
  {  cList <- add_new_authors(cList, newdata$dc.contributor.author..,"author")
     newdata$dc.contributor.author.. <- ""
  }
After we had the data for the creator column, we used the “write.csv” function to create a new file. The new file name will have “creators-” prefix.
newFileName <- paste0("creators-",file_list[[Z]])
write.csv(newdata, file = newFileName, row.names = FALSE)
Improvements
This script was the first script the author wrote in R, so it is by no means perfect. There could be many improvements, especially error handling. Though, even an imperfect script could process a collection with thousands of entries in several seconds and it helped us to meet the migration deadline.
Using Python to Resize Images
CONTENTdm provides an extension that enables the Project Client, a platform for adding content to CONTENTdm site, to generate file transcripts by using Optical Character Recognition (OCR).[7] To use the extension, a separate license needs to be purchased and each license only allows 10,000 pages per month. If a scanned image is measured bigger than 8.27 by 11.69 inches, it will be counted as two or more pages depending on its actual size.
Scanned A4 size documents with extra edges exceed the specification and would be counted as multiple pages. Unfortunately, this counting behavior caused us to run out of our monthly license quota quickly, resulting in long wait times for ingesting new items. To avoid this issue, we need to resize these images. While Adobe Photoshop and Bridge have batch resizing functions, they cannot resize based on page orientation or process multiple folders. Additionally, Adobe Lightroom can resize images by long side, but it requires importing images to its library, which can be time-consuming. Therefore, we developed a simple Python script that can resize images based on page orientation from multiple folders and create new folders to hold the resized images.
Human-created vs. AI-generated Code
Later, we tried to use ChatGPT to generate a script to achieve the same goal. However, we had to modify the input to the AI several times before it produced a script that met our desired functionality and user experience. Additionally, we had to relocate one line of code to a different location to improve its efficiency.
Command for ChatGPT
Write a python script to resize images based on the long side.
- Prompt for a directory with original images to be resized. The original directory can have sub-directories that contain images that need to be resized.
- Prompt for the root folder name which will be used to hold all resized images. The new folder should be in the same root directory as the to-be-resized folder. If the original directory has subdirectories, create sub-directories with the same names. Keep directory structure.
- Original images can be .jpg .jpeg .png .tif or.tiff. Resized images should be saved as .jpg.
- Prompt for size in inches to be used for resizing. All images will be resized at 300 dpi and the long side length will be the user-provided value.
We discovered that even if the initial attempt does not succeed, we can still refer to the AI-generated code and modify it to achieve the desired outcome more efficiently.
Human Generated Code
import os
from PIL import Image, ImageOps
Image.MAX_IMAGE_PIXELS = None

# Prompt for inputs
org_dir = input('Input the orginal folder name.')
print(org_dir)
resized_dir = input('Input a folder name for resized images.')
print(resized_dir)
os.mkdir(f'{resized_dir}')
dir_list = os.listdir(org_dir)
input_long_side = input('Input long side length in inches. (e.g. 8,9,10 or 11): ')
long_side = int(input_long_side)
long_side_pixels = long_side * 300

# Batch process. Will process a directory with sub-directories.
for subDir in dir_list:
    print('Now processing folder: ', subDir, 'please wait...')
    os.mkdir(f'{resized_dir}/{subDir}')
    og = f'{org_dir}/{subDir}'
    orgScans = os.listdir(og)

    for orgImage in orgScans:
        orgFileName = f'{org_dir}/{subDir}/{orgImage}'
        newFileName = f'{resized_dir}/{subDir}/{orgImage}'
        if(orgImage.startswith('.')):
            print('Ignore a hidden file: ', orgFileName, 'still processing files. Please wait...')
        elif(orgImage == 'Thumbs.db'):
            print('Ignore file: ', orgFileName, 'still processing files. Please wait...')
        else:
            newJPG = newFileName.split(".")
            resizedJPG = newJPG[0] + ".jpg"
            img = Image.open(orgFileName)
            width,height = img.size
            area = width * height

            if (area >= 89478485):
                print('File: ', orgFileName, 'exceeds pixel limitation and would not be converted. Please convert it manually.')
            else:
                rgb_image = img.convert('RGB')
                resizedImage = ImageOps.contain(rgb_image, (long_side_pixels,long_side_pixels))
                resizedImage.save(resizedJPG, dpi=(300, 300))

print('Total processed ', len(dir_list), 'folders.')
AI-generated Code
import os
from PIL import Image

# Prompt for original directory
orig_dir = input("Enter the path of the directory containing original images to be resized: ")

# Prompt for root folder name for resized images
root_folder_name = input("Enter the name of the root folder to hold all resized images: ")
root_folder_path = os.path.join(os.path.dirname(orig_dir), root_folder_name)
long_side_inches = float(input("Enter the size in inches for the long side of a resized image: "))

# Create root folder if it doesn't already exist
if not os.path.exists(root_folder_path):
    os.mkdir(root_folder_path)

# Walk through the original directory and its subdirectories
for dirpath, dirnames, filenames in os.walk(orig_dir):
    # Create corresponding subdirectories in the root folder
    subfolder_path = os.path.join(root_folder_path, os.path.relpath(dirpath, orig_dir))
    if not os.path.exists(subfolder_path):
        os.mkdir(subfolder_path)

    # Loop through image files in current directory
    for filename in filenames:
        # Check if file is an image
        if filename.lower().endswith(('.jpg', '.jpeg', '.png', '.tif', '.tiff')):
            # Open image and get dimensions
            filepath = os.path.join(dirpath, filename)
            img = Image.open(filepath)
            width, height = img.size

            # Determine new dimensions based on user input and maintain aspect ratio
            if width >= height:
                new_width = int(long_side_inches * 300)
                new_height = int(height * new_width / width)
            else:
                new_height = int(long_side_inches * 300)
                new_width = int(width * new_height / height)

            # Resize image and save as .jpg
            resized_img = img.resize((new_width, new_height))
            new_filepath = os.path.join(subfolder_path, filename)
            new_filepath = os.path.splitext(new_filepath)[0] + '.jpg'
            resized_img.save(new_filepath, format='JPEG')
Using Python to Process Scanned Documents with Transcript
CSUL’s Institutional Repository contains many digitized personal diaries and hand-written letters. Since these documents are not suitable for Optical Character Recognition (OCR) processes, they were transcribed by volunteers or student employees.
These scanned documents and their transcripts files were imported into DSpace as PDF files. Users must download both files to their computers and use two browser windows to view them side-by-side. One great feature of CONTENTdm is displaying transcripts alongside scanned images, which significantly improves user-friendliness.
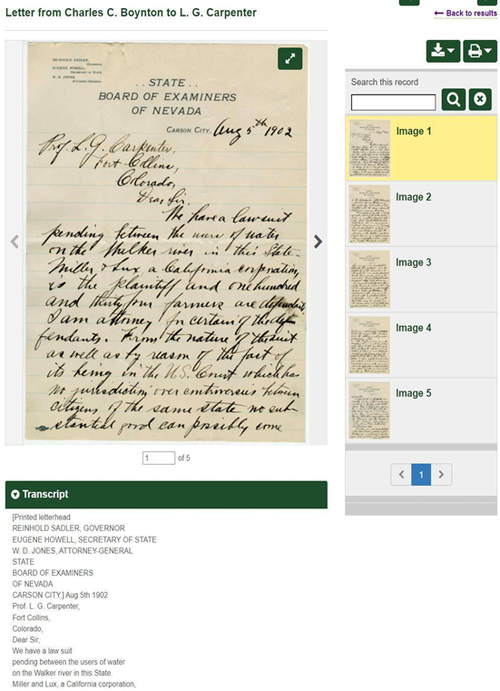
Figure 3. Transcript display in CONTENTdm.
To ingest the document illustrated in Figure 3, we chose the ingest method, a compound object with a directory structure. For each compound object, there is an item-level folder that contains:
- An image folder that stores all page images.
- A transcript folder that includes all page-level transcript TXT files.
- An item-level metadata TXT file.
Original Files
For each entry, we have a PDF file, a transcript TXT file, and a collection-level metadata CSV file that was exported from DSpace. The collection-level metadata file contains metadata not only for this record but also for dozens, or even thousands, of other records.
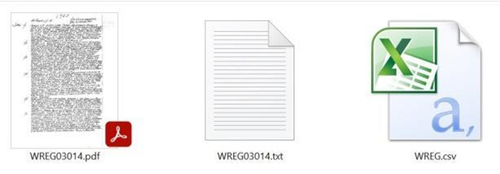
Figure 4. Original files for an entry with transcript in DSpace
Manual Process
Doing this manually would require the following work for each document:
- Create three folders, one item-level folder, an images folder, and a transcript folder.
- Export a PDF to images and place them in the image folder.
- Copy and paste text from the original transcript file into page-level transcript files. The most time-consuming step.
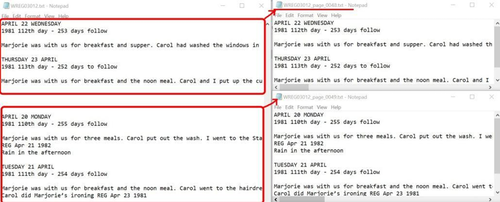
Figure 5. Creating page-level transcript - Find corresponding rows for this item. Each item has three rows of data in the collection-level metadata file. Merge data into one row and use it to create an item-level metadata file which is a tab-delimited TXT file.

Figure 6. Metadata migration

This manual process would be extremely time-consuming, prone to numerous human errors, and ultimately result in the failure of the ingest process.
How the Python Script Works
To streamline and process multiple items at once, we utilized a Python script to automate these steps. The script takes three parameters.
- The name of a folder that contains a set of PDFs.
- The name of a folder that contains corresponding item-level transcript files. These transcripts have not been split into individual transcriptions at page-level.
- A collection-level metadata CSV file.

Figure 7. Python command line to run the script.
The script will:
- Create a batch ingest folder that contains compound object folders.
- Export PDFs to images and save them to corresponding “scans” folders.
- Read in master transcript files, split them into page-level TXT files, and name them according to the corresponding image names.
- Create an item-level metadata file by extracting data from the collection-level metadata file.
| Original Files | Script’s Output |
|---|---|

|
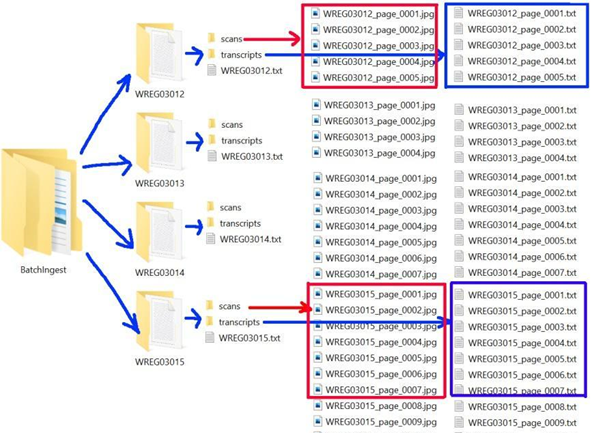
|
Import Modules
In Python, a module can be considered a code library that contains functions to be used in your scripts. For this program, the following libraries were used.
import os
import csv
import pandas as pd
from pdf2image import convert_from_path
Input and New Directories
The code below takes three parameters, finds all PDF files, and creates a new directory called “BatchIngest” to store all compound objects.
pDir = input('Input a directory with original PDFs:')
orgTransDir = input('Input a directory with original transcript .txt files:')
orgMetadata = input('Input the master metadata file name in csv format:')
dir_list = os.listdir(pDir)
subDir = "BatchIngest"
os.mkdir(subDir)
A loop is used to create the batch ingest structures. It creates folders based on pdf file names. Each pdf file will result in a folder with the same name and inside of this folder will have two subfolders, one is for holding page-level images and another is for page-level transcript files.
for file in dir_list:
y = file.strip(".pdf")
os.mkdir(f'{subDir}/{y}')
os.mkdir(f'{subDir}/{y}/scans')
os.mkdir(f'{subDir}/{y}/transcripts')
Convert PDF Files to JPG Images
To convert PDF files to images, you need to install two Python modules: pdf2image and poppler. The pdf2image module converts a PDF file to a PIL object, while the poppler module allows you to read, render, or modify PDF documents. Windows users will have to build or download poppler for Windows.[8]
Go to https://github.com/oschwartz10612/poppler-windows/releases/, download the zip file, and unzip it to any location you like. We placed it at the top level of the C drive. A detailed tutorial on how to install poppler can be found at https://pdf2image.readthedocs.io/en/latest/installation.html. A useful tutorial, Convert PDF to Image using Python, can be found here https://www.geeksforgeeks.org/convert-pdf-to-image-using-python/. We included the following two lines of code in our script.
from pdf2image import convert_from_path
poppath = r"C:\poppler-22.12.0\Library\bin"
Our “pdftoimage” function converts a PDF file to JPG images using the “convert_from_path” function from pdf2image module. To adhere to the standard naming convention employed at CSUL, we utilized the “zfill(4)” function to generate four-digit numbers. As a result, instead of producing “_page_15.jpg” the script generates “_page_0015.jpg”.
def pdftoimages(pdfDir, pdfFile, imgDir):   # Omitted code
  		 images = convert_from_path(pdf_file_name, poppler_path=poppath)
  	  for i in range(len(images)):   # Omitted code
images[i].save(f'{imgDir}/{file_name_preceeding}_page_' + str(j).zfill(4)+'.jpg', 'JPEG')
Generate Transcript Files
Each PDF file has a corresponding transcript file. At CSUL, it was decided that 4 consecutive blank lines would signify the start of a new page. The script reads in the original file line-by-line, appends each line to a new string, and keeps track of empty lines. Once four consecutive empty lines are detected, a new TXT file is generated. For example, the image WREG03014_page_0001.jpg will have a corresponding transcript file, WREG03014_page_0001.txt.
f = open(orgTrans, 'r')
newFile = []
for file in imageNames:
       newFile = file.replace('jpg','txt')
…
if(len(aLine) == 1): # find empty lines
                lineBreakCount += 1
aLine = f.readline()
        if not aLine:  #reach the end of file.
            newFile.append(aLine)
Generate Metadata File
First, the script reads a comma-separated value CSV file into a DataFrame named “orgMD” using a built-in function, “read_csv”. Then it employs a built-in function, “index”, to locate the row number where a corresponding file name is present. Next, it finds the row that contains the matching PDF file name by using the “loc” property, and merges data and assigns the resulting value to “resultRow”. Finally, it writes this row to a new tab-delimited TXT file. The “to_csv” function writes an object to a file in either CSV or TXT format with comma-separated values.
orgMD = pd.read_csv(orgMetadata, encoding= 'unicode_escape', low_memory=False) matchingRowIndex = orgMD.index[orgMD['File Name'] == file]
resultRow = orgMD.loc[[matchingRowIndex]]
mdRow = int(matchingRowIndex[0])+2
resultRow = orgMD.loc[[mdRow],'Title':'File Name']
csvFileName = f'{file.strip(".pdf")}.txt'
tn = f'{csvPath}{csvFileName}'
resultRow.to_csv(exportedFileName, mode='a', sep ='\t', index=False, encoding='utf-8')
Conclusion
By utilizing custom R and Python scripts, the CSUL repository librarians have saved many hours of work and encountered fewer human errors. Besides practical instances discussed in this article, CSUL also used R and Python scripts for GIS data analysis and post-ingest verifications. Although commonly used by data scientists, computer and electrical engineers, and geospatial scientists, these languages are also useful for librarians. We highly encourage librarians to take online courses or free workshops to learn these skills, and then apply them to simpler projects. As more experience is gained, they will find many more opportunities to use these programming languages.
Endnotes
[1] “What is R?” The R Foundation, accessed December 1, 2022, https://www.r-project.org/about.html.
[2] “What is Python?” Coursera Inc., accessed December 12, 2022, https://www.coursera.org/articles/what-is-python-used-for-a-beginners-guide-to-using-python.
[3] “RDA, Resource Description & Access Toolkit”, American Library Association, accessed December 12, 2022, https://www.rdatoolkit.org/about#:~:text=RDA%3A%20Resource%20Description%20and%20Access,user%2Dfocused%20linked%20data%20applications.
[4] Steele, Nick. “Breaking Down UUIDS”, accessed December 12, 2022, https://duo.com/labs/tech-notes/breaking-down-uuids#:~:text=Universally%20Unique%20Identifiers%2C%20or%20UUIDS,both%20the%20IETF%20and%20ITU.
[5] “Statistical & Qualitative Data Analysis Software: About R and RStudio”, 26, October er, 2022, accessed December 12, 2022, https://libguides.library.kent.edu/statconsulting/r.
[6] “gregexpr: Extended gregexpr with substring retrieval”, RDocumentation.org, accessed December 12, 2022, https://www.rdocumentation.org/packages/micropan/versions/1.0/topics/gregexpr.
[7] “OCR”, OCLC, 1 January, 2023, accessed March 23, 2023, https://help.oclc.org/Metadata_Services/CONTENTdm/Project_Client/Enter_metadata/OCR?sl=en.
[8 kumar_satyam. “Convert PDF to Image using Python.” 21 Jan, 2021, accessed December 9, 2022, https://www.geeksforgeeks.org/convert-pdf-to-image-using-python/.
About the Author
Yongli Zhou is the Digital Repository Librarian at Colorado State University Libraries (CSUL). She has been involved in several migrations of the institutional repository during her tenure, including a transition from CONTENTdm to Digitool, then to DSpace, and back to CONTENTdm. She was also involved in integrating the institutional repository into the library’s discovery systems. She is passionate about using new technologies, including AI, to simplify system migration and enhance discoverability for digital collections.

Carolyn Sullivan, 2023-07-17
Hello Yongli,
Thank you for this article and for providing your code. I’m curious though–how did your institution come to select ContentDM as a DAMS over DSpace? It surprises me since most libraries over the past decade seem to be adopting DSpace, and I’d read a few articles that seemed to suggest folks had previously found ContentDM problematic (ie. ‘Breaking up with ContentDM’, Code4Lib 2013, Gilbert & Mobley; ‘ContentDM to Digital Commons’, Journal of Archival Organization 2018, Mita, Pelli, Reamer & Ince). Has ContentDM added any interesting features to their platform or corrected any existing issues? Thanks for any info you can provide!