By Jason Griffith and Eric Weig
Introduction
The Kentucky Digital Newspaper Program (KDNP) was born out of the University of Kentucky Libraries’ (UKL) work in the National Digital Newspaper Program (NDNP) that began in 2005. The program, and the content it delivers, continued to grow through the years, until a new approach to disseminate its content was needed. In early 2021, a team of specialists at UKL from library systems, digital archives, and metadata management was formed to explore a new approach by leveraging the power of the library services platform (Alma) and discovery system (Primo VE) licensed from Ex Libris. There were many reasons for the decision to explore this solution, such as:
- KDNP content was hosted locally using costly and difficult to maintain infrastructure. Since Alma and Primo VE are the primary systems licensed by UKL to gather and display content, using their infrastructure to provide the KDNP content seemed a logical alternative.
- A planned upgrade from Primo Classic to Primo VE in the summer 2021 provided the ability to manage discovery settings from within the Alma interface. This capability, along with a familiarity in using Ex Libris products, would deepen the support bench since more library employees were versed in working in Alma rather than the homegrown system that was used for KDNP content.
- Primo VE provides access to an enhanced suite of features that the existing KDNP interface did not; such as customized facets to filter and narrow down search results and the capacity to index full-text content into the Primo VE.
- Loading content into Alma using a discovery import profile would streamline the indexing process.
- Primo VE can link out to external resources from the brief and full-record displays, allowing for easy linking to Internet Archive Objects.
With all these benefits in mind, the team began to explore how to approach the project and what the implementation would look like. Many questions were raised during the exploratory phase, such as: “which metadata schema is best to use for the source records?”, “which fields from the source records will be displayed in the Primo VE full record?”, and “how does full-text harvesting for search and retrieval work in Primo VE?” The answers to these questions generated more ideas from the team. Ultimately the result was the creation of a dedicated Primo VE search interface (Kentucky Digital Newspapers and Microfilm) that would include KDNP content as well as all Kentucky newspapers held on microfilm in the UKL system. This article will describe the journey from the question of whether we could harness the power of Alma and Primo VE to display KDNP content, to the methodology used in creating a new dedicated search interface that can be replicated to create custom search interfaces of your own.
Digital Library Technology in Layers
Before discussing the work done on the Alma/Primo VE side, let’s look at a brief overview of the digital library technology involved in our digital library project. Our digital library objects consisted of descriptive metadata and full-text newspaper issues hosted on the Internet Archive.
 Figure 1. Project Layers Chart.
Digital Objects
Digital objects for our project exist as web addressable resources which can be referenced in database records via URLs [1]. These reside on the Internet Archive. In order to establish stable URLs over time, ARK identifiers were used [2]. We chose to use ARK identifiers due to our newspaper objects already having them assigned from a previous digital library system.
The digital objects layer can be linked to directly as a file or within the context of a viewer application. In the following image, search results include hyperlinks to digital objects presented through our KDNP Newspaper Object Viewer.
 Figure 2. Link Between Discovery and Digital Object Layers.
Metadata
The metadata layer consists of an Omeka database that allows for CRUD (Create, Read, Update, and Delete) operations as well as exporting metadata records as Primo specific XML [3]. Our descriptive metadata elements focus on newspaper issues. Some of our elements stem from the NDNP standards while others were added for local purposes.
We chose Omeka as a CMS platform for this work due to our development expertise with that platform and its ease of deployment via a Reclaim Hosting virtual server [4]. In particular, we found that for CRUD operations, Omeka’s optimized administrative UI including built-in capabilities for expanding metadata fields was a perfect fit [5].
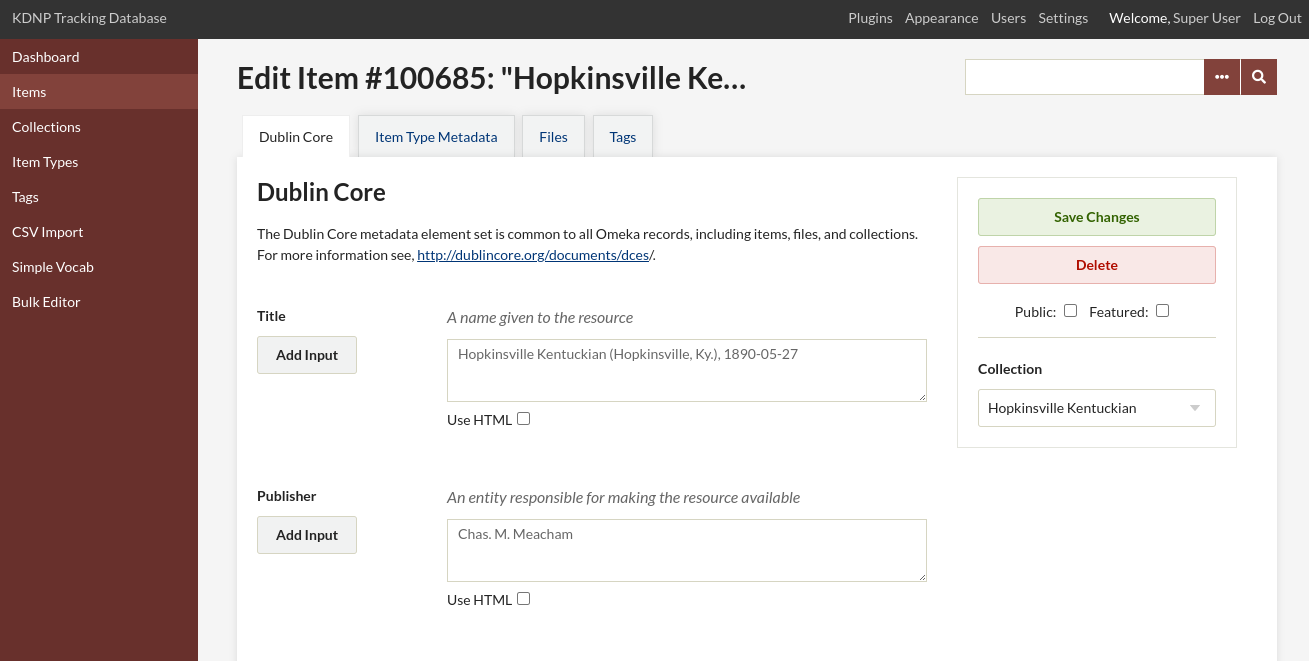 Figure 3. Omeka metadata editor.
Our KDNP metadata in Omeka, included three important fields created specifically for Primo VE and our project – the Object URL, Thumbnail URL, and Full Text URL fields.
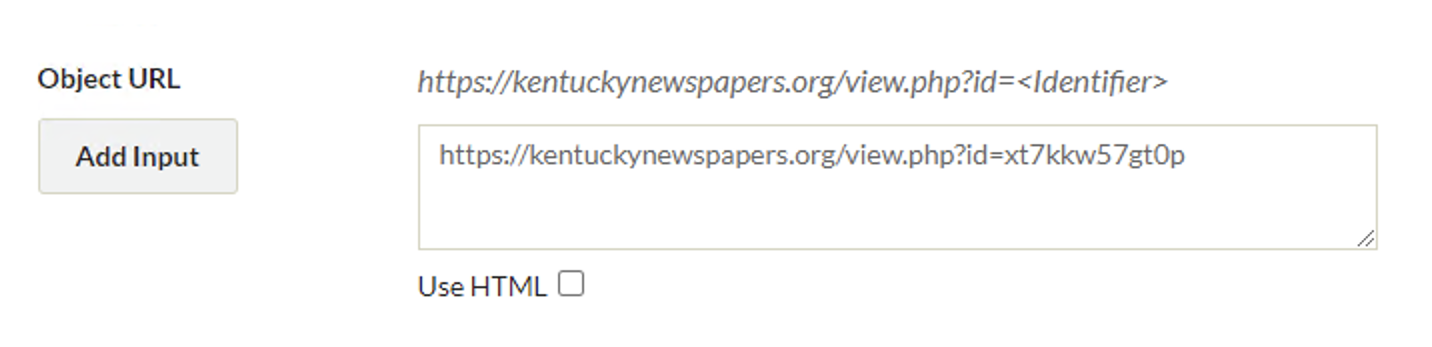 Figure 4. Object URL
The Object URL field holds the hyperlink that points to the related digital object. In our project, these are individual newspaper issues. For example, the URL in Figure 4 points to the digitized newspaper issue for Hopkinsville Kentuckian (Hopkinsville, Ky.), 1890-05-27.
 Figure 5. Thumbnail URL.
The Thumbnail URL field holds the hyperlink that points to the thumbnail image for the related digital object. This allows Primo VE to display thumbnail reference images in both search results and item views.
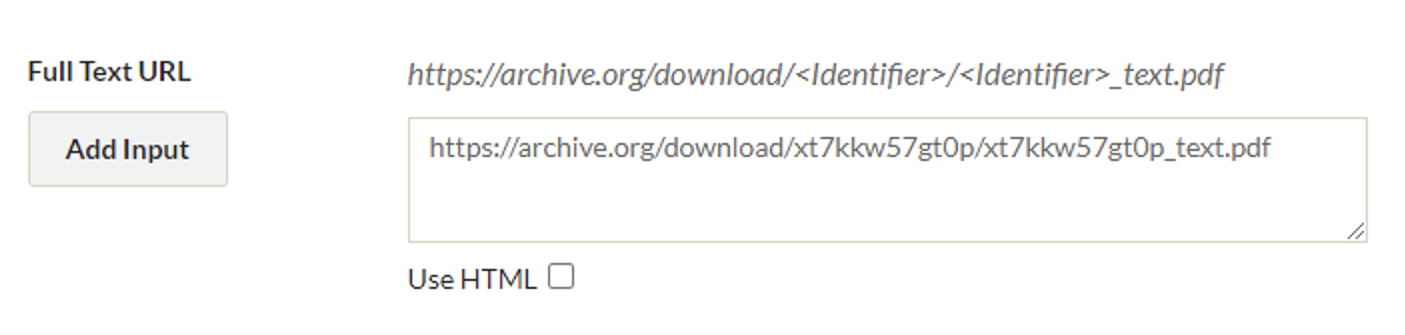 Figure 6. Full Text URL.
The Full Text URL field holds the hyperlink that points to a PDF version of the digital object. This PDF is searchable. This link allows Primo VE to harvest full-text for the digital object via the PDF file. This harvesting happens during the metadata importing and indexing process.
An additional benefit in using Omeka was its extensible plugin environment which allowed us to craft a plugin for exporting our records into a generic XML format that Primo VE can index [6].
 Figure 7. Due to the size of our metadata, records are exported out in manageable chunks.
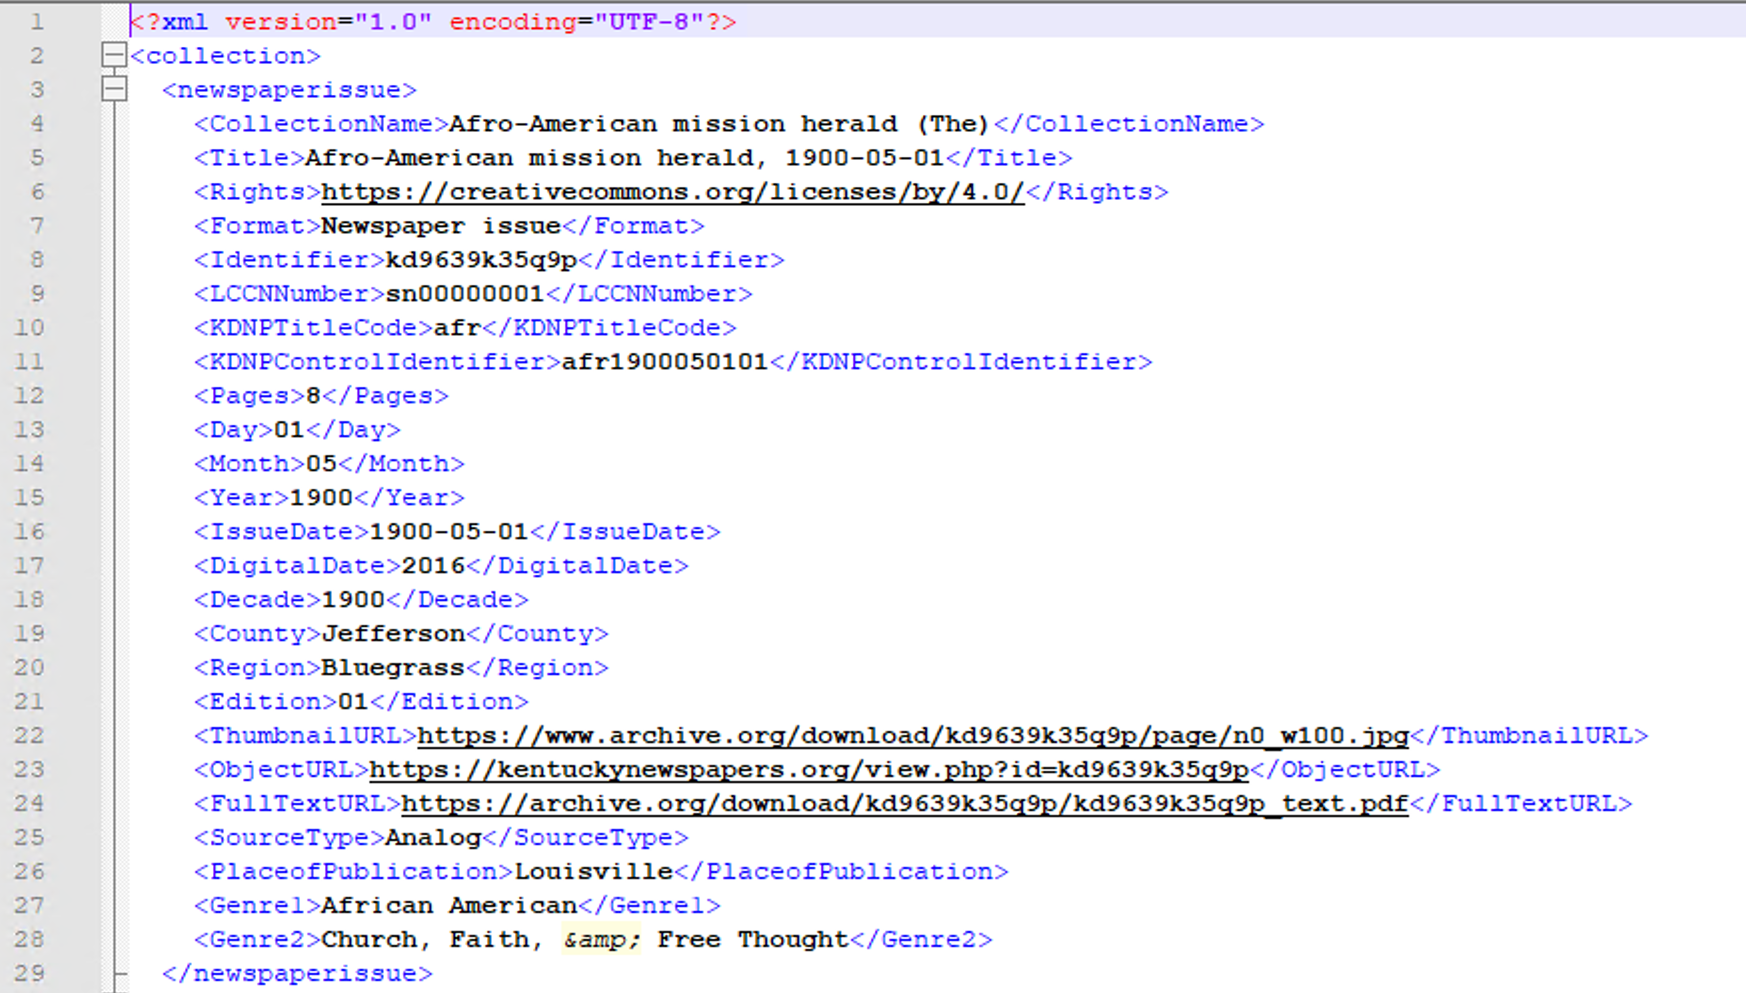 Figure 8. Sample Primo XML export from Omeka database.
Index (Alma)
Choosing a Method to Import KDNP Content
After the decision to use Alma/Primo VE for KDNP content was made, we began to explore what the work would look like from the Alma side. The first big decision we had to make was the method we would use to import and display KDNP records in Primo VE. There were two methods we could choose from – the Collection Discovery feature in Alma and a Discovery Import Profile. The main difference in the two methods is the location of the source records. Using Collection Discovery meant that all 87,000+ records would need to be imported into and managed by Alma to be displayed in Primo VE; while using a Discovery Import Profile in Primo VE provides the ability to load the records for display only.
We decided to explore the Discovery Import Profile route for two reasons – one is that the KDNP team already had a mechanism in place for managing these records and we did not want to add a complication to that process by forcing them to learn how to manage the metadata in Alma; and the other is that we anticipated an upgrade from Primo Back Office (BO) to Primo VE in the coming months. While manipulating the metadata to our liking for display in Primo BO was possible, implementing Primo VE would allow the capability to manage discovery settings from within the Alma interface (which is more intuitive and user friendly than Primo BO).
Creating a Discovery Import Profile in Primo VE (Phase 1)
The process of creating a Discovery Import Profile in Primo VE was not linear; it required different phases because of decisions we made along the way. Documentation provided by Ex Libris [7] helped to guide us through the entire process; but for phase 1, the most important information to have is:
- Profile Type – Discovery profiles are used to load records from external systems for discovery in Primo VE, so that is the type we chose.
- Originating system – Of the options provided here, we chose “Other” because our KDNP records are not housed in ContentDM or Dspace.
 Figure 9. Discovery Import Profile Phase 1 (Profile Details).
At this point, we had to pause creating the Import Profile so that we could decide what source format we would use for the KDNP metadata (which were encoded in JSON in the originating system). Alma provides three options to choose from – MARC21, Dublin Core (DC), and Generic XML. We uncovered challenges with each. Converting to MARC21 would be preferable if we wanted to import and create the records for management in Alma but converting from JSON to MARC21 required more manipulation than the other options, so we ruled MARC21 out almost immediately. Using DC or Generic XML presented similar, albeit lesser, challenges so we decided to test each method and see which worked best for us.
We used training materials provided by Ex Libris [8] to guide us in importing DC records for discovery, but each attempt to import a test record in DC format failed to process our DC record (even though Alma displayed that the upload processed correctly), so we moved to Generic XML.
The next challenge was in normalizing the source Generic XML records for display in Primo VE; but before explaining the normalization process, we had to go back to the Import Profile for phase 2 of its creation.
Creating a Discovery Import Profile in Primo VE (Phase 2)
After deciding upon our source data format, the Import Profile required some additional parameters to complete the Profile Details. In this phase, we had to choose the import protocol, source format, and target format. For these options, we chose the following:
- Import Protocol – Upload file/s (we chose this because we decided to batch upload all the records at once, rather than transferring via SFTP or using OAI-PMH).
- Source format – Generic XML
- Target format – DC (this was the only option available)
Once the source format field is populated, a new section appears with options specific to the source format. Since we used Generic XML, a File Splitters parameter section appeared with the following options:
- Root element tag – This is a required field where the first tag in the source file (before the list of records in the file) is listed.
- Record elements tag – This is a required field where the tag representing the beginning of a record appears in the source file.
- XPath to the identifier tag – This is a required field where a unique identifier for each record can be found.
When looking at the source file in Figure 8, we determined the following information was needed in the File Splitters parameter section:
 Figure 10. File splitter parameters.
We determined that our settings were correct after testing and moved on to creating normalization rules and a normalization process.
Normalization Rule #1 – XML to Qualified Dublin Core Fields
Writing normalization rules was required to convert the Generic XML from our source file to DC fields that could be displayed in Primo VE. Our first attempt at creating normalization rules was guided by Ex Libris documentation that provides examples of normalization rules for XML sources [9]; however, the XML rule examples in this documentation did not work for what we wanted to accomplish. After some more digging, we found a Knowledge Base article which provided links to additional documentation that helped us to break through this barrier [10]. Using this documentation, we created a normalization rule that would convert the fields from our Generic XML test record in DC in the following manner:
rule "title"
when
exist "//*[local-name()='Title']"
then
copy "//*[local-name()='Title']" to "dc"."title"
end
Once we determined that this method worked for our title field, we wrote similar normalization rules that would convert the XML elements from our source record that corresponded to qualified DC fields such as publisher, identifier, and creator.
The process of creating a normalization rule for external resources in Primo VE is outlined in documentation provided by Ex Libris [11]. Using this process, we were able to create the normalization rule and test to ensure that our rule worked by using the testing tool provided within the normalization rule editor.
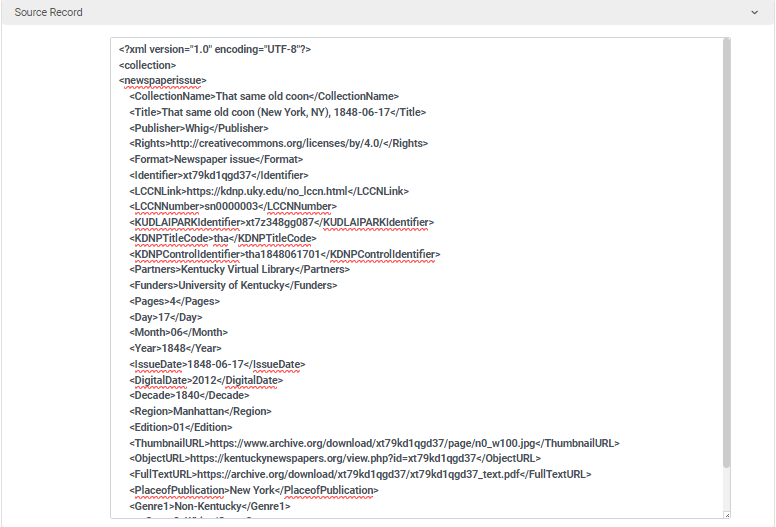 Figure 11. Normalization rule test #1 (Source record).
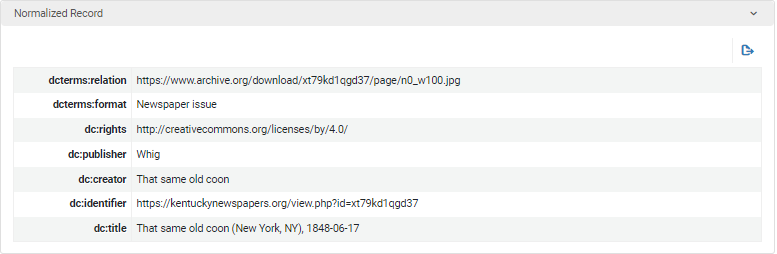 Figure 12. Normalization rule test #1 (Normalized record).
However, our source record also contained fields that did not directly correspond to qualified DC fields. To overcome this hurdle, we mapped these fields to local fields in Primo VE using documentation provided by Ex Libris [12]. We did not map every field, only the ones we deemed to be necessary for display or to create facets that would be used to aid in search and display.
Normalization Rule #2 – XML to Local Fields
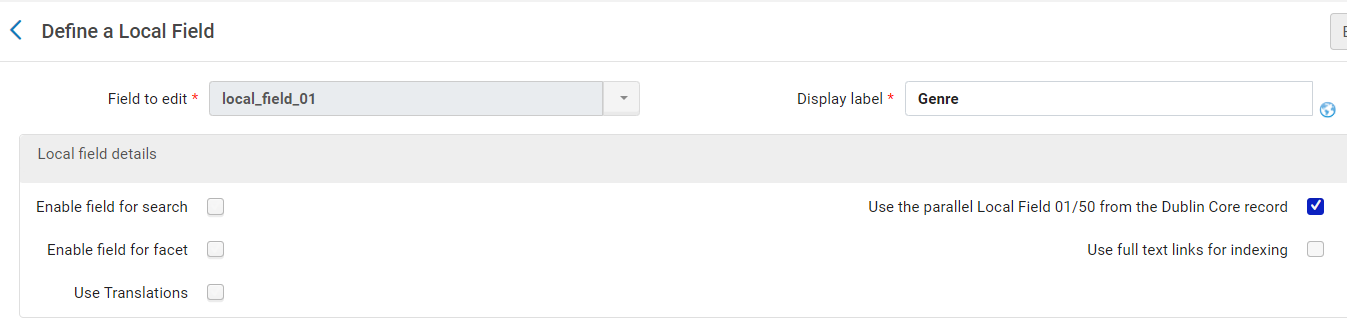 Figure 13. Local field configured for Genre field from source XML.
The example above shows one of many local fields we created. When creating a local field that will be used in this manner, it is especially important to pay attention to the settings under the “Local field details” section. The most important setting to note is “Use the parallel Local Field 01/50 from the Dublin Core record.” Ex Libris defines the purpose of this field in the documentation for creating local fields as being “for use with Dublin Core records only, select this field if you have defined DC normalization rules that map information to the associated local discovery fields (discovery.local1 – discovery.local50) in the Primo VE DC expanded schema.” [12] We checked this setting for each local field we created, which also meant that we had to create an additional normalization rule that would map the remaining fields we wanted to display to the local fields we created using the same rule syntax, with a minor tweak. For example, the rule we use to map the Genre field to local_field_01 is:
rule "genre"
when
exist "//*[local-name()='Genre']"
then
copy "//*[local-name()='Genre']" to "discovery"."local1"
end
Most of the XML fields we decided to map to local fields used only this setting, but there are three other settings that were used only for certain fields that should be outlined. These are:
- Enable field for search – this option allows the local field to be searchable by users. The field is automatically indexed but is not searchable unless this option is checked.
- Enable field for facet – this option allows the field to be used as a facet to filter search results. Further details about this will occur later.
- Use full text links for indexing – this option indexes an external full-text file (in PDF, TXT and HTML formats) that is linked in the source record. Further details about this will occur later.
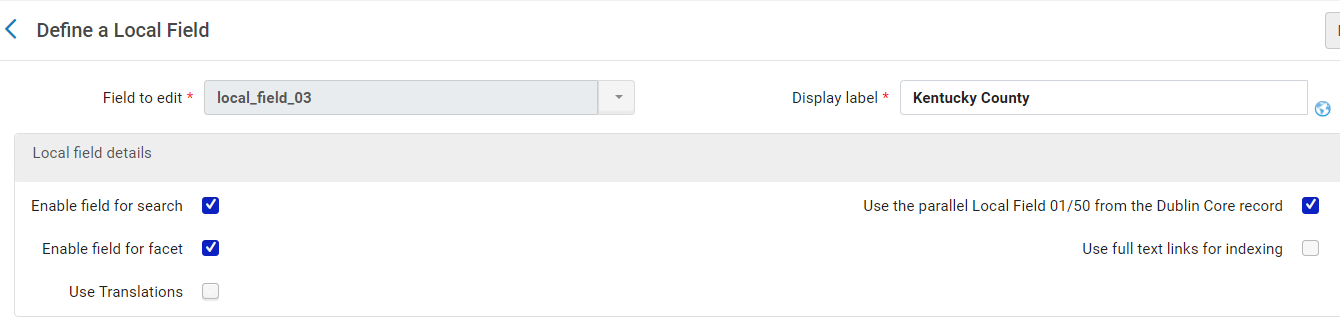 Figure 14. Local field configured for Kentucky County field from source XML.
For example, we mapped local_field_03 to the Kentucky County field in the source XML so it could be displayed in discovery. We also chose to set Kentucky County as a field that could be searched and used as a facet to filter search results. We will outline the process of creating search facets from local fields in a later section.
In all, we created fifteen local fields from the source file: genre, decade published, Kentucky county, Kentucky region, Kentucky city, issue date, Library of Congress Control Number (LCCN), funding body, year published, ID, pages, month published, full-text KDNP, newspaper title, and day published (it should be noted that Ex Libris limits the number of local fields that can be created to 100 for MARC records and 50 for Dublin Core records). We tested the rule created for converting XML to local display fields, just as we did for the first normalization rule.
Figure 15. Normalization rule test #2 (Source record).
 Figure 16.Normalization rule test #2 (Normalized record).
Normalization Process and Phase 3 of Discovery Import Profile
Since we had to use two different methods to normalize our source records for display (one for XML to qualified DC fields and one for XML to local fields), two different sets of normalization rules had to be created. The next step in our workflow was to combine the two sets of normalization rules into one normalization process. To create the normalization process, we followed the steps outlined in documentation provided by Ex Libris [13].
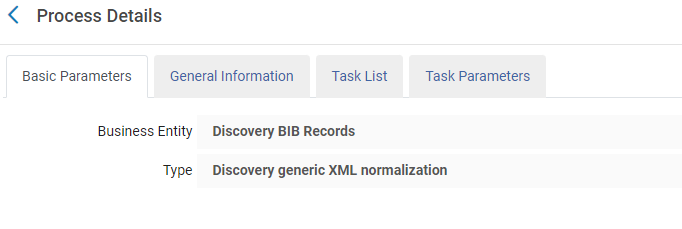 Figure 17. Normalization Process – Basic Parameters.
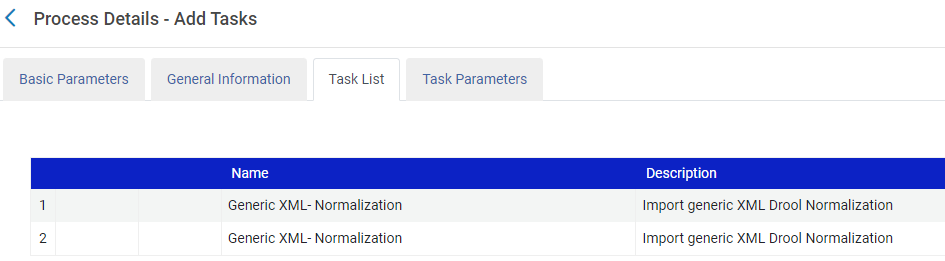 Figure 18. Normalization Process – Task List (this tab shows the steps performed, using the XML Drool Normalization rule logic).
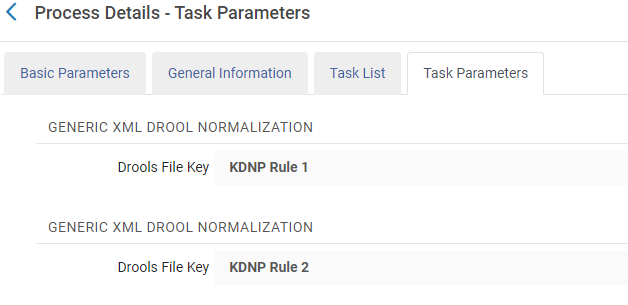 Figure 19. Normalization Process – Task Parameters.
After finishing this step, we then went back to the import profile, opened the Normalization tab, and added the normalization process to the profile. This allows the normalization process to be used while the records are imported.
 Figure 20. Adding Normalization Process to Discovery Import Profile.
Additional Customizations: Local Resource Type, Thumbnail Image and Finalized Discovery Import Profile
Once we determined that our import profile and normalization rules/process worked as intended, we then directed our attention to additional customizations that would improve how the records display in Primo VE. The first was to create a local resource type that would be used, instead of an out-of-the-box resource type from the list of supported resource types in Primo VE [14]. The group felt that using a resource type label of “newspaper issue” would be the best option for the KDNP content, so we went about creating this as a local resource type using the instructions provided by Ex Libris [15]. This was simple enough to do; all that was required was to point the local resource type configured to the DC field containing the resource type and enter the value of the resource type in the mapping section of the local resource type configuration settings.
 Figure 21.Local Resource Type Configuration (General).
 Figure 22. Local Resource Type configuration (Mapping from DC).
Another customization we decided to add was a custom image for each newspaper issue that would display in Primo VE. This customization was also easy to configure because the KDNP issues already had .jpg images of each issue. All we had to do was add the link to the image into the source XML file, then point the “Link to Thumbnail” section on the Delivery tab of the import profile to the field that contained the link.
 Figure 23. Discovery Import Profile (Delivery tab).
There was one last piece of information needed on the Delivery tab – where to point Primo VE to link out to the resource. We determined that the best way to handle this was to map the “Object URL” field from the source XML to the “dc.identifier” field in our first set of normalization rules. We then identified that field as the DC tag used for the static URL, and changed the Link Label to “View at KDNP.” This final touch wrapped up our discovery import profile.
The following images show the finished product of a KDNP issue displayed in Primo VE, with the customizations noted:
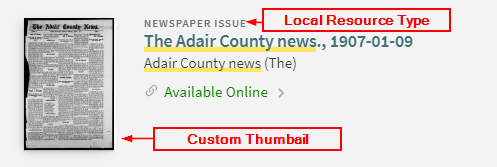 Figure 24. KDNP Record in Primo VE (Local Resource Type and Custom Thumbnail).
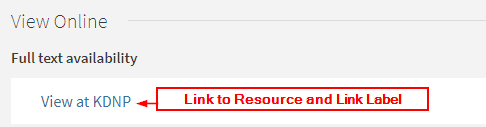 Figure 25. KDNP Record in Primo VE (Link to Resource and Link Label).
 Figure 26. KDNP Record in Primo VE (Details Section).
Viewing the source record in Primo VE displays the fields mapped from the source XML to qualified DC and local fields:
 Figure 27. Source Record in Primo VE.
Full Text Harvesting
The most daunting task in this process was configuring full text harvesting. We created a local field for this purpose (referenced earlier) and chose the option to use full text links for indexing when we configured the rest of our local fields; however, we were initially unsuccessful in our attempt to harvest full text for search. We were confused by this because the KDNP issues met the requirements laid out by Ex Libris and our local field was configured according to their instructions [16]. We contacted Ex Libris support for assistance, and after some back and forth, it turned out that our support case helped to identify a bug in the full text harvesting process for DC records, and Ex Libris needed to deploy a fix for the bug in a future feature release.
 Figure 28. Local field configured for full text harvesting.
After the fix was deployed, we revisited this issue and found that it had indeed been corrected and searching for keywords in KDNP articles retrieved results in Primo VE. While we were thrilled that this functionality finally worked, we uncovered another issue with full text harvesting – the quality of search results. The harvesting process indexes up to 10,000 terms in the source file, and each indexed term produces results when searched for. This sounds good in theory, but in practice it led to a lot of junk results because searching for any word that is indexed in the source file will retrieve results. Given the wide range of content that was published in the historical newspapers, searching for basically any term would overwhelm the user with KDNP results. This was not what we intended for full text harvesting, and we debated about whether we should harvest full text for KDNP issues at all.
While attempting to solve this dilemma, a new idea emerged that would take the project into a different direction – creating a standalone search view for KDNP content and excluding it from blending with our local holdings and Central Discovery Index (CDI) content. Creating a different view for KDNP was easy enough. We simply copied our primary Primo VE view to create a KDNP only view so that our local customizations would be present in the new view. The main challenge in doing this was in the way that search scopes and profiles are configured in Primo VE. Documentation provided by Ex Libris goes into specific details about how search scopes and profiles are configured and how they work together in Primo VE [17], but in a nutshell – search scopes are included in search profiles, which are used to search for different types of content. By default, Primo VE includes predefined profiles that will search only in the CDI, Local Catalog, and an “everything” scope which combines the two along with any custom local data scopes. To allow users to search for KDNP content separately, we needed to create a custom local data scope, but that local data scope was included in the “everything” profile; thus we had to redefine our default search profile from scratch if we wanted to achieve our goals of providing a standalone search interface for KDNP content and separating that content from the rest of our catalog to avoid producing junk search results.
Redefining the Search Profile
In a conceptual sense, redefining the search profile seemed easy; however, in practice, it became quite complicated. The first step in the process was to create two custom local data scopes – one that would include KDNP content, and one that would exclude it.. Both scopes used the same type of condition (external data source) and looked like this:
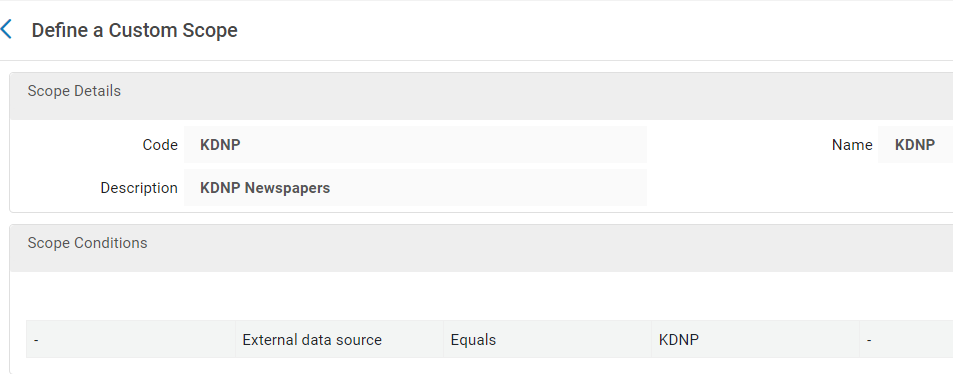 Figure 29. Local Data Scope (includes KDNP content).
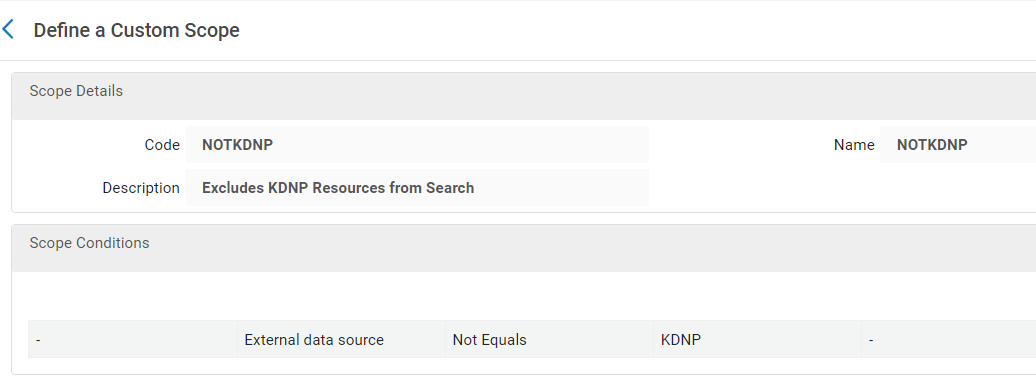 Figure 30. Local Data Scope (excludes KDNP content).
The next step was to create custom search profiles for both, so that they could be used to create a search profile slot in Primo VE:
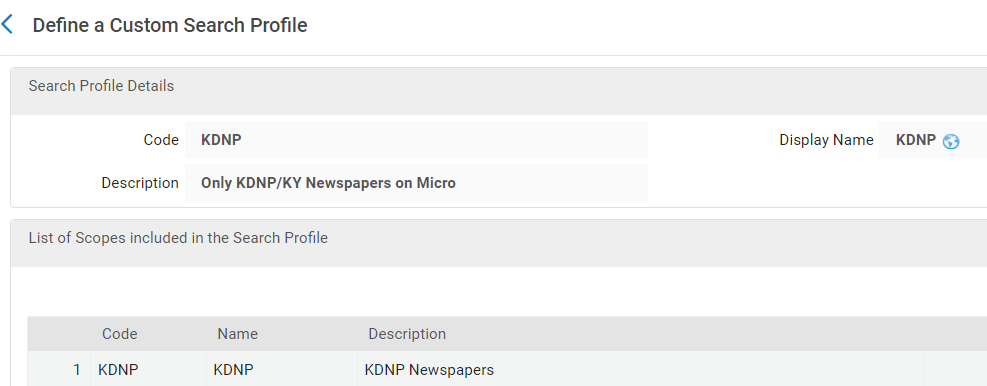 Figure 31. Custom Search Profile for ‘KDNP’ Scope.
 Figure 32. Custom Search Profile for ‘NOTKDNP’ scope.
The final, and most time-consuming step was to create the new “everything” profile that would separate KDNP content from the rest of the catalog. What made this step so complicated was that we had to build the new profile piece-by-piece. In the default profile that was created during implementation, all our branch libraries in the system were grouped into one search profile, using a specific profile code. This was done behind-the-scenes, so we did not have a hand in creating that. To have our search profile perform as desired, we had to eliminate that profile and add each library individually into our new profile, along with each custom local data source, the CDI, and our local Alma data. This is where the profile we created to exclude KDNP content was used – including this profile effectively excluded the KDNP content from appearing with everything else in our system. Our default search profile went from looking like this:
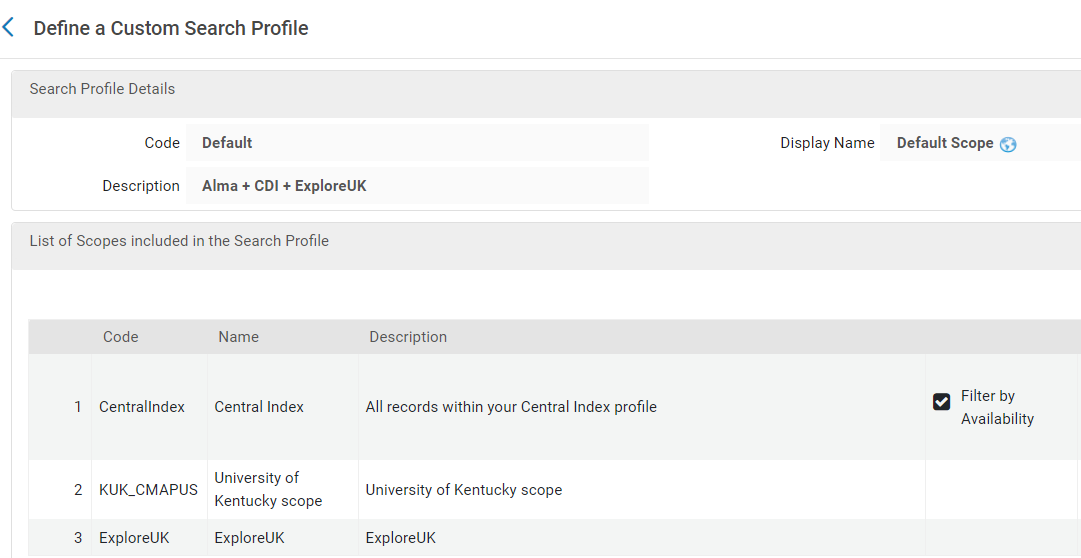 Figure 33. Default Search Profile.
To this:
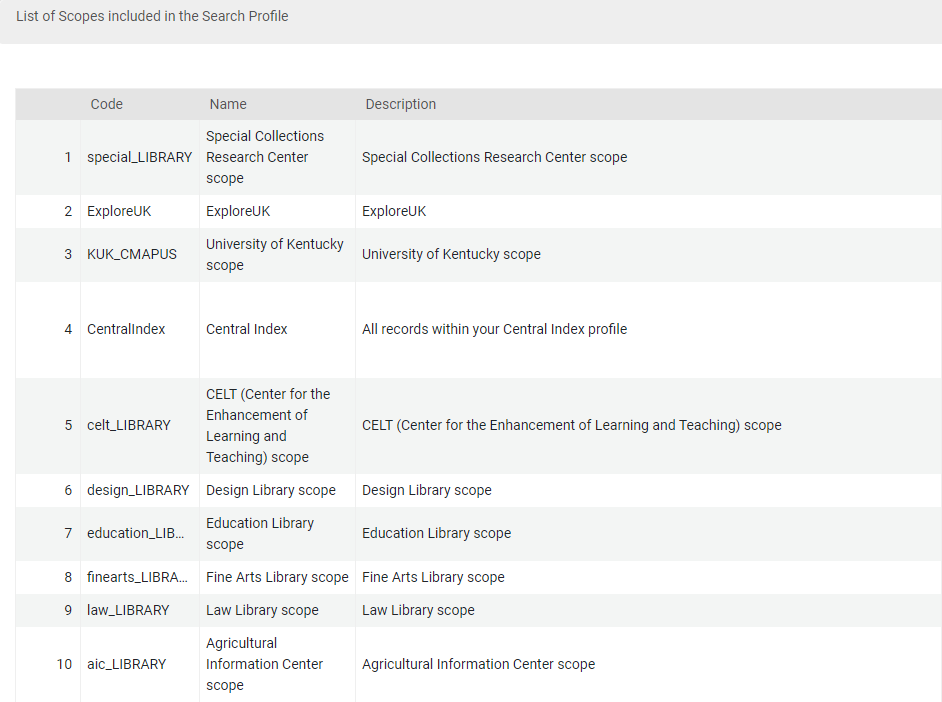 Figure 34. Redesigned Search Profile 1.
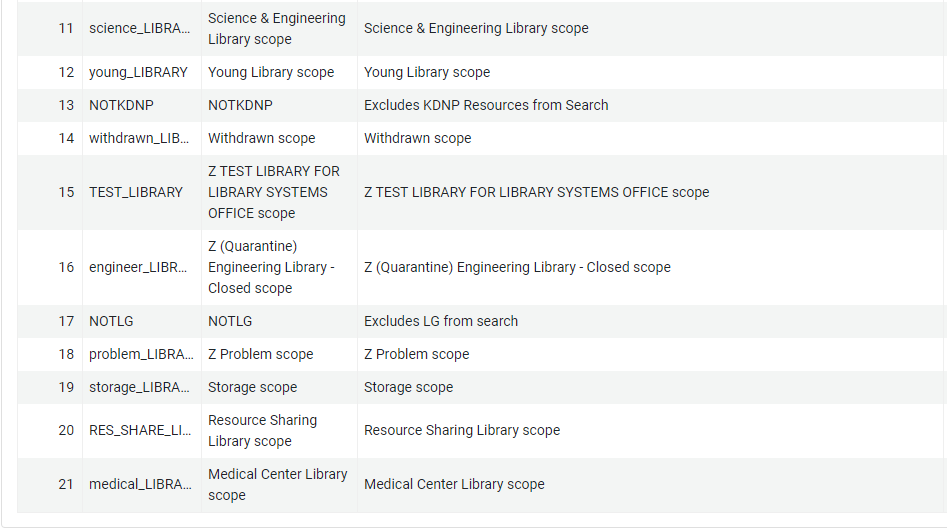 Figure 35. Redesigned Search Profile 2.
Dedicated Newspaper Search Interface
After reconfiguring the search profile, we continued on the path of creating a dedicated KDNP search interface. This was easy to accomplish since we created the search profile that would only search for KDNP content. Once we created the dedicated view and did some testing, our team posed another question – could we expand the KDNP search interface to include all Kentucky newspapers on microfilm held within the libraries? The work that had already been done established that it was theoretically possible to refine search profiles in such a way, so we went about the process of adding Kentucky newspapers on microfilm into the KDNP interface. To do so, we created a set of Kentucky newspaper titles with microfilm holdings in Alma, then created a collection that could be added to the KDNP search profile using instructions from Ex Libris [18]. We then added an additional parameter to the KDNP search profile that would include all titles from the collection.
 Figure 36. KDNP Search Profile (with microfilm newspapers).
Discovery (Primo)
Finishing Touches – Display Fields, Facets, and Landing Page
After the standalone interface was finished and all the titles we wanted to include were selected, we turned our attention to what data would display in the records. As mentioned earlier, we created a normalization process to map all the unqualified DC fields in our source record to local display fields; however, we decided that some fields did not need to display in the full record in Primo VE. Controlling which fields display in the full record is a simple process outlined in documentation from Ex Libris [19]. Of the local display fields we configured, we decided to include only the following: Issue date, LCCN, Kentucky County, Kentucky Region, Kentucky City, Pages, Genre, and Funding Body. For the Issue Date field, an additional tweak was made to allow the end user to search Primo VE for the content in that field by clicking on a hyperlink. This was accomplished by creating an entry into the Hypertext Linking Definitions table [20].
 Figure 37. Example of a field using Hypertext Linking Definition (clicking on the hyperlink allows the user to search for the Issue Date).
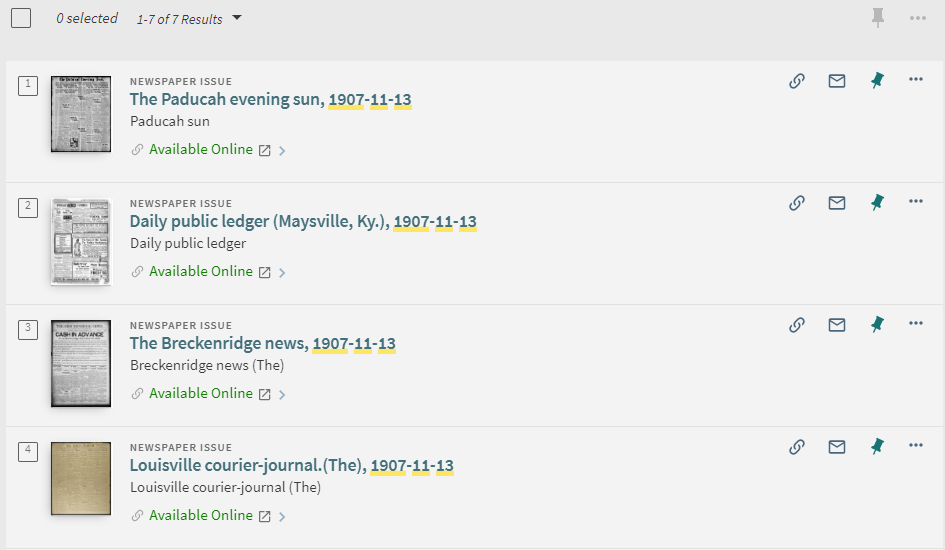 Figure 38. After clicking the hyperlink in the Issue Date field, Primo VE returns search results for any newspaper issue of the same date.
The remaining fields that display in the full record – such as title, creator and publisher – are all out-of-the-box fields. We then decided on the order the fields would display in the full record, wrapped up that part of the project, and moved our attention to creating search facets for the interface.
A two-step process is required to create search facets. The first step is to follow the instructions in the Ex Libris documentation for “Configuring Local Search and Facet Fields for Primo VE” [21]. All we had to do here was add the local fields that were previously configured to the list:
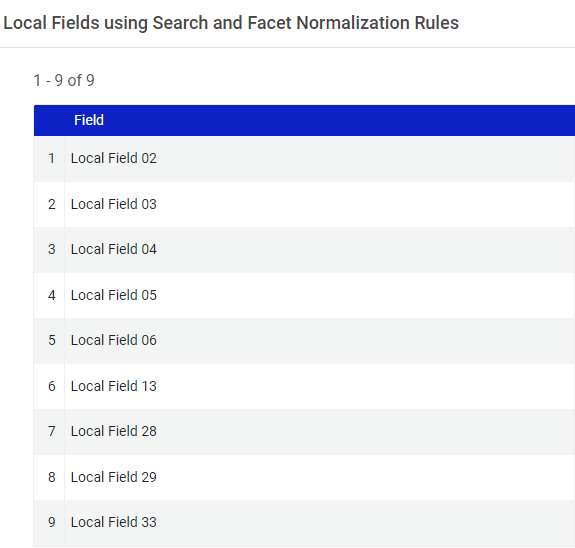 Figure 39. Local Fields using Search and Facet Normalization Rules.
The second step is to display these fields as facets in the brief results list, according to the instructions provided by Ex Libris [22]. This is where checking the “enable field for facet” option when creating a local field comes into play – the only way you can add these fields as facets is by checking that box when creating a local field. While adding each as a facet, we also tweaked the settings for “values to display”, “sort type”, and “search profile slots.” These settings allow the facets to display up to 50 values underneath the facet (we chose 5 because we didn’t want to clutter the search interface, and the full list can be displayed by clicking on the “Show More” link), sorting by alphanumeric or by number of search results (we chose alphanumeric), and which search profile slots the facets would be included in (all were included in the KDNP slot only, with the exception of the microfilm newspaper title facet).
 Figure 40. Example search showing custom facets.
The last interface tweak we made was to create a landing page for the KDNP view that provided different methods to pre-filter search results. The old KDNP interface used similar pre-filters and we wanted to continue to provide those in the new interface. Using an embedded I-frame, we created a dropdown search box that could search for a date, a list of KDNP titles that could be browsed, a clickable map of Kentucky that allows the user to search for KDNP issues from a certain Kentucky county with one click, and a Genre word cloud that displays the genres used in KDNP newspapers. From the Primo VE side, all that had to be included to create these pre-filters was any necessary local fields that were defined (for example – the map of Kentucky used the local field created for “County” to search for the county name and the date dropdown box used the local fields created for the month, day, and year of the issues) and a search URL to use in the code.
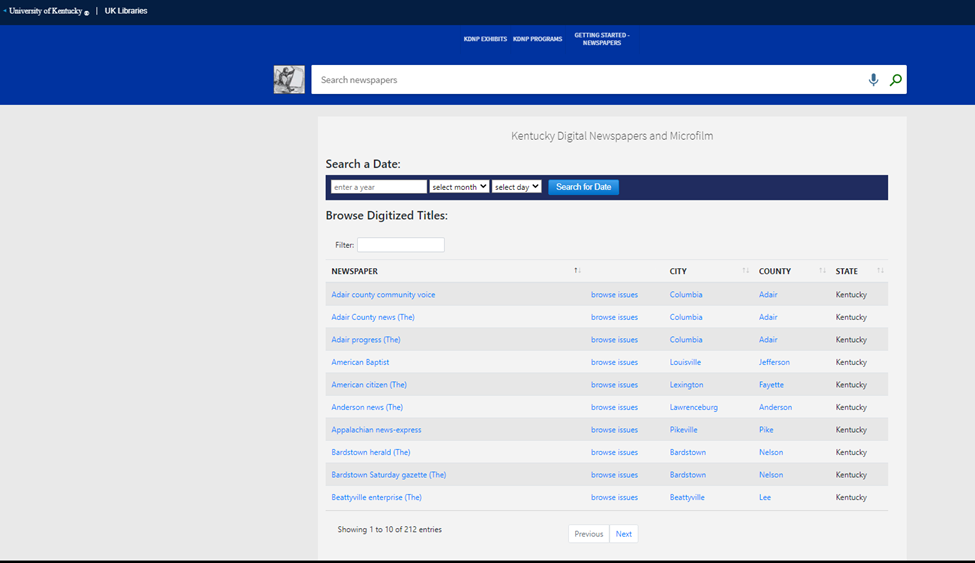 Figure 41. KDNP Landing 1.
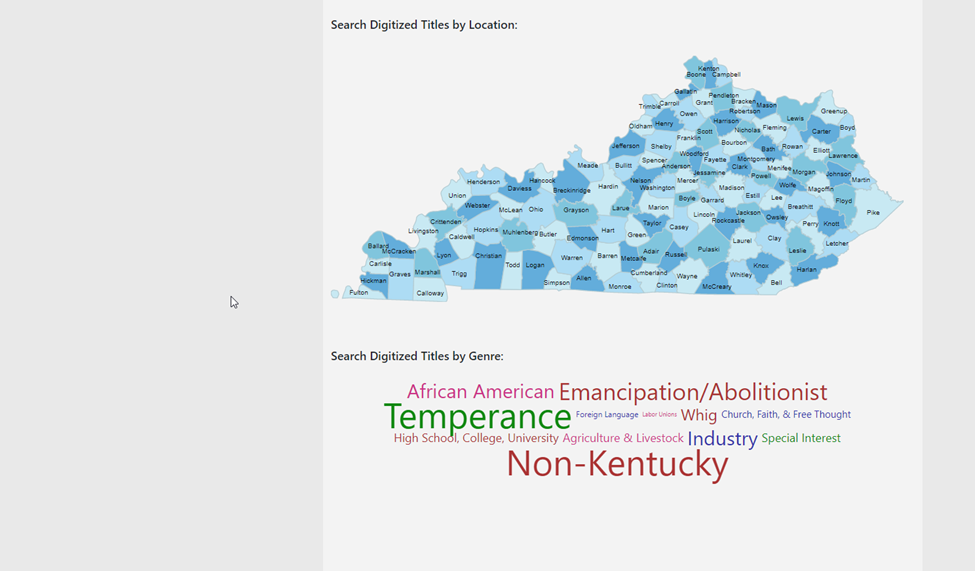 Figure 42. KDNP Landing 2.
Conclusion
This project went in many different directions. We did not anticipate creating a dedicated search interface combining KDNP newspapers with microfilm newspapers (Kentucky Digital Newspapers and Microfilm) in the beginning, but the project continually evolved as the team asked the sort of “what if” questions that drive innovation.
The dedicated view is still relatively new, having been launched on February 1, 2022, but we are encouraged by its usage since the launch. The following chart shows a breakdown of the number of actions (a measure that tracks the number of times any action was taken within the KDNP interface) and sessions (a measurement that tracks the number of sessions, which can contain multiple actions) performed in the KDNP interface since the launch.
 Figure 43. KDNP Usage (2/1/2022-2/28/2023).
From these statistics, we can see that the number of actions/sessions dropped off a bit after the first month, but began picking back up in August 2022 (aligning with the beginning of the Fall semester). So far, the action/session totals in 2023 appear to be heading in a promising direction.
The methods outlined in this article can be used to create a dedicated search interface for any type of collection, either housed in the physical library, from an external data source, or a combination of the two. Primo VE provides many options for manipulating the way data will be loaded from external sources and how that data and local data can be displayed in the brief and full search results. This project took on a life of its own and we are pleased with the outcome so far.
References
[1] Overview of the Digital Object Architecture (DOA). Internet Society. [accessed 2023 Feb 17]. https://www.internetsociety.org/resources/doc/2016/overview-of-the-digital-object-architecture-doa/.
[2] About ARKs. 2020 Oct 16. ARK Alliance. [accessed 2023 Feb 17]. https://arks.org/about/.
[3] CRUD Operations – What is CRUD? 2022 Jun 15. freeCodeCamporg. https://www.freecodecamp.org/news/crud-operations-explained/.
[4] Reclaim Hosting – Take Control of your Digital Identity. [accessed 2023 Feb 17]. https://www.reclaimhosting.com/.
[5] Omeka. omekaorg. https://omeka.org/.
[6] Import External Generic XML Data Sources. 2020 Nov 12. Ex Libris Knowledge Center. [accessed 2023 Feb 17]. https://knowledge.exlibrisgroup.com/Primo/Product_Documentation/Go_VE/Getting_Started_with_Go_VE/Go_VE_Webinars_and_Training/020Go_VE_-_Become_an_Expert_Series/Import_External_Generic_XML_Data_Sources.
[7] Configuring Import Profiles for Primo VE. 2017 Oct 21. Ex Libris Knowledge Center. [accessed 2023 Feb 17]. https://knowledge.exlibrisgroup.com/Primo/Product_Documentation/020Primo_VE/Primo_VE_(English)/100Loading_Records_from_External_Sources_into_Primo_VE/Configuring_Import_Profiles_for_Primo_VE.
[8] Import External Dublin Core Data Sources. 2020 Nov 3. Ex Libris Knowledge Center. [accessed 2023 Feb 20]. https://knowledge.exlibrisgroup.com/Primo/Product_Documentation/Go_VE/Getting_Started_with_Go_VE/Go_VE_Webinars_and_Training/020Go_VE_-_Become_an_Expert_Series/Import_External_Dublin_Core_Data_Sources.
[9] Configuring Normalization Rules for External Resources (Primo VE). 2017 Oct 21. Ex Libris Knowledge Center. [accessed 2023 Feb 20]. https://knowledge.exlibrisgroup.com/Primo/Product_Documentation/020Primo_VE/Primo_VE_(English)/100Loading_Records_from_External_Sources_into_Primo_VE/Configuring_Normalization_Rules_for_External_Resources_(Primo_VE)#XML_Examples.
[10] Generic XML Normalization Rules and XPath Tips. 2020 Feb 8. Ex Libris Knowledge Center. [accessed 2023 Feb 20]. https://knowledge.exlibrisgroup.com/Alma/Community_Knowledge/Generic_XML_Normalization_Rules_and_XPath_Tips.
[11] Configuring Normalization Rules for External Resources (Primo VE). 2017 Oct 21. Ex Libris Knowledge Center. [accessed 2023 Feb 20]. https://knowledge.exlibrisgroup.com/Primo/Product_Documentation/020Primo_VE/Primo_VE_(English)/100Loading_Records_from_External_Sources_into_Primo_VE/Configuring_Normalization_Rules_for_External_Resources_(Primo_VE)#Creating_Normalization_Rules.
[12] Managing Display and Local Fields for Primo VE. 2017 Mar 28. Ex Libris Knowledge Center. [accessed 2023 Feb 20]. https://knowledge.exlibrisgroup.com/Primo/Product_Documentation/020Primo_VE/Primo_VE_(English)/050Display_Configuration/040Configuring_Local_Display_and_Search_Fields_for_Primo_VE#Adding_a_Local_Field.
[13] Creating Normalization Processes for External Data Sources. 2018 Oct 20. Ex Libris Knowledge Center. [accessed 2023 Feb 20]. https://knowledge.exlibrisgroup.com/Primo/Product_Documentation/020Primo_VE/Primo_VE_(English)/100Loading_Records_from_External_Sources_into_Primo_VE/Creating_Normalization_Processes_for_External_Data_Sources.
[14] Configuring Normalization Rules for External Resources (Primo VE). 2017 Oct 21. Ex Libris Knowledge Center. [accessed 2023 Feb 20]. https://knowledge.exlibrisgroup.com/Primo/Product_Documentation/020Primo_VE/Primo_VE_(English)/100Loading_Records_from_External_Sources_into_Primo_VE/Configuring_Normalization_Rules_for_External_Resources_(Primo_VE)#Supported_Resource_Types_in_Primo_VE.
[15] Configuring Local Resource Types for Primo VE. 2017 Mar 13. Ex Libris Knowledge Center. [accessed 2023 Feb 20]. https://knowledge.exlibrisgroup.com/Primo/Product_Documentation/020Primo_VE/Primo_VE_(English)/050Display_Configuration/050Configuring_Local_Resource_Types_for_Primo_VE.
[16] Go VE: Full Text Indexing in Primo VE. 2020 Jul 31. Ex Libris Knowledge Center. [accessed 2023 Feb 20]. https://knowledge.exlibrisgroup.com/Primo/Product_Documentation/Go_VE/Step_3%3A_Configuration/040Go_VE%3A_Converting_Primo_Data_Configuration_to_Primo_VE/060Go_VE%3A_Full_Text_Indexing_in_Primo_VE.
[17] Configuring Search Profiles for Primo VE. 2017 Mar 13. Ex Libris Knowledge Center. [accessed 2023 Feb 20]. https://knowledge.exlibrisgroup.com/Primo/Product_Documentation/020Primo_VE/Primo_VE_(English)/040Search_Configurations/010Configuring_Search_Profiles_for_Primo_VE#Defining_a_Local_Data_Scope.
[18] Managing Collections. 2015 Dec 3. Ex Libris Knowledge Center. [accessed 2023 Feb 17]. https://knowledge.exlibrisgroup.com/Alma/Product_Documentation/010Alma_Online_Help_(English)/040Resource_Management/050Inventory/050Managing_Collections.
[19] Configuring Discovery Views for Primo VE. 2017 Mar 13. Ex Libris Knowledge Center. [accessed 2023 Feb 17]. https://knowledge.exlibrisgroup.com/Primo/Product_Documentation/020Primo_VE/Primo_VE_(English)/050Display_Configuration/010Configuring_Discovery_Views_for_Primo_VE#Configuring_the_Details_Service.
[20] Configuring Hypertext Link Definitions for Primo VE. 2018 Sep 12. Ex Libris Knowledge Center. [accessed 2023 Feb 17]. https://knowledge.exlibrisgroup.com/Primo/Product_Documentation/020Primo_VE/Primo_VE_(English)/050Display_Configuration/Configuring_Hypertext_Link_Definitions_for_Primo_VE.
[21] Configuring Local Search and Facet Fields for Primo VE. 2019 Apr 26. Ex Libris Knowledge Center. [accessed 2023 Feb 17]. https://knowledge.exlibrisgroup.com/Primo/Product_Documentation/020Primo_VE/Primo_VE_(English)/120Other_Configurations/Configuring_Local_Search_and_Facet_Fields_for_Primo_VE.
[22] Configuring Discovery Views for Primo VE. 2017 Mar 13. Ex Libris Knowledge Center. [accessed 2023 Feb 17]. https://knowledge.exlibrisgroup.com/Primo/Product_Documentation/020Primo_VE/Primo_VE_(English)/050Display_Configuration/010Configuring_Discovery_Views_for_Primo_VE#Configuring_Facets_on_the_Brief_Results_Page.
About the Authors
Jason Griffith (Jason.Griffith@uky.edu) is the Systems Librarian at the University of Kentucky. He is a certified administrator of Alma and Primo VE and has over six years of experience in administering Ex Libris products. He is a member of the ELUNA (Ex Libris Users of North America) Steering Committee and a member of eBug (Ex Libris Bluegrass Users Group).
Eric C. Weig (eweig@uky.edu) has been an academic librarian at the University of Kentucky Libraries since 1998. His current title is Web Development Librarian. Eric manages the University of Kentucky Libraries Drupal based website and intranet. He also designs, builds and manages digital libraries for the University of Kentucky Special Collections Research Center.

Subscribe to comments: For this article | For all articles
Leave a Reply