by Tim Ribaric and Jonathan Younker
The Arduino microcontroller platform is popular with hobbyists for two main reasons: first, it is easy to use, requiring minimal knowledge of electronics and programming; second, it is very versatile in the way it can sense phenomenon from the physical world and translate it into signals that can be understood by computers. This basic understanding of the functioning of the Arduino provides the basis of a patron interaction tabulating device created by the Library Systems and Technologies department at Brock University.
Traditionally, tracking patron interactions at the various service points in a library was conducted with paper-based tally sheets. Each time a patron approaches the desk with an inquiry, a tick mark is placed in the appropriate category of the tally sheet. The data gathered can be used to keep track of how busy the desk is at specific points in time, to provide insights into what staffing levels are required, to get a general understanding of what the gaps in the service are by analyzing recurring questions, etc. Most often, this data is transcribed into an electronic database or spreadsheet where further analysis can be done. At some institutions – like Brock University – the paper tally form has been replaced with a software solution that allows service desk staff to enter this data electronically, using a piece of software or a web form to capture the interaction. The immediate downside to such a configuration is that it is often easy for staff to forget or to miss recording the interactions into the application when the service point becomes busy, the immediacy of paper and pencil is lost, and additional steps are introduced (opening the application, selecting the options, etc.)
This project aims to address the shortcomings of each of these collection styles (physical and electronic), by creating a hybrid approach facilitated by the use of an Arduino microcontroller.
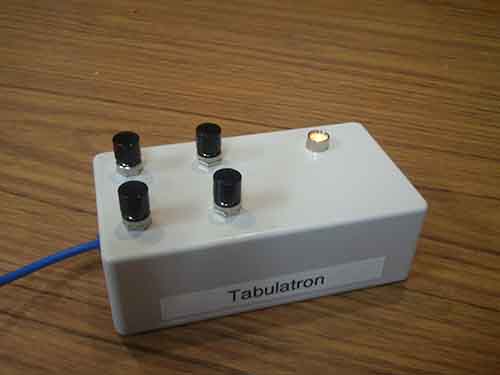
Figure 1. Tabulation device / controller box
A tabulation device (seen above) is placed on the service desk and connected to a computer with a USB cable. When a patron asks a question, the staff member simply taps a button, and the interaction is added directly to a Google Docs Spreadsheet (the data collection endpoint can easily be changed, if necessary). The immediate advantage of using this approach is that there is a lower chance of staff forgetting to tabulate the question, as the physical device would be difficult to overlook, the process is extremely quick and efficient, and the transaction is logged electronically so that it can be analyzed in a meaningful way. Three distinct pieces are involved in the synthesis of this machine (known as the Tabulatron): the construction and programming of the physical signaling device, a software component running on a computer to receive the signals from the physical device and to translate them to HTML POST calls, and a Google Docs Spreadsheet to collect the information.
The Signaling Device
The parts required to construct the device:
- An Arduino microcontroller board (Example)
- Four pushbutton switches (Example)
- One amber Light Emitting Diode (LED) (Example)
- One USB cable to interface the device to a computer and to provide power(Example)
- One enclosure to hold the constructed device (Example)
The example links are just suggestions and a wide variety of products could easily be substituted in their place. Local electronic stores are a great resource and can easily supply all the required components. The total cost to construct a Tabulatron is approximately $50.
The Arduino microcontroller board comes in a variety of sizes and configurations designed to be used in various different environments (http://arduino.cc/en/Main/Products). The Arduino UNO board was used for this project, however, other Arduino boards could have been used instead. The only restriction is that the board chosen must have the required number of analog inputs to correspond to the number of desired buttons (smaller Arduino boards often have less input/output ports). The following diagram, created in an open source package called Fritzing (http://fritzing.org), shows a rendering of the completed circuit as a schematic.
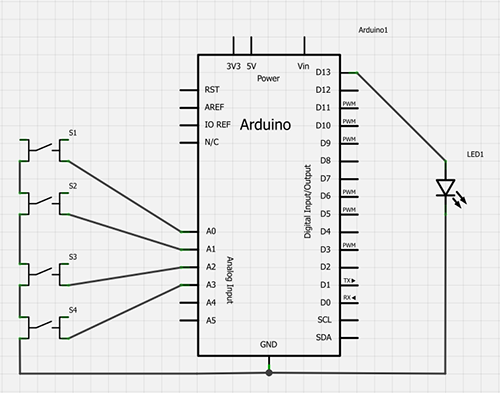
Figure 2. Schematic
The wiring can be described as follows:
- The LED is connected as an output on digital pin 13 and grounded to the Arduino
- One terminal of each of the 4 buttons is connected as input to analog pin 0, analog 1, etc.
- The opposite terminals of the push buttons are wired together in series and grounded to the Arduino
This exact circuit, rendered with physical wires and buttons, takes shape as the following:
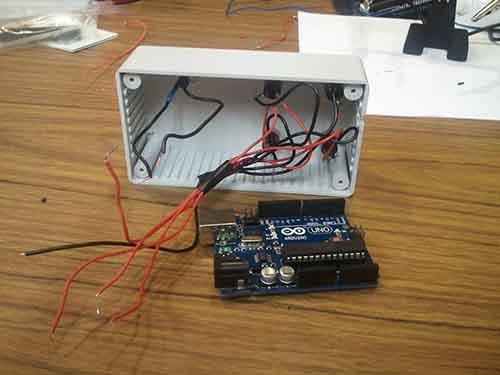
Figure 3. Controller box with wiring
Programming the Arduino Microcontroller
After the physical construction of the device is completed, it needs to be programmed via the Arduino integrated development environment (IDE). This IDE is an open source package and can be downloaded from the Arduino site (http://arduino.cc/en/main/software). Once programmed, the Arduino microcontroller will listen for button pushes and send a signal via the USB port to the connected computer. This connected computer is running a program that will be listening for these signals (outlined in the following section). For example, when the button connected to the Analog 0 input is pushed, a ‘0’ character is sent to the computer via the USB port and then the LED is told to flick on and off. This provides haptic feedback to the user that the button press has registered. When the button attached to Analog 1 input is pushed, a ‘1’ character is sent to the computer via the USB port followed by a blink of the LED, and so on. Programming the Arduino chip with the IDE only needs to be done once. Programs created with the IDE are called sketches, and the chip will retain this uploaded sketch indefinitely, even after power cycling.
The key function in this piece of code check_switches() was borrowed from the Adafruit site (http://www.adafruit.com/blog/2009/10/20/example-code-for-multi-button-checker-with-debouncing/). Adafruit is an online store for electronic components and also a resource hub for learning how to create with electronics. The following code is the complete program that the Arduino needs:
//Tabulatron Arduino Code
//Will signal via Serial whenever a button is pressed
//Circuit is pretty simple
//-Pushbutton on A0
//-Pushbutton on A1
//-Pushbutton on A2
//-Pushbutton on A3
//-LED on 13
//Many,many thanks to Adafruit industries where I blatantly lifted this code
// http://www.adafruit.com/blog/2009/10/20/example-code-for-multi-button-checker-with-debouncing/
//Buy something from there please

//Global variables
// Hash marked lines are not comments in the Arduino IDE as is common
// with other languages, more details: http://arduino.cc/en/Reference/Define
#define DEBOUNCE 10
byte buttons[]={14,15,16,17}; // the analog 0-5 pins are also known as 14-19
#define NUMBUTTONS sizeof(buttons)
byte pressed[NUMBUTTONS], justpressed[NUMBUTTONS], justreleased[NUMBUTTONS];
int led = 13;

voidsetup(){
  byte i;
  Serial.begin(9600);
  pinMode(13,OUTPUT);

  //Make input & enable pull-up resistors on switch pins
  for(i=0;i<NUMBUTTONS;i++){
    pinMode(buttons[i],INPUT);
    digitalWrite(buttons[i],HIGH);
  }
  start_led();
}

//LED blink sequence for when device starts up.
voidstart_led()
{
  digitalWrite(led,HIGH);
  delay(1000);
  digitalWrite(led,LOW);
  delay(1000);
}


//LED blink sequence for after a button is pressed
//gives nice feeling that the machine is paying attention
void flick_led()
{
   digitalWrite(led,HIGH);
   delay(250);
   digitalWrite(led,LOW);
   delay(250);
   digitalWrite(led,HIGH);
   delay(250);
   digitalWrite(led,LOW);
   delay(250);
   digitalWrite(led,HIGH);
   delay(250);
   digitalWrite(led,LOW);
   delay(250);
}

//This function does the heavy lifting of checking for button presses
//and changing the values of the byte array to reflect button states
void check_switches()
{
  static byte previousstate[NUMBUTTONS];
  static byte currentstate[NUMBUTTONS];
  static long lasttime;
  byte index;

  if (millis() < lasttime) {
     //we wrapped around, lets just try again
    lasttime = millis();
  }

  if ((lasttime+DEBOUNCE) > millis()){
    //not enough time has passed to debounce
    return;
  }
  //ok we have waited DEBOUNCE milliseconds, lets reset the timer
  lasttime = millis();

  for (index = 0; index < NUMBUTTONS;index++){
    justpressed[index] = 0; //when we start, we clear out the "just" indicators
    justreleased[index] = 0;

    currentstate[index] = digitalRead(buttons[index]); //read the button

    if (currentstate[index] == previousstate[index]) {
     if ((pressed[index] == LOW) && (currentstate[index] == LOW)) {
        //just pressed
        justpressed[index]=1;
      }
      else if ((pressed[index] == HIGH) && (currentstate[index] == HIGH)) {
        //just released
        justreleased[index] = 1;
      }
      pressed[index] =! currentstate[index]; //remember, digital HIGH means NOT pressed
    }
    previousstate[index] = currentstate[index]; //keep a running tally of the buttons
  }
}

void loop() {
  check_switches();
  for (byte i = 0; i < NUMBUTTONS; i++){
  if (justpressed[i]) {
    Serial.print(i,DEC);//Print the button number to the serial port so that the processing app can listen for it.
    Serial.println();
    Serial.flush(); //Always flush when you're done.
    flick_led();//An immediate couple of blinks of the LED makes the user feel like it has done something
   }

  }
}
The Arduino website has a clear and comprehensive tutorial on how programming the chip can be done. Reading through the tutorial before programming the Tabulatron will help clarify this process (http://arduino.cc/en/Guide/Windows | http://arduino.cc/en/Guide/MacOSX )
Setting up the Reference Workstation: Software Listening for the Button Press
This piece of software is written using the Processing IDE (http://processing.org/), and its main purpose is to listen for the signals sent to the USB port from the Tabulatron. Processing is a Java-based product that can be used for a multitude of applications. It is used here because it is very easy to draw graphical user interfaces, and it is complementary to the Arduino IDE, due to the fact that it has built-in support for reading signals sent through the USB connection (which is the functionality we developed in the previous section). This Processing sketch is run on the computer that the Arduino is connected to and always needs to be running so that it can listen for signals from the Tabulatron. When run, this Processing program first renders an image of the physical device to the screen with labels that indicate what each corresponding button push will do:
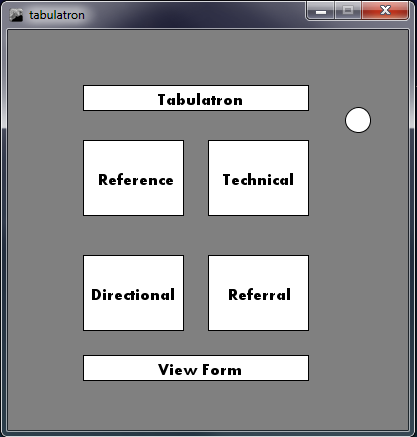
Figure 4. Processing script display
Once the Processing sketch receives a signal from the device, it completes a HTML POST to a Google form. As a further method of feedback, the rendered image on the screen will change the corresponding button that was just pressed to green. The ‘View Form’ button will open a browser to the results page of the Google Form. The following code listing is the Processing source code that completes this:
//TabulatronApp
//
//Listens for the data sent to the serial port from the Arduino
//Post svalues to Google Doc
//
//written by Tim Ribaric(tim@elibtronic.ca)
//@eLibtronic
import processing.serial.*;
Serial port;
PFont f;
String buttonsig;
//A Google Doc Form is required.
//It should only have 1 question on it
//That one question should be a dropdown box with only 4 values on it
//Example: https://docs.google.com/spreadsheet/viewform?formkey=dHdaS1NkdEtHY2Y5YkNjaDVfNGFpSkE6MQ#g id=0
String formkey = "dHdaS1NkdEtHY2Y5YkNjaDVfNGFpSkE6MQ"; // the public 'key' for the Google document form (found in url of view mode)
String revformkey = "0AicMfKa7wo4FdHdaS1NkdEtHY2Y5YkNjaDVfNGFpSkE"; // the private key for the Google document form (found in the url of edit mode)
String btn0 = "Reference"; // the text of the first option in the dropdownbox
String btn1 = "Technical"; // the text of the second option in the dropdownbox
String btn2 = "Directional"; // the text of the third option in the dropdownbox
String btn3 = "Referral"; // the text of the fourth option in the dropdownbox
char bsig;
//Clicking on the 'View Form' button will open up the 'edit' mode in a browser
//A login to Google Doc will be needed unless set to public
void mouseReleased(){
if(mouseX > 75 && mouseX < 300&&mouseY > 325 &&mouseY < 350)
link("https://docs.google.com/spreadsheet/ccc?key="+revformkey+"#gid=0");
}
//Branding
void viewform(){
rect(75,55,225,25);
rect(75,325,225,25);
ellipse(350,90,25,25);
fill(0);
text("ViewForm",150,345);
text("Tabulatron",150,75);
fill(255);
}
//Draw the 4 boxes and labels them according to the form values outlined above
//Once a button is pressed it will be drawn in green, as a form of feedback
voidboxmaker(intc,intpos){
//1 draws a green box, everything else is white
switch(c){
case1:
fill(119,232,105); //Greenish
break;
default:
fill(255);
}
//Four button, 4 rectangles
switch(pos){
case0:
rect(75,110,100,75);
fill(0);
text(btn0,90,155);
break;
case1:
rect(200,110,100,75);
fill(0);
text(btn1,215,155);
break;
case2:
rect(75,225,100,75);
fill(0);
text(btn2,83,270);
break;
case3:
rect(200,225,100,75);
fill(0);
text(btn3,220,270);
break;
}
fill(255);
}
//Draws blank boxes
void clearboxes(){
boxmaker(0,0);
boxmaker(0,1);
boxmaker(0,2);
boxmaker(0,3);
}
//Does the actual sending to Google
//Will produce loads of errors in the console window
//Couldn't really fix these. (Exceptions couldn't be caught)
void tally(intbtn){
switch(btn){
case0:
loadXML("https://docs.google.com/spreadsheet/formResponse?formkey="+formkey+"&ifq&ent ry.1.single="+btn0);
break;
case1:
loadXML("https://docs.google.com/spreadsheet/formResponse?formkey="+formkey+"&ifq&ent ry.1.single="+btn1);
break;
case2:
loadXML("https://docs.google.com/spreadsheet/formResponse?formkey="+formkey+"&ifq&ent ry.1.single="+btn2);
break;
case3:
loadXML("https://docs.google.com/spreadsheet/formResponse?formkey="+formkey+"&ifq&ent ry.1.single="+btn3);
break;
default:
}
}
voidsetup(){
f = loadFont("Aharoni-Bold-16.vlw");
textFont(f);
size(400,400);
background(128);
boxmaker(0,0);
boxmaker(0,1);
boxmaker(0,2);
boxmaker(0,3);
viewform();
//At first run you'll have to figure out what COMM port the Arduino is on
//change the array index to corresponding value
println(Serial.list());
port = newSerial(this,Serial.list()[2],9600);
}
//Listens to Serial port defined above and reads until linefeed
//grabs the character and colors the box, sends the tally
//Works fairly well
void draw(){
while(port.available() > 0){
buttonsig = port.readStringUntil(char(10));
try{
bsig = buttonsig.charAt(0);
}
catch(Exception e){
//Sometimes reading from serial will produce a null value
//break out and try again
break;
}
switch(bsig){
case'0':
clearboxes();
tally(0);
boxmaker(1,0);
break;
case'1':
clearboxes();
tally(1);
boxmaker(1,1);
break;
case'2':
clearboxes();
tally(2);
boxmaker(1,2);
break;
case'3':
clearboxes();
tally(3);
boxmaker(1,3);
default:
}
}
}
Of interesting note is the function called tally() that begins on line 97. This is where the HTML POST happens. The calls to loadXML() within tally() can be easily modified to work with a preexisting Library solution instead of Google Docs.
An additional benefit of using Processing is that it can create standalone executables for all of the major platforms (Mac OS, Windows, Linux). The Processing program can then be placed in the ‘Startup’ directory of a Windows machine, or the appropriate location on other platforms, so that when the machine boots up the program automatically runs and sits waiting for signals from the Tabulatron, requiring no intervention from the staff member at all.
The Google Documents Spreadsheet form
The final component is the Google Documents Spreadsheet Form. The construction of this form needs to completed as follows: one multiple choice question with four answers, each one corresponding to the labels used in the preceding Processing program.
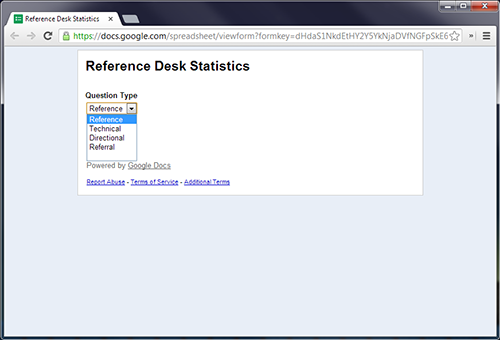
Figure 5. Google form
The Processing program emulates exactly what happens when a typical end user is filling data into to a Google form via the web. A few values need to be set in the Processing source code to complete this action.
The formkey variable (line 18) is what is found in the ‘formkey‘ variable in the URL of the publicly facing form.

Figure 6. Google form key
The revformkey variable (line 19) is the ‘key’ variable is found in the URL of the the form when looking at it in ‘Results’ mode.

Figure 7. Google form key
The form should also have ‘Share’ options enabled so that it can be viewed by any when the ‘View Form’ button is clicked. This is done by clicking on the ‘Share’ button and enabling ‘Anyone who has the link can view’.

Figure 8. Google form share settings
Putting the Pieces Together
Once the signaling device is constructed and attached via USB to a computer, the Processing program is run. Each time a button is pressed on the Tabulatron, a signal is sent via the USB port. The Processing sketch listens for this signal and completes an HTML POST of the appropriate value to the Google form. The form will automatically add a timestamp to every submission, adding an extra dimension to the data. The process is interactive and instantaneous. A video demonstrating the Tabulatron in action can be found here:
http://youtu.be/F7Hq6lvvdhI
Figure 9. Device in use
Any library staff member can be looking at the web results and can watch the patron interactions tabulated in realtime. This information can then be used to signal backup staff to come out to the desk when large volumes of interactions are seen. If a library has existing patron question counting software, this code can be easily modified to post to that instead of a Google form.

Figure 10. Google form spreadsheet view
As seen earlier, if the tally function is modified it can be used to create any web call, (e.g. loading a PHP file that increments a MySQL database). While the Tabulatron was only constructed with four buttons, it could easily be modified to have more or less, depending on the needs of the institution.
The code required to construct this project is all available via github and can be found here: https://github.com/elibtronic/tabulatron
Conclusion
The Tabulatron was initially conceived as a proof of concept device, yet after demonstrations and an in-house presentation, staff were immediately enthusiastic about using this in production at Brock University Library service points. While technically still a prototype, the device is fully functional; additional units can be easily constructed, using the exact same Arduino code to program the microcontroller. We hope to deploy this prototype as a pilot project in the near future. Using tools like Fritzing, it would be possible to design and construct a custom printed circuit board (PCB) to reduce the size and eliminate unused features/functions of the Arduino board, but at such low volumes and low setup costs to equip a library’s service points with these devices (not to mention an already small footprint), this really seems unnecessary at this point. The great advantage of the Tabulatron is its customizability, simplicity, and ease of use. With a little imagination and a few additional lines of code, the Tabulatron could be modified to serve a number of roles in the Library. All at the push of a button.
About the Authors
Tim Ribaric (tribaric@brocku.ca) is the Digital Services Librarian at Brock University located in St. Catharines, Ontario. He blogs at http://elibtronic.ca and is the subject specialist for Computer Science and Philosophy as well as the administrator for the Brock University Digital Repository. He has been working at Brock since 2006.
Jonathan Younker (jyounker@brocku.ca) is the Head, Library Systems and Technologies at Brock University in St. Catharines, Ontario. Prior to working at Brock, he worked in public and academic libraries in Illinois. Jonathan is particularly interested in finding and developing creative solutions to ongoing library technology problems.


Donald Moses, 2013-05-11
Thanks for the article … I made this and have lots of ideas for other uses. A nice project and a great introduction to Arduinos/Processing and how we might use them.
Donald