by Anthony Cocciolo
Introduction
As a teacher of digital archives and digital libraries at Pratt Institute’s School of Information and Library Science, I often try to give students a taste of the Unix environment. When presenting on it, I sometimes hear a small gasp when I bring up the black terminal window with white text, making it clear to me that students think that this seemingly anachronistic computing interface is somewhat daunting if not outright terrifying. My advice to them is get to love Unix. One major reason the Unix environment ought to be of interest to librarians and archivists is it enables the quick and inexpensive batch processing of born digital and digitized assets. This means that if you are looking to perform one or more transformations on a batch of assets (e.g., resizing videos, creating access copies of digitized photos, create MP3s from WAV files), you can do it very quickly, and without the need to manually process individual items, which can be error prone, time consuming, and tedious.
Unix is not the only way to do batch processing. Many programs with graphic user interfaces have incorporated batch-processing capabilities, and batches can be performed with other operating systems like Windows’ command prompt (although with some less functionality). Despite these other options, a persistent advantage of the Unix environment is the wide array of open source software that can be used for batch processing. Some of these programs include ffmpeg, lame, sox, and ImageMagick.
The field of library and information science has begun to recognize the value that the Unix environment can bring to LIS professional practice. Botticelli et al. (2011) noted that digital curators “need a balance between technical and analytical skills,” including “hands-on practice with syntax, whether in typing Unix commands or applying valid XML tags” (p. 154). Heising, Lewis, Moen and Salter (2013) confirm this need and note that of the 208 digital curator and manager job postings they analyzed, 28 required some knowledge of Linux or Unix. To address this need, they have developed a one-week Unix fundamentals course at the University of North Texas.
Some of the best tools librarians and archivists may need for batch processing will be discussed here, as well as some of the most basic and often used Unix commands.
Your Mac as Unix environment
If you are a Macintosh user, you already have access to a Unix environment since OSX is built on top of Unix. You can access the command-line Unix environment by going to your Macintosh HD, selecting Applications, Utilities, and then Terminal.
You can easily navigate between the text-based terminal and the graphical Finder. For example, if you type the following in the Terminal prompt, it will open your current directory within the Finder:
$ open .
The “.” in Unix means the current directory. If instead you typed “open ..”, you would open the parent of the current directory, since “..” refers to the parent directory. The parent directory is the directory that contains the current directory.
If you are not a Macintosh user, consult the Unix for Windows Users section of this article, or use unix on a remote host, as described below.
Connecting to a Remote Host
As often is the case, you will be connecting to a Unix computer from a personal computer. For example, this could be a webserver where you are hosting files for your end users. If you do not know what Unix remote servers are available at your institution, or what your username and password may be, be sure to contact your Information Technology department. Many webhosts allow users to connect via secure shell (also known as SSH), which effectively provides the Unix command line of a remote server. On a Mac, to connect to a remove server, open the Terminal app, and issue the following command:
$ ssh -l my_user_name my_remote_host.edu
This command instructs ssh to remote connect to my_remote_host.edu, with the username my_user_name. It will prompt you for a password. Once authenticated, you will have access to the Unix command prompt.
If you want to connect to a remote host via a Windows PC, you can use the freeware program PuTTY.[1]
In addition to being able to connect to the Unix shell, it is also very useful to know how to transfer files between a Unix host and your computer. To do this, you can use a secure FTP program. For Mac, a program for doing this is Cyberduck.[2] For Windows, a program for doing this is WinSCP.[3] In these programs, you specify your host, your username, and password, and once connected you can drag and drop files between your remote Unix host and your personal computer.
Unix File system
The Unix file system is similar to most operating system file systems in that it is a hierarchy of directories with files in them. For example, a fairly common top-level organization of the Unix file system includes:
/
/Users
/etc
/usr
/bin
/var
Typically, most user home directories are contained within “/Users” or “/home.” The “etc” directory generally contains system settings. The other directories typically include programs and utilities.
To find out what directory you are in, you can use the “pwd” command, which will output your current directory.
You can see a listing of the files contained within a current directory by typing “ls” (or list).
For example, typing the following will show the contents of my home directory:
$ ls /Users/acocciolo
Similarly, you can type ls . or ls .. to list the contents of the current directory or the parent directory, respectively.
You can copy a file by issuing the “cp” command. For example:
$ cp anthony.txt anthony2.txt
This will copy a file called anthony.txt to a file called anthony2.txt. Similarly, if you want to move a file or rename it, use the “mv” (or move) command. For example, the following command will rename anthony2.txt to anthony3.txt:
$ mv anthony2.txt anthony3.txt
You can change your current directory by issuing the “cd” command. For example, if I’m currently in my home directory, the following command changes the current directory from my home directory to the root directory:
$ cd /
I could then return back to my home directory by issuing either of the following commands:
$ cd /Users/acocciolo
$ cd ~
You should note that the “~” is shortcut for your home directory.
You can create a new directory by issuing the “mkdir” command. The following command will make a new directory within the current directory:
$ mkdir my_new_directory
Similarly, you can use the “rmdir” command to remove a directory, and the “rm” command to remove a file.
Wildcards
The power of Unix starts to become apparent when we start using wildcards. Wildcards allow you to perform some operation on a set of files that match the wildcard. For example, imagine that in my current directory, I have a set of text files that I want to output to the screen. The following command would output each file that has a .txt extension:
$ for i in *.txt; do cat "${i}"; done
This command loops through every .txt file in the current directory, and runs the “cat” command on it, which just outputs the contents of the file to the screen. This is not an incredibly useful function, but the use of wildcards in conjunction with loops becomes more apparent with the following examples.
Commands for Photo Collections
Although products such as Adobe Photoshop have incorporated batch features, performing batch operations on born-digital or digitized photos through Unix can be quicker and more cost effective since the software is open source and does not require an expensive software license. For example, imagine that you have digitized a large quantity of images and produced them as high-resolution TIFF files. You would like to produce a high-quality JPG version for distribution in the reading room, as well as a lower quality version with a watermark for distribution over the web. These operations can be performed using the command line tool ImageMagick.
To download ImageMagick on a Mac, the easiest way is to install the package manager MacPorts[4], and then to run the following command from the Terminal application:
$ sudo port install ImageMagick
Note that ‘sudo’ runs the command as an administrator on the machine, and may prompt for a password to do so. Once installed, you can run the following command from the directory with your TIFF files in it to create your reading-room ready photos:
$ for i in *.tif; do convert "$i" -density 72 "$i.jpg"; done
This command converts the TIFF files to JPG, and changes the image resolution to 72dpi, which is the resolution amenable to most computer monitors. It does not change the size of the image.
The web accessible versions with the thumbnail can be created using the following command:
$ for i in *.jpg; do convert "$i" -resize 500 "web_$i"; composite -dissolve 40% -gravity southeast pratt.png "web_$i" "web_$i"; done
The above command takes all the newly created JPGs and resizes them to a maximum width of 500 pixels using ImageMagick’s “convert” command. In doing so, it creates a new file with the prefix “web.” After it creates the resized image, it adds a watermark by using ImageMagick’s “composite” command. The logo is 100 pixels in width and contained within pratt.png. The “gravity” parameter indicates the watermark should go in the southeast part of the image, which is also the lower right. The image is made partially transparent with the dissolve option set to 40%. A sample resulting image is shown in Figure 1.

Figure 1: Resized image with watermark. Photo by Anthony Cocciolo
Many options are available for adding watermarks using ImageMagick, as well as changing the properties of images. Additional commands can be found on their website.[5]
Commands for PDFs
As someone who has worked on several outsourced digitization projects, I am always surprised to find vendors who charge per page to convert multipage TIFFs into PDFs. Fortunately, this is easily and quickly accomplished by using ImageMagick once again. The following command will convert a directory full of single or multi-page TIFFs into PDFs.
$ for i in *.tif; do convert "$i" "$i.pdf"; done
Commands for Sound Collections
The Unix environment also offers many benefits for transforming audio collections. For example, imagine that you have a large collection of digitized audio that originated on audio cassette. You have digitized the files as WAV files and would like to make them available online. However, you were unable to secure rights to put them online, so you have decided to make a small portion of the audio available under fair-use conditions. From the digitization process, you know that your recordings are roughly 60 minutes in length, and you feel that you can confidently put 10% of the recordings online (or 6 minutes). However, the process of trimming the files in an audio editor such as Audacity[6] and then exporting to a format that is amenable to Internet access such as MP3 could be a time consuming process. An alternative is to perform the work as a batch.
The following command will use the open-source program sox to create 6 minute WAV files from the original 60 minute WAVs:
$ for i in *.wav; do soxi "6min_$i" "$i" trim 2 360; done
Before you can run this command, you will need to download sox, which is an open-source audio editing program. You can download sox from their website[7] and install using the instructions provided.
The command will create a new file with the prefix “6min_” given the input file “i.” It will also start two seconds into the recording (since recordings on audio cassette often have leaders with no audio) and trim it to 360 seconds (or 6 minutes). This will create our trimmed WAV files, yet these are still not amenable to access. The following command will convert all the WAV files into MP3s using the open-source MP3 encoder lame:
$ for i in *.wav; do lame "${i}" "${i}.mp3"; done
Like sox, lame also needs to be downloaded and installed.[8] For the Mac, it can be downloaded from C-Net.[9]
Commands for Video Collections
Imagine that you have spent the last several weeks digitizing a collection of VHS tapes. The files you have created are 640 by 480 pixels, but you want to make them smaller so they will play quickly over the Internet without the use of a streaming service such as YouTube. You can use command line tools like ffmpeg to apply a transformation across this entire batch of files rather than having to pull each file into a video editing program, applying the transformation, and exporting the file. Although ffmpeg is not included with all Unix installations, it can be downloaded from their website.[10] A version that is easy to install from Macintosh users is also available.[11]
Within the current directory of MP4 files (which are your digitized video), you can issue the following command:
$ for i in *.mp4; do ffmpeg -i "${i}" -vcodec h264 -s 320x240 -movflags faststart "320_${i}"; done
This will loop through every MP4 file in the directory and run the ffmpeg command on it. The “-i” option specifies the input file. The “-vcodec” parameter specifies that the output video should be encoded using the H264 encoder, which is a very popular video format used for delivering video over the Internet. The “-s” command instructs ffmpeg to change the size dimensions of the video. The “-movflags faststart” command instructs ffmpeg to place the video metadata into the front of the file so the video can start playing as soon as enough information has been downloaded (rather than having to wait for the entire video file to download before it starts playing). The final parameter says that the output file should be named with the prefix “320_” to indicate that this is our new, resized file.
You can modify the above script to perform a wide variety of transformations on video files. For example, the website “19 ffmpeg commands for all needs” includes a list of frequent commands you can use with ffmpeg.[12]
Commands for Web Archiving
There are several methods for creating web archives, such as producing WARC files, which is an ISO standard format for web archives.[13] However, one limitation of this approach is that you will need a program to read the WARC files. A less complex solution is using the wget program to download the webpages into a directory (Fino-Radin, 2012). The wget program is able to crawl an entire website and download all related html, image files, and other media that might be linked to the page. To install wget on a Macintosh, the easiest method is to install it using MacPorts by running the following command:
$ sudo port install wget
Once it is installed, you can run commands like:
$ wget -mpk http://www.thinkingprojects.org
The above command will download my entire website. The “-mpk” parameter is a series of options to wget. The “m” specifies that all contents stemming from the homepage should be downloaded. The “p” command causes wget to download all the files that are necessary to properly display a given html page. The “k” option converts links within the document to make them amenable to local viewing. A listing of all wget options is available on their website.[14]
Other Useful Commands
There are hundreds of commands available in the UNIX environment, and many of them you can find out about by doing a Google search (e.g., by searching for “basic unix commands”). Some that I have found particularly useful over the years include:
$ df -hk
This command will output the amount of disk space used and free space available to your Unix computer. This is especially useful for librarians and archivists, who often deal with many large files that can quickly fill-up a hard disk.
$ find . -name '*.tif ' -print
The find command searches across the specified directory and all its sub-directories for a file name matching the wildcard. The example above will look for all files with the extension .tif. You can also search an entire Unix file system for TIF files using the related command:
$ find / -name '*.tif ' –print
The last useful utility that will be discussed here is grep. Grep allows you to search for text occurring within files. For example, the following command will search the current directory and all sub-directories for occurrence of the word “curation” with all the files.
$ grep –r "curation" *
Whereas the find command will search for filenames, grep actually searches within files.
Unix for Windows Users
Unlike Macintosh OS X, Microsoft Windows is not built upon Unix. However, there are several options for accessing Unix and Unix-like functionality on your Windows machine. The simplest option is to remote connect to a Unix host using SSH, as described earlier in this paper. However, if you do not have access to a remote Unix host, you can use one of the following options. Please note for all of these options, you would need administrative rights on your computer to install the requisite software. The options include:
Option 1: Install Cygwin, which is a Unix-like environment for Windows, that allows you to run many Unix programs and can be downloaded for free from their website.[15] It includes a package manager with a graphical user interface that allows you to install Unix programs into the environment. For example, if you wanted to install sox, you could choose to install it via the package manager interface (see Figure 2). You could then run all of the commands included here within the Cygwin terminal window. Files can be made available outside of the Cygwin environment using standard Windows file copy routines (e.g., copying files to the C:\cygwin directory using Windows Explorer).
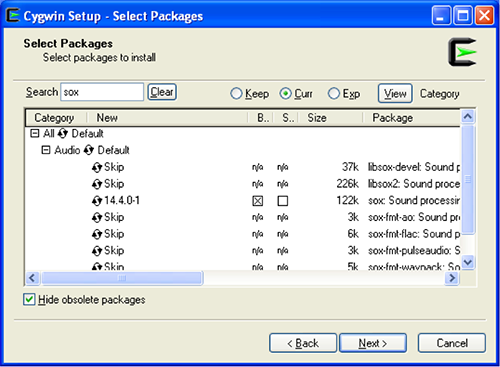
Figure 2: Cygwin allows you to install packages such as sox using a graphic user interface.
Option 2: Install a Unix virtual machine on your Windows computer. This option allows for an entire Unix operating system to be running within a Windows environment much like any other Windows program. An easy and inexpensive way to accomplish this is to use Oracle’s product VirtualBox, which is free virtual machine software that can be easily downloaded and installed from their website.[16] After installing VirtualBox, you can then download a Linux (Unix) environment that has been pre-packaged for use within VirutalBox. For example, the BitCurator [17] team has assembled an Ubuntu Linux, a popular flavor of Unix, environment that can be easily downloaded and run within VirtualBox.[18] This Linux installation is pre-loaded with tools that are useful for processing born-digital materials. Once inside the Ubuntu Linux environment, you can use a package manager with a graphical user interface to install additional packages that may not be included with the default installation. The downside of this approach is that running an entire OS within another OS can be disk-space and processor intensive, so you would want only to attempt this on a well-equipped modern computer. For example, the BitCurator virtual machine environment requires a 2.6 GB download from their website.
Option 3: The final option to run the commands included in this article is to sidestep the use of Unix altogether and instead use Windows’ command prompt environment, and install Windows versions of the programs described here. Programs described here such as ffmpeg, sox, and ImageMagick are available as Windows programs, and instructions are available for installing them for Windows from their respective websites. The Windows command prompt has a similar look to the Unix environment, and some commands function very similarly. For example, you can run the “cd” command in much the same ways in both Windows and Unix environments. However, the Windows command line environment does not offer as rich a set of functionality as Unix, and the syntax for commands is slightly different. For example, the command to convert a batch of WAV files to MP3 using Lame in Unix is the following:
$ for i in *.wav; do lame "${i}" "${i}.mp3"; done
However, in Windows, you would write the command as the following:
C:\>for %i in (*.wav) do d:\lame\lame.exe %i %i.mp3
In this example, d:\lame\lame.exe refers to the location of the lame executable program, which would be different depending on where you installed that program. Note the use of the “%” as a way to denote a filename variable within the Windows environment that is absent from the Unix environment.
Conclusion
This article offered ways that librarians and archivists can take advantage of the Unix environment for the expedient processing of digitized and born-digital assets. These scripts can be modified in many ways to suit a variety of purposes. Google searches for scripts, which point to many useful resources such as StackOverflow,[19] are very helpful in modifying scripts to meet local needs. Also, the novice batch processor should note that it is fairly common that scripts don’t work right away and may require refining to produce the desired result. However, depending on the size of the collection you are looking to process, the investment in producing a script can save time in the long run, and can eliminate human error that occurs when processing items one at a time.
Notes
[1] http://www.chiark.greenend.org.uk/~sgtatham/putty/download.html
[2] http://cyberduck.en.softonic.com/mac
[3] http://winscp.net/eng/download.php
[4] http://www.macports.org/install.php
[5] http://www.imagemagick.org/Usage/annotating/
[6] http://audacity.sourceforge.net/
[7] http://sox.sourceforge.net/
[8] http://lame.sourceforge.net/download.php
[9] http://m.download.cnet.com/LAME-Audio-Encoder/3000-2140_4-51042.html
[10] http://ffmpeg.org/download.html
[11] http://ffmpegmac.net/
[12] http://www.catswhocode.com/blog/19-ffmpeg-commands-for-all-needs
[13] http://www.iso.org/iso/catalogue_detail.htm?csnumber=44717
[14] http://www.gnu.org/software/wget/manual/wget.html
[15] http://www.cygwin.com/
[16] https://www.virtualbox.org/wiki/Downloads
[17] http://www.bitcurator.net/
[18] http://wiki.bitcurator.net/index.php?title=Software
[19] http://stackoverflow.com/
References
Botticelli P, Fulton B, Pearce-Moses R, Szuter C, Watters P. 2011. Educating Digital Curators: Challenges and Opportunities. International Journal of Digital Curation 6(2):146-164.
Fino-Radin B. 2012. Wget cheat-sheet. Available from: http://notepad.benfinoradin.info/tag/wget/.
Heising J, Lewis P, Moen WE, Salter J. 2013. Scaffolding for Digital Curation Education: A One Week Unix Fundamentals Course. ALISE Annual Meeting 2013, January 22-25, Seattle, WA. Available from: http://digital.library.unt.edu/ark:/67531/metadc139456/
About the Author
Anthony Cocciolo, Ed.D. (acocciol at pratt.edu) is an Assistant Professor at Pratt Institute School of Information and Library Science. His research and teaching are in the areas of digital archives, digital libraries, educational technology and moving image and sound archiving.

Subscribe to comments: For this article | For all articles
Leave a Reply